
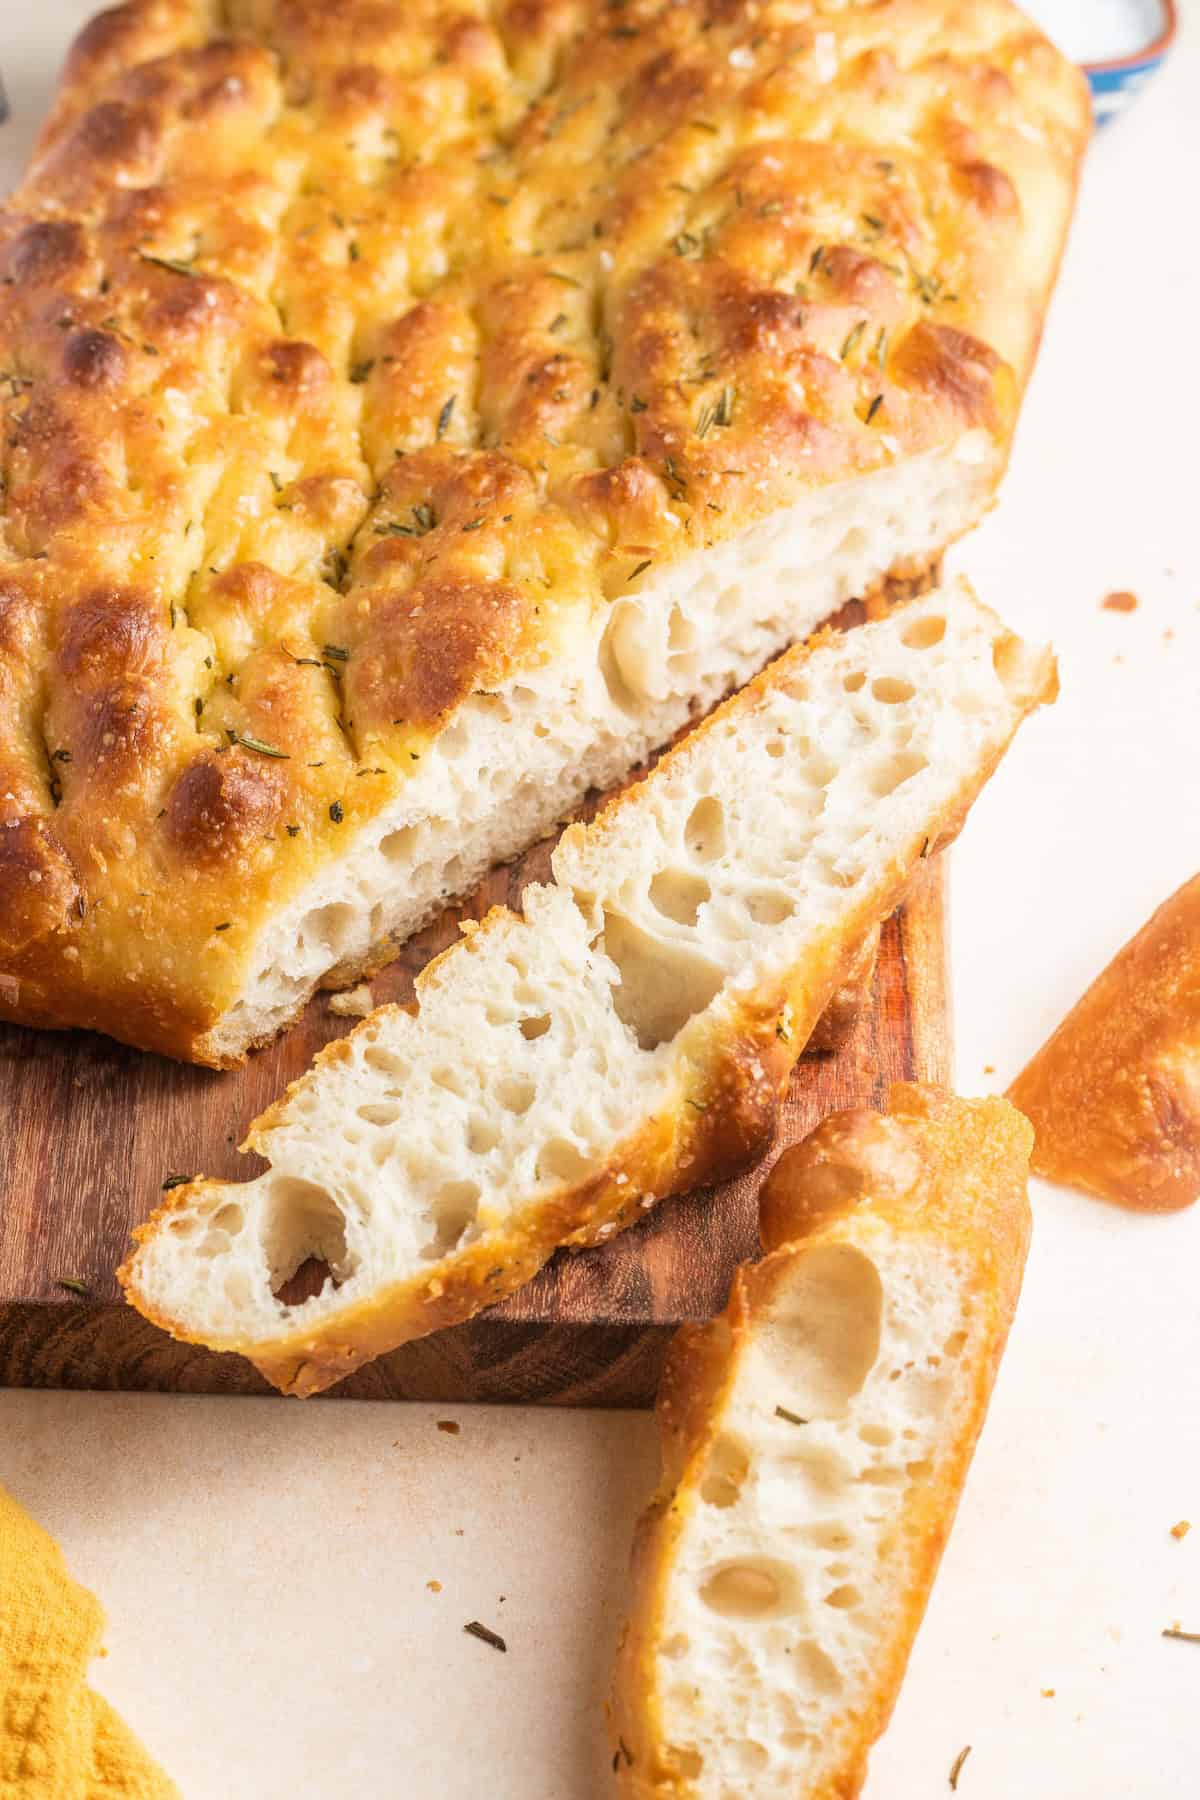
This fluffy focaccia recipe is by far the most popular recipe on my site, and for good reason! Through countless rounds of testing, I’ve developed a delicious no-knead bread with a crisp exterior and a soft, fluffy inner crumb. An overnight rise in the refrigerator and a long fermentation period provide a deep flavor and a golden brown crust.
Originally published in 2021, this recipe is a total crowd favorite. See why so many readers love it:
Reader Rating: “I have spent a year in search of the best focaccia recipe, and this is it! Other recipes have produced a bread that has a cornbread-like consistency. Still others have produced a soft, non-crispy crust. This one is as close to perfect as I have found. I love it! ★★★★★” – David
👩🏽🍳 Testing Notes
In my experiments, I learned about fermentation time, pan sizes, pan thickness, and how oven temperature could yield dramatically different results to produce my absolute favorite recipe! I’ve tested and adjusted this many times to achieve a bubbly, crunchy exterior and a moist, soft, and airy interior.
The recipe is simple, but it takes time. You can’t speed it up, and in my opinion, you wouldn’t want to. A slow fermentation is what helps produce a delicious, lovely crust.
I highly recommend trying this homemade focaccia recipe as written the first time, and then experimenting with different variables to achieve your perfect rendition.
A Quick Overview
My recipe uses many of the same techniques as the Genovese style but with a thicker, bubblier crust. Here are some of the differences between regional varieties:
- Focaccia Genovese uses a salt brine and bakes at a lower temperature than pizza (Samin Nosrat’s focaccia variation for Ligurian focaccia is inspired by this!).
- Focaccia di Recco is paper-thin dough stuffed with cheese, yielding a thin, crispy pastry.
- Tuscan Schiacciata is typically topped with rosemary or grapes.
- Focaccia Barese (from Bari) uses semolina and boiled potatoes for a softer interior.
Though there are many variations, most follow a similar set of principles:
- Ingredients: Almost all varieties use flour, water, salt, oil, and yeast.
- Two rising periods: In the first period, the dough is mixed together, then set to rest and rise (also called bulk fermentation). In the latter period, the dough is deflated and then transferred to a pan for a second rise.
- Dimpling: Before baking, the dough is dimpled using your fingers. Some variations require light dimpling, while others are more aggressive.
Ingredient Notes

- Flour: Flour with a high protein content (at least 11%) is essential for strong gluten development leading to that fluffy texture we know and love! I typically use bread flour or Antimo Caputo’s 00 Flour. In a pinch, you can use King Arthur’s all-purpose flour, which has a protein content of 11.7%.
- Water: This recipe has a higher hydration, meaning the ratio of water to flour is quite high. High-hydration doughs yield a moist and spongy texture.
- Instant Yeast: Unlike active dry yeast, instant yeast can be added directly to dry ingredients. You can also use active yeast; just dissolve it in some of the liquid first.
- Kosher Salt: Salt assumes many roles in baking, from strengthening gluten to creating better elasticity and lowering stickiness. And there’s the obvious one: providing flavor! Salt also slows down fermentation to improve flavor development.
- Extra-Virgin Olive Oil: Olive oil provides flavor and moisture. Feel free to use an everyday olive oil for the dough. For dimpling and drizzling, use a more premium variety if you wish.
How to Make Focaccia (Step-by-Step Photos)
Make the Dough:
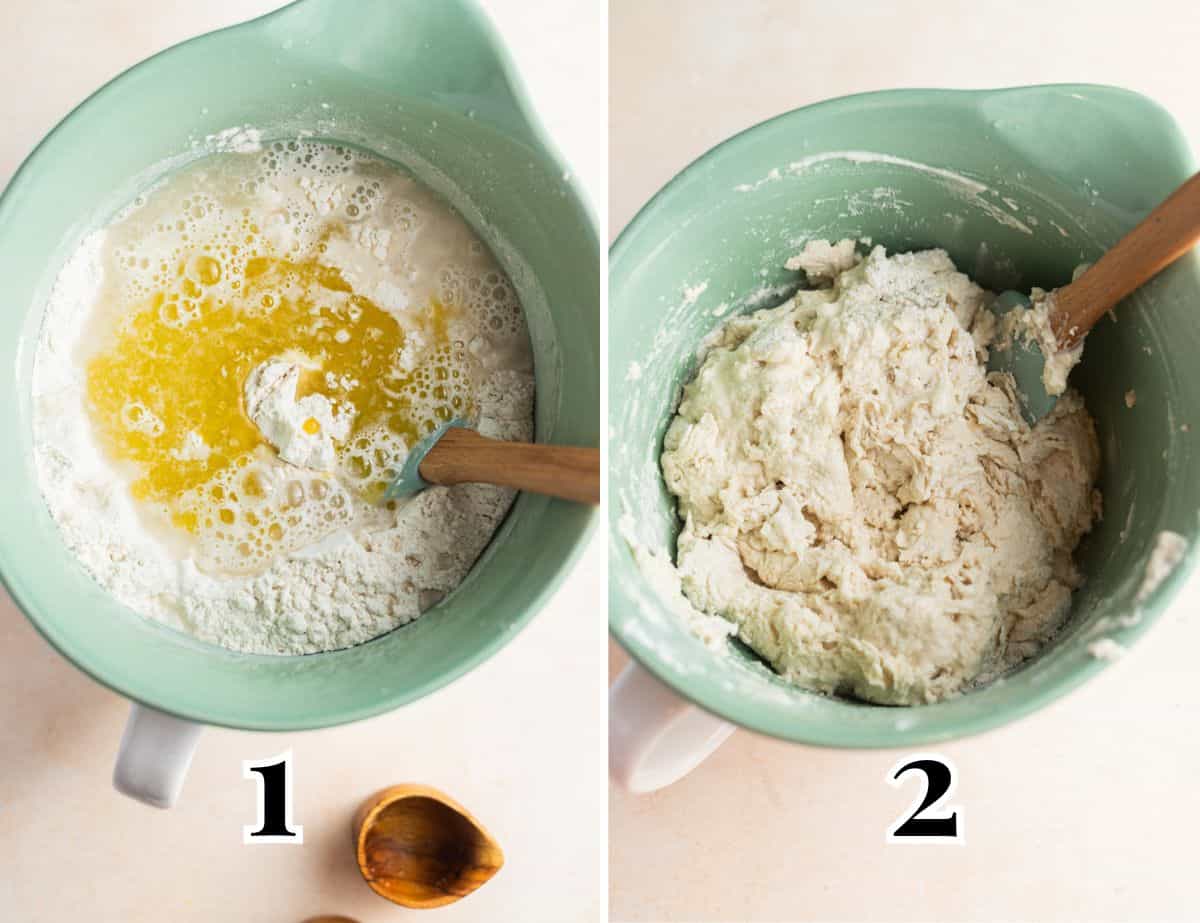
Form a well in the center of the bowl, then add the water and extra-virgin olive oil.
Use a wooden spoon or spatula to slowly begin incorporating the wet ingredients into the dry (Image 1). Continue mixing until a shaggy dough forms with no dry spots. Sometimes it’s easier to get your hands dirty and finish mixing by hand. It will be incredibly sticky at this point (Image 2).
Let the focaccia dough rest for 20 minutes before performing stretch and folds.
Stretch and Fold Method:
💡What is a Stretch and Fold?💡
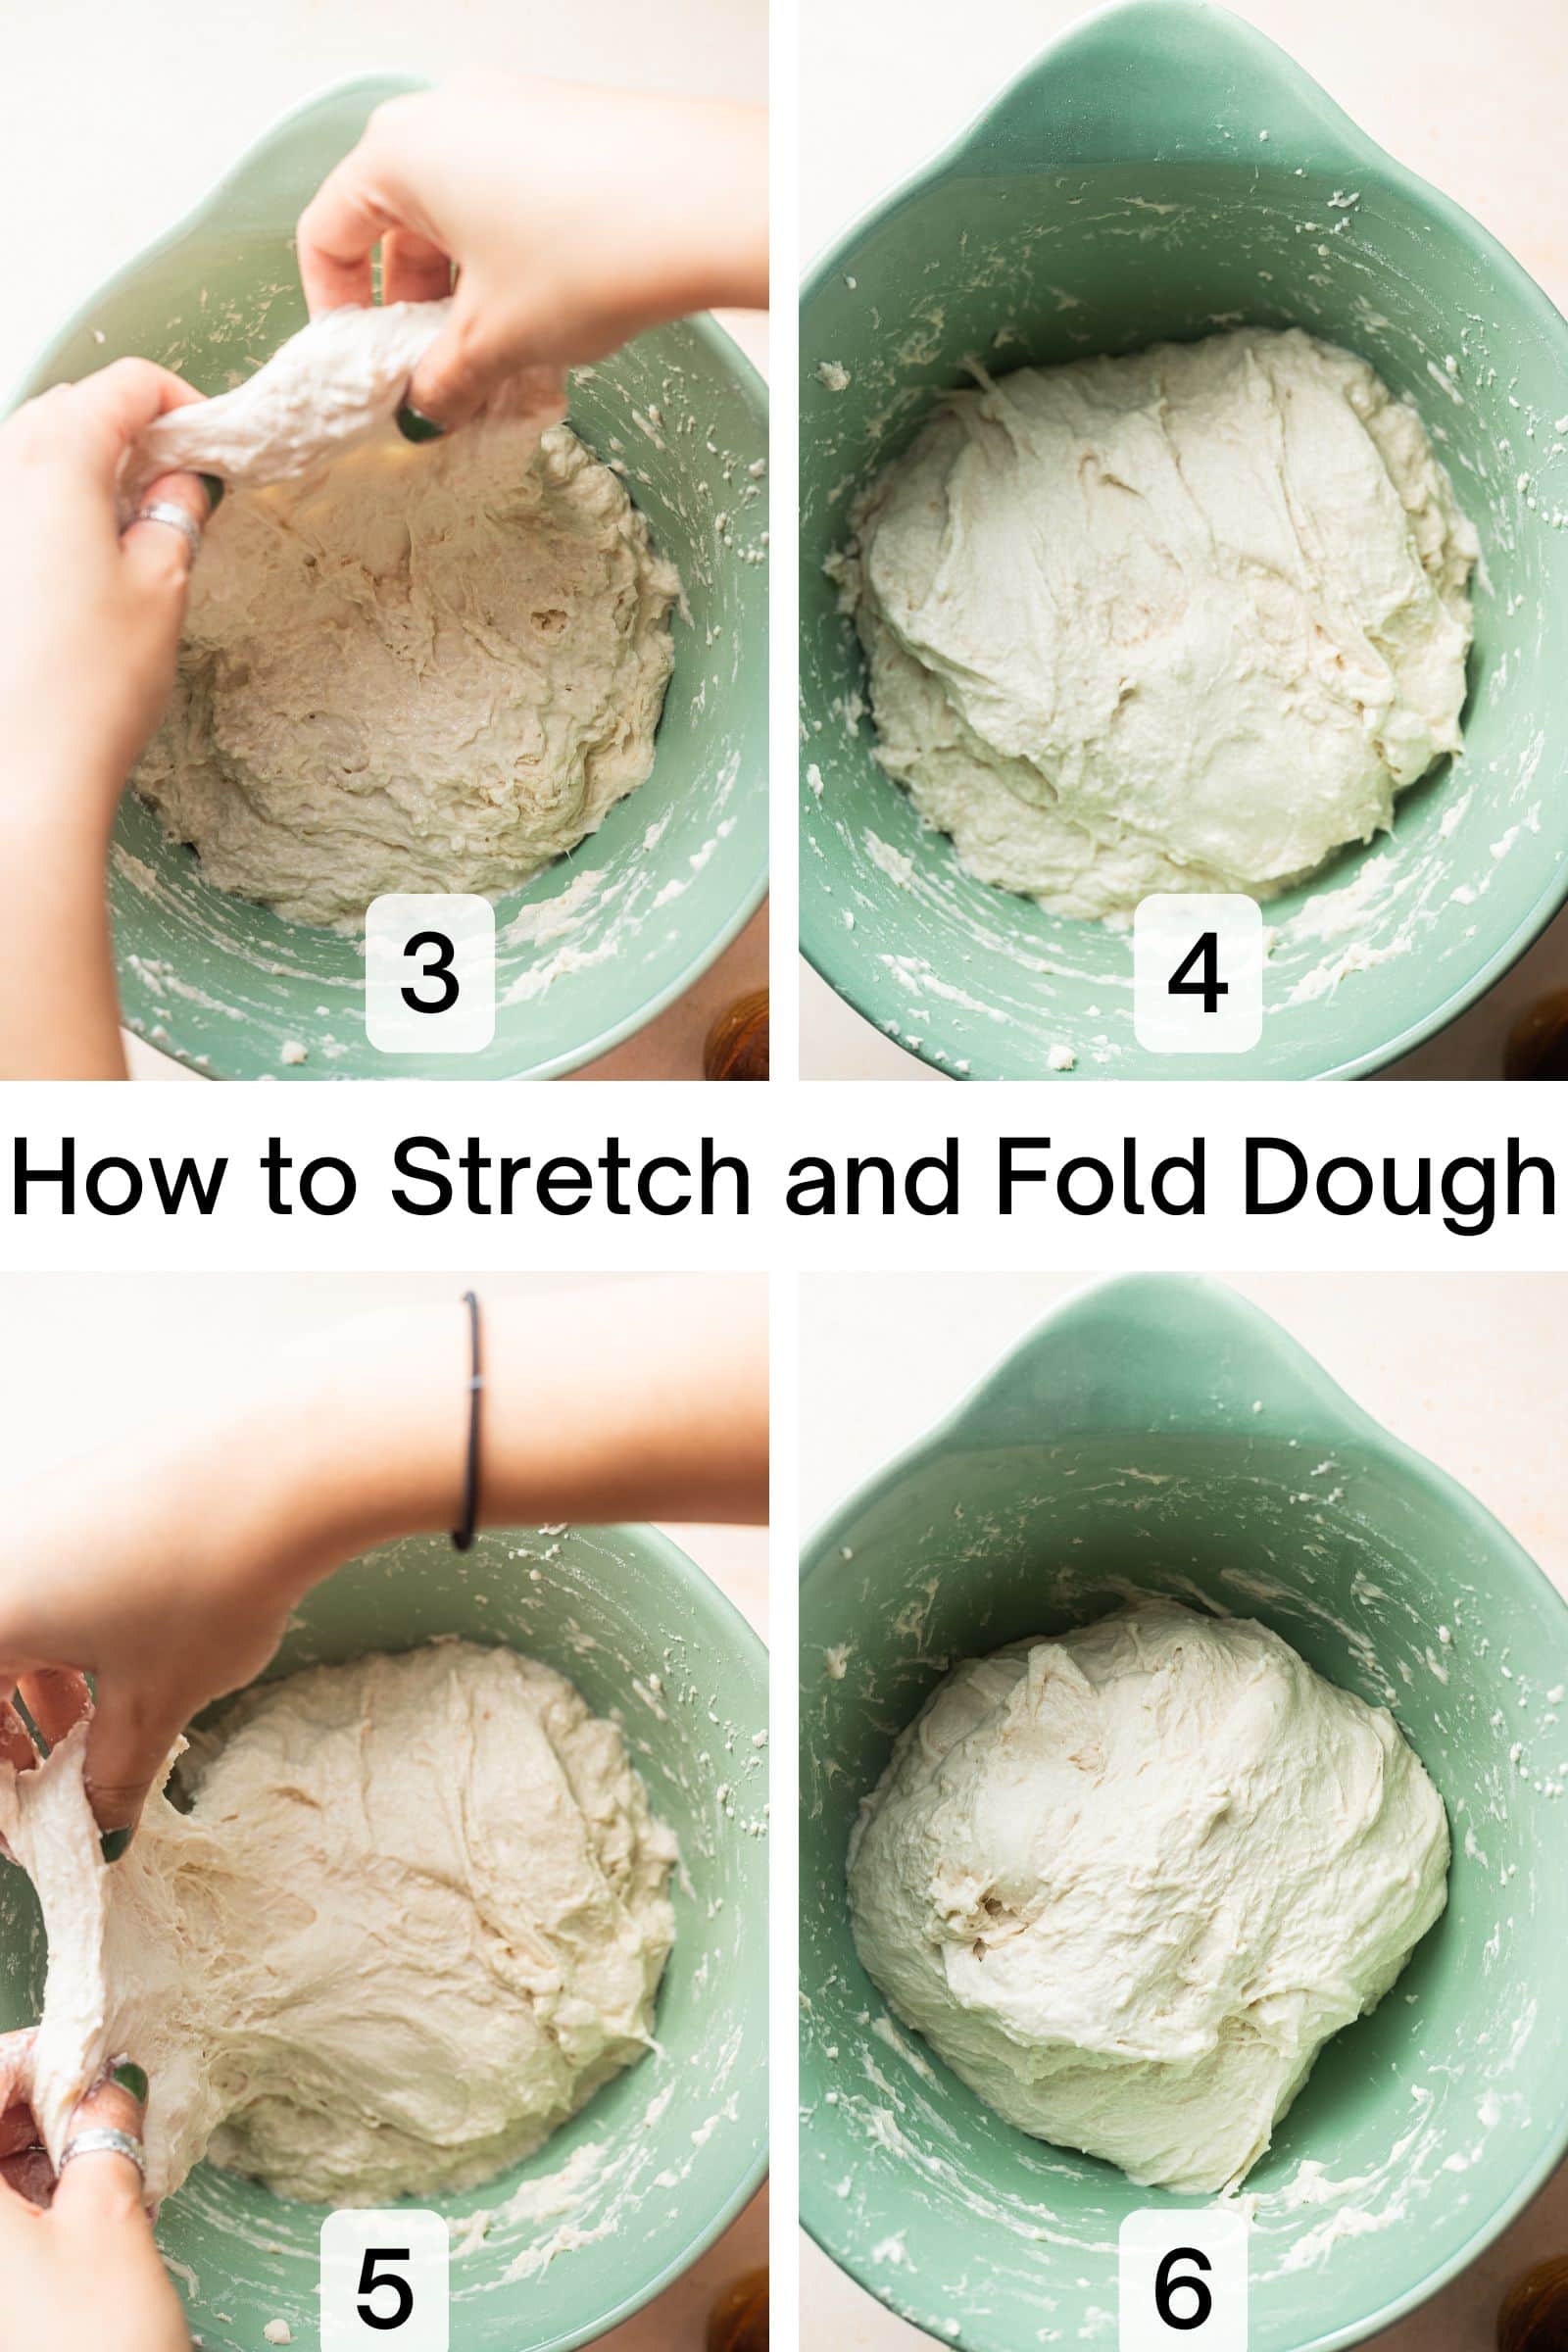
A stretch and fold is a gluten strengthening technique in breadmaking where you pick up and stretch your dough and fold it onto the other side. It helps strengthen your dough without kneading — it’s a much more lax way to develop gluten.
If you visualize your dough as a rough rectangle with four sides, one “set” of a stretch and fold means: 1) picking up the dough from one side (Image 3), stretching it upwards until it feels taut, then folding it onto the opposite side (Image 4), 2) rotating the bowl 180 degrees, then stretching and folding again (Image 5), 3) rotating the bowl 90 degrees, stretching and folding, 4) turning the bowl 180 degrees, stretching, and folding again onto the other side (Image 6).
In total, each “set” involves rotating, stretching, and folding 4 times, with a 30 minute break in between to allow the gluten to relax.

After the last stretch and fold, cover the bowl with plastic wrap and chill in the fridge for a minimum of 24 hours up to 72 hours. During this time, the dough will slowly ferment, further developing flavor and yeast activity.
If you’d like to learn more about the science of dough fermentation, check out my cold fermented pizza dough recipe.
Rest and Rise:
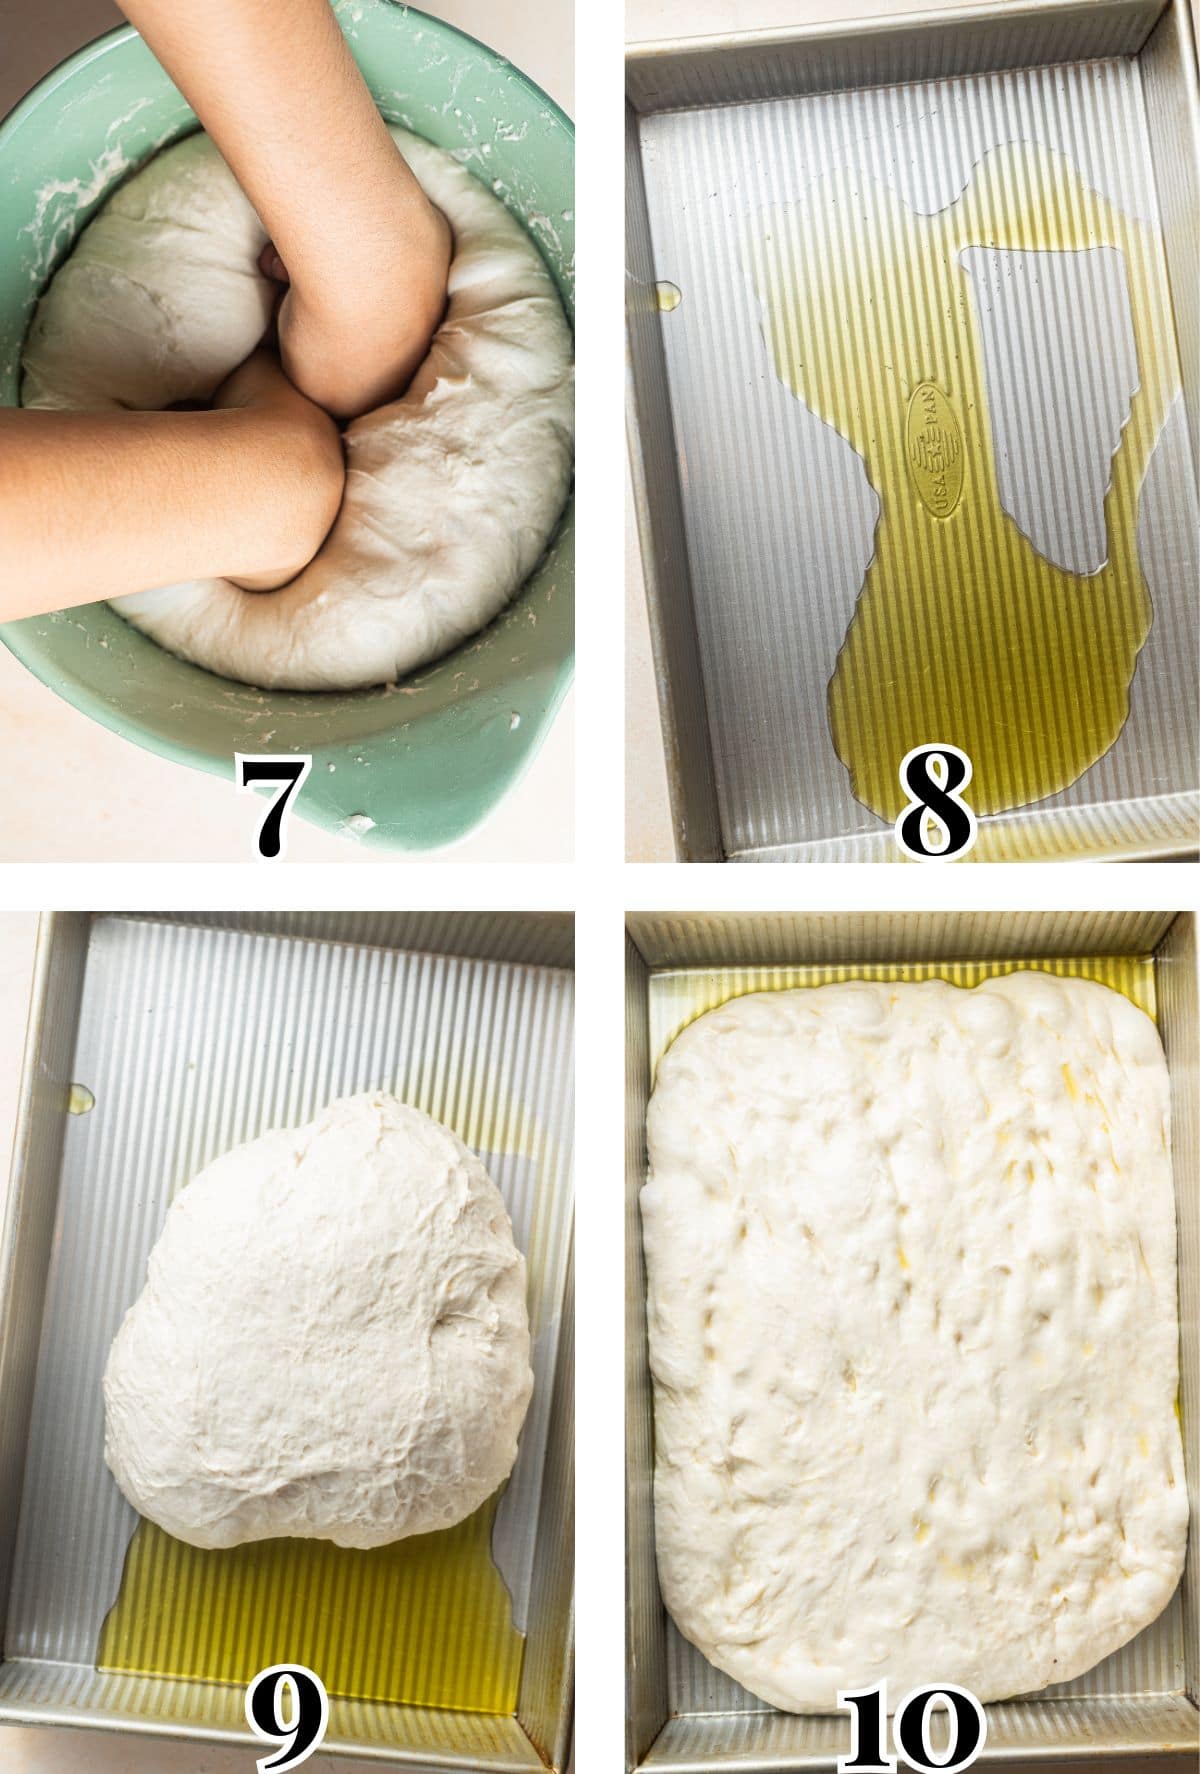
Remove bowl from the fridge. Drizzle the bottom of the pan with a couple tablespoons of olive oil (Image 8). Punch down the dough (Image 7) to remove any excess air bubbles, and transfer it to the pan (Image 9).
Over the course of an hour, stretch the dough (the dough will initially resist stretching after taking it out of the fridge, that’s normal!) a few times until it fills the entire pan (Image 10). Let the dough rise for another hour or so until nicely bubbly.
TIP: If your pan is not fully non-stick, line the bottom with parchment paper.
Dimple and Bake:
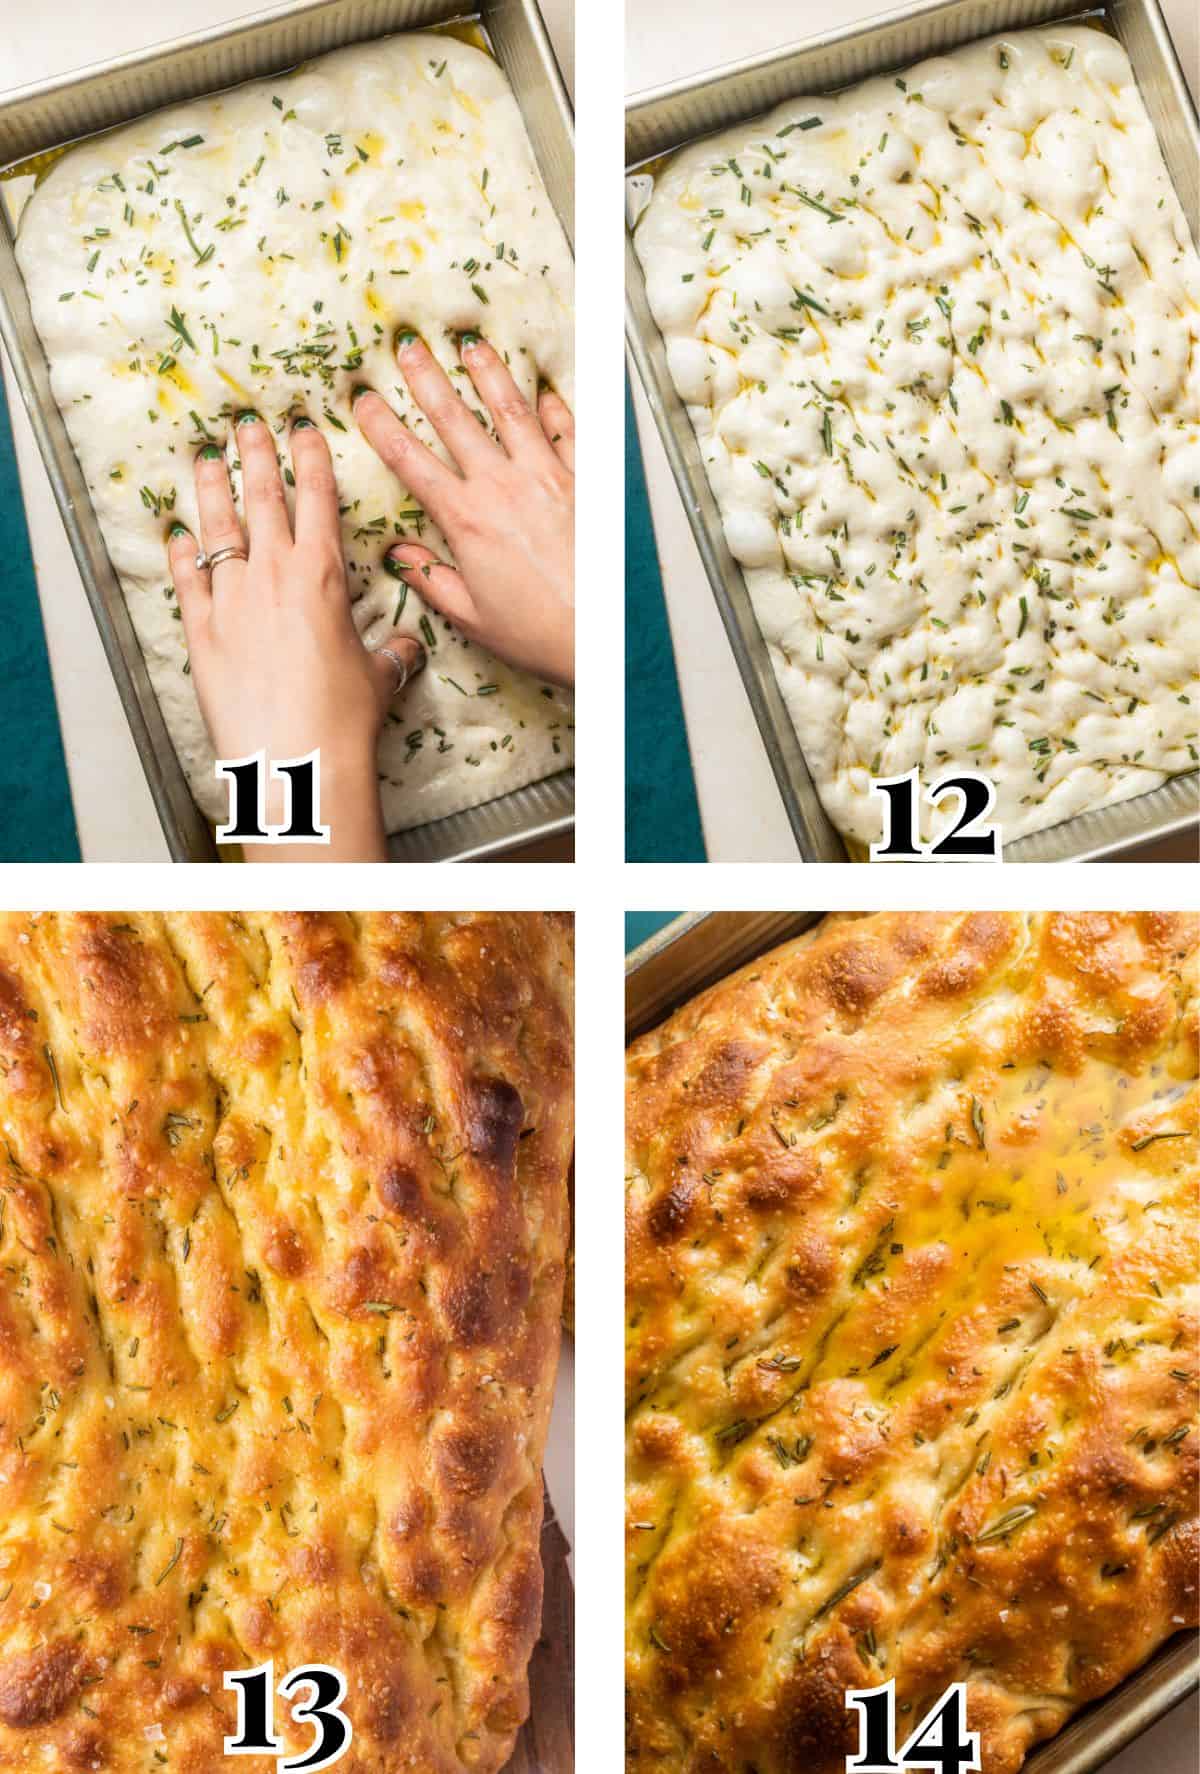
Drizzle some olive oil all over the surface of the dough, then sprinkle with flaky salt and any desired toppings. To dimple the dough, firmly press down with the tips of your fingers (Images 11 & 12).

Bake in the oven until golden-brown and crispy on the top and bottom (Image 13). Remove from the oven, immediately drizzle with a little bit of olive oil (Image 14). Cool for a few minutes before transferring to a wire cooling rack to cool completely before digging in!
Variations
- Temperature: The higher the oven temperature, the sooner the outside will brown and form a crust. From my experimentation, I noticed higher temperatures with a thinner dough lead to crispier focaccia. On the other hand, lower temperatures with thicker doughs yield a softer crumb.
- Fermentation Time: This dough can be refrigerated for up to 72 hours. The longer the ferment, the more the flavor develops. Additionally, longer fermentation times yield bubblier focaccias.
- Liquids: I’ve successfully subbed apple cider and other beverages for some of the water, producing a moist interior with a slight sweetness. Play around with hard cider, beer, even orange juice — the sky’s the limit! I recommend subbing 20% – 50% of the water.
- Toppings: Thinly sliced red onion, olives, garlic confit, rosemary, grapes, chilies, or cheese all make great toppings. Tomatoes are delicious as well, though raw tomatoes can make the crust a bit soggy, so pre-cook them first to remove some moisture.
- Pan Shape/Size: I recommend baking this in a non-stick aluminized steel 9×13 pan for a thicker, fluffier bread. You can use an 18×12 pan for a thinner sandwich bread (but scale the recipe up 20% if so). Baking times will vary if you use a different type of pan!
Recipe FAQs
Absolutely!
100% High-protein 00 flour or Bread flour
0.5% Instant Yeast
3% Diamond Crystal Kosher Salt
75% Water
5% Extra-Virgin Olive Oil
Saturday Morning:
9:00AM – Prep dough
9:30AM – Autolyse/Rest
9:50AM – 11:50AM – Stretch and Folds and 1st rise
11:50AM – Fridge
Sunday Morning:
12PM – Remove from fridge and transfer to pan. Stretch every 20 minutes or so for an hour.
1PM – 3PM: 2nd rise
2:00PM: Preheat oven
3PM: Dimple dough and bake
3:20PM: Remove from oven and cool.
Yes, it’s expected that the dough will still rise in the fridge! The fermentation will be slower than at room temperature, but you should still see visible bubbling and rising.
I love eating this focaccia alongside a tender & juicy steak, brothy beans, mushroom bourguignon, jalapeno artichoke dip, or this whipped ricotta!
Focaccia is best enjoyed the same day it’s made but will continue to taste fresh for 2 to 3 days at room temperature as long as it’s stored in an airtight container or plastic bag. Leftovers can be reheated, wrapped in foil in the oven, at 350°F/177°C, for 5 to 10 minutes until warmed through.
Did you try this recipe?
I would love to hear your feedback! Be sure to rate the recipe and leave a comment below.
Want to see more of my content? Add me as a trusted google source.

Note: This recipe was tested by an in-house recipe tester. The post was originally published in January 2021 and last updated in May 2025 to streamline instructions and step-by-step photos. The recipe remains the same, as it’s incredibly loved as is!
Fluffy Focaccia Recipe
Equipment
Ingredients
- 600 g high-protein 00 flour or bread flour, for 00 flour, I recommend Antimo Caputo
- 3.2 g instant yeast
- 18 g diamond-crystal kosher salt, if using any other type of salt (Morton, Sea Salt, etc.) and measuring by volume, measure ½ of the volume listed.
- 450 g room temperature water
- 30 g extra-virgin olive oil, plus more for dimpling and topping
Instructions
- In a large bowl, combine 600 g high-protein 00 flour or bread flour, 3.2 g instant yeast, and 18 g diamond-crystal kosher salt using a wooden spoon.
- Make a well in the center of the bowl, and pour in 450 g room temperature water and 30 g extra-virgin olive oil. With a wooden spoon or your hands, slowly begin incorporating the dry ingredients into the wet ingredients.
- Continue mixing until fully incorporated and no dry bits remain, about 3 minutes. The dough will feel very wet and sticky.
- Cover the bowl with plastic wrap and allow the dough to rest, covered, for 20 minutes.
- Bulk Fermentation: Perform four sets of stretch and fold every 30 minutes over the course of 2 hours (see recipe post for visual demonstration). After each set of stretch stretch and fold, keep the dough covered with plastic wrap, allowing it to rest in between each set. If the dough feels too sticky, moisten your hands with water for easier stretching.
- At the end of the 2 hours, the dough should have risen slightly and shown some signs of bubbling/yeast activity. If it doesn't show any signs of activity, let sit at room temperature for another hour.
- Cover the bowl with plastic wrap, then chill in the fridge for a minimum of 24 hours up to 72 hours.
- After allowing the dough to ferment, remove the bowl from the fridge. Generously grease the entirety of your baking pan with at least 2 tablespoons of extra-virgin olive oil.
- Punch down the dough with your hands. Then, using a bench scraper or your hands, tilt the bowl and scrape the dough onto the oiled pan in one piece. Coat the dough with the oil from the pan on all sides. Ensure the smoother side of the dough remains face-up.
- Stretch the dough gently towards the edges of the pan. It will likely resist a lot of stretching initially. Stretch the dough approximately every 20 minutes until it stretches all the way to the corners of the pan, about 1 hour.TIP: I often place my hands on the underside of the dough to stretch, as I think it stretches more easily and evenly.
- Let dough rest, uncovered, for an additional 2 – 4 hours until it reaches room temperature, doubles in size, and appears quite bubbly. About an hour before the dough has fully risen, adjust the oven rack to the middle of the oven and preheat the oven to 500°F/260°C.
- Once the dough has risen, drizzle another 2 tablespoons of olive oil evenly over the top. Generously top with flaky sea salt (or kosher salt), and add any toppings.
- Moisten your hands with a bit of olive oil. Dimple the dough by gently pressing your fingers into the top of the dough.
- Bake in the oven for about 10 minutes until golden brown on top.
- Rotate the pan 180°, then reduce the heat to 450°F/232°C and bake for another 10 – 15 minutes until golden brown on the top and bottom. Note: To test if the bread is browned on the bottom, I remove it from the oven and use a metal spatula to carefully lift it up and check the coloring. As long as the pan is non-stick (or lined with parchment), it should lift up relatively easily. If you find the bottom is browning too quickly compared to the top, you can move the pan to a higher rack. If the top is browning too quickly, tent with foil. If both sides are browning too quickly, turn heat down to 425°F/218°C.
- Remove from the oven, then drizzle with a bit more olive oil (about 1 – 2 teaspoons).
- Cool for 10 minutes, then transfer focaccia to a cooling rack or cutting board to cool completely before slicing.
- Once cooled to room temperature, slice the bread as desired and enjoy!
Video

Notes
- For best results, use a scale.
- For a crispier bottom, bake your focaccia directly on top of a preheated baking steel.
- Equipment: If you’re using a pan that is less non-stick, make sure to put a bit more oil on the bottom and/or lay some parchment paper down.
- Storage: Focaccia is best enjoyed the same day it’s made but will continue to taste fresh up to 3 days when stored in an airtight container or plastic bag.
- Leftovers: Leftover focaccia can be reheated, wrapped in foil in the oven, at 350°F/177°C, for 5 to 10 minutes until warmed through. You can make croutons by cutting up leftover focaccia into bite-sized cubes, tossing them with olive oil, salt, and pepper, and baking at 375°F for 6 to 10 minutes until crispy. I also make breadcrumbs by grinding the stale bread in a food processor.
Nutrition
The nutritional information on this website is only an estimate and is provided for convenience and as a courtesy only. The accuracy of the nutritional information for any recipe on this site is not guaranteed.
Other recipes you might like:


References
https://theamericanmag.com/a-brief-history-of-seductive-focaccia/
https://www.google.com/books/edition/Delizia/nB6NtvQhYDYC?hl=en&gbpv=1&bsq=history%20of%20focaccia


definitely want to try this recipe but I do have a question about step number 11. I always cover my dough so a skin doesn’t form. What is your reasoning to keep it uncovered? Thanks
Hi Diane, good question! It’s not absolutely necessary, but in testing, one of my recipe testers found that it rose better uncovered. As long as it’s coated well with olive oil, you shouldn’t need to cover it.
Absolutely the best focaccia recipe ever. I’m always wary of “no-knead” bread recipes – seems like cheating – but this focaccia turns out beautiful every time. With a little “waiting around” time, and very little “hands-on” time, this recipe produces exceptional results. It’s soooo easy and soooo good!
Hi Bruce,
Thank you so much for leaving a comment and so glad you enjoyed the recipe! It’s amazing what time can do for bread dough, right?
For the stage (11) where you Let dough rest, uncovered, for an additional 2 – 4 hours until it reaches room temperature, doubles in size, and appears quite bubbly. About an hour before the dough has fully risen, adjust the oven rack to the middle of the oven and preheat the oven to 500°F/260°C.
Can I leave it out longer if I cover it with a towel? E.g. Do the previous step of stretching in the AM, go work, come home and bake it– or would that be leaving it out too long?
Hi Erin,
Unfortunately, I think it might be out too long if you’re imagining it’d be sitting out for 8 – 9 hours while you’re at work. I’d be worried it’d overproof!
Hello. Thanks for the recipe. This was probably the best & easiest to follow focaccia recipe I’ve tried. I did a 24 hour fermentation. My pan was half an inch bigger in both length and width and it still turned out super fluffy. I topped it with fresh rosemary, I sliced up fresh garlic and added it to a ramekin filled with olive oil, cooked it in the oven and topped the focaccia with this, I also added sautéed onions and crushed tomatoes. It was absolutely delicious.
Hi Mike,
Ahh so happy you loved it! Sounds delicious with the rosemary, garlic, onions, and crushed tomatoes. Will need to try it some time. Thanks for leaving a comment!
Best,
Karishma
I have spent a year in search of the best focaccia recipe, and this is it! Other recipes have produced a bread that has a cornbread-like consistency. Still others have produced a soft, non-crispy crust. This one is as close to perfect as I have found. I love it!
David, I can’t tell you how happy this makes me! I’m so glad you enjoyed the recipe. Thanks so much for the comment 🙂
What is the serving size for these nutrition facts?
Hi Antonia, the nutrition facts are based on 12 servings from a 9-inch by 13-inch pan by 2-inch pan. So each serving is probably similar to the size of a larger bread roll. Hope that helps!
Look at the amazing browned crust of this Focaccia. I love the idea of 26hrs of fermenting. I am sure that the time was totally worth it. I made whole wheat Focaccia sometime back. I am not aware of the good quality of bread flour that we can get in India. Would you be able to suggest any good brands? Also, if they are APF or wheat-based? Thanks so much.
Great question! I did a bit of research, and here’s what I found. I’d definitely recommend ordering online. On Amazon, I’d recommend Josef Marc (https://www.amazon.in/Josef-Marc-Farine-Strong-Bread/dp/B07PDGYXB8/ref=sr_1_7?keywords=bread%2Bflour&qid=1700147618&sr=8-7&th=1), Raw Himalayas (https://www.amazon.in/Raw-Himalayas-Unbleached-Sourdoughs-Baguettes/dp/B0BJ751L3X/ref=sr_1_6?keywords=bread%2Bflour&qid=1700147618&sr=8-6&th=1#customerReviews), or TWF (https://www.amazon.in/TWF-Bread-Flour-T55-Unbleached/dp/B0C4Z3C7VN/ref=sr_1_5?keywords=bread+flour&qid=1700147618&sr=8-5#customerReviews). These are all strong, higher protein bread flours.
Alternatively, if you can find vital wheat gluten, you could try adding a tablespoon of that to an all-purpose flour blend to increase the protein content.
OhMyGod!! I made this, & it’s SO delicious – such an easy recipe to follow! I even did the 70hours for the fermentation – pretty exciting stuff..
But I had to cut it out of my pan at the end of the 2 baking periods, & the base was still a bit ‘blonde’. I feel this is not quite right, but I followed the recipe exactly – but I can’t help feeling there’s a step missing:
Your instructions say ‘Rotate the pan 180°, then reduce the heat to 450°F/232°C and bake for another 10 to 15 minutes until golden brown on the top and bottom’, but at no point do you say to remove the half cooked bread from the pan… Are we supposed to do that? Otherwise, how do you assess the colour of the base if it’s still in the pan?
This recipe is DEFINITELY a Keeper, I just want to clarify this tweak. Thank you SO much for giving this to us – it’s incredible, & you’re both brilliant and generous.
Hi Vivienne,
Thanks so much for your feedback! I’m so glad you enjoyed despite the baking hiccup. I have a few thoughts/questions to help you achieve the most foolproof process.
1. In terms of assessing the color of the base, I usually use a metal spatula to lift up the bread and check the coloring. But this is a great call-out, and I’ll make sure to add a note about this in the future. The caveat, here, is that my focaccia isn’t sticking to the pan and pretty easily lifts out; I don’t have to cut it out, so it makes it much easier to check this. And so I think ensuring that your bread doesn’t stick to the pan is probably the most important next step.
2. I’m a bit surprised your base was still blonde – if anything I usually have to move the pan to a higher rack to finish cooking because my base ends up quite browned. The two things I could see leading to that are: a) the material of your baking pan or b) the temperature of your oven.
Let me know what kind of baking pan you used, so we might be able to troubleshoot that! For example, if it’s less conductive, then maybe that’s why it didn’t brown as much? If it’s less non-stick, I advise lining it with parchment paper before baking to prevent stickage or using a bit more oil. As to the temperature of your oven, do you use an oven thermometer? Could it be possible that your oven runs a little cold?
Hey Karishma, thanks so much for your reply.
I use a porcelain baking dish for cooking, & I thought I had enough oil in the bottom of it – it was quite oily.
And yes, my oven only goes to 250C. – should I put it higher in the oven? Fan Forced is supposed to make the heat even, so if I do it at 250C Conventional, the temperature should be higher towards the top of the oven…?
BTW, I’ve just taken half my loaf over to friends, my tasting guinea pigs, & they absolutely LOVED it! Definitely a keeper recipe – thank you so much.
Okay, sounds like oil isn’t the issue then! I think it might be due to using a porcelain dish, which isn’t as conductive as metal; typically, it heats more slowly and that may be why the bottom was still blond. And because metal pans get hotter, they can promote more browning and create more of a non-stick crust.
That said, I think there are other things you could try if you don’t have a metal baking pan! If you noticed that the top of your focaccia got a nice browning while the bottom was more blond, you could definitely try conventional to see if that helps. And even though heat rises (so the top of the oven can be hot), if your heating element is at the bottom of the oven you might want to try baking on the lower rack — the direct heat might create more develop more browning on the bottom. Finally, since your oven only goes to 250C, you may need to bake it for longer, assuming that doesn’t dry it out.
Hopefully that’s helpful 🙂 My guess is one of the issues I outlined above (or a combination) might be leading to the textural differences you’re seeing.
The name doesn’t lie! This is truly the fluffiest focaccia I’ve ever had. The only problem is that I ate it all so quickly!
I paired this bread with a lamb ragu for one meal and your mushroom bourguignon for another. I also made breakfast sandwiches and gave a slice to my neighbor who also loved it!
Hi Daniel,
So happy you enjoyed the recipe! Love that you were able to use it in so many ways!