
My go-to 72-hour cold-fermented pizza dough recipe uses a slow, cold fermentation method to yield a flavorful dough with a chewy, crispy crust. Plus, it’s easy enough to use for both home ovens and outdoor pizza ovens.

In 2020, I took up pizza making as a hobby during the pandemic. Along the way, I tested several different recipes, many times (read: over 100 times) across the Internet before creating my own.
My homemade pizza dough utilizes the magic (or, rather, science!) of a slower rise in the fridge, resulting in a better flavor and texture. This yields a bubbly, crispy crust and a soft, chewy interior. It’s my go-to recipe and versatile enough for both my indoor home oven and my outdoor oven (Ooni).
Why You’ll Love This Dough
First published in 2022, this recipe has been tested dozens of times by me alone (and dozens more times by others).
Here’s what reader Michael said, “I have been learning the art of pizza making for a couple years, I have tried many dough recipes, this is a game changer! Thank you for all your hard work and dedication…I live in Montana, my favorite pizza place is a 3 ½ hour drive, this just as good as the dough they make! They have been voted best pizza in Montana, so that says it all. Thanks again!”
- Slow fermentation equals better flavor: Chilling the dough for a minimum of 24 hours allows a better flavor and texture to develop over time.
- It’s delicious: The end result is a cross between a Neapolitan and a NY-style pizza — slightly crispy on the outside and chewy on the inside.
- It’s easy to work with: A 62% hydration eliminates stickiness and favors a traditional Neapolitan ratio.
Journey to a Better Home Pizza
A few crucial factors can transform your homemade pizza from good to great. Proper technique is critical, from kneading to stretching to baking. The dough is equally important, including the ingredients used and their ratios. Finally, there’s a lot of science and experimentation in making great pizza dough.
But don’t worry. I’ve conducted extensive research for you and laid it out throughout the post below. The ultimate goal of this article is to provide you with the tips, techniques, and fundamentals you need to make an awesome pizza at home.
There’s a lot of valuable information here, and I’ve tried to make it as exciting and digestible as possible. Feel free to bookmark this page and come back to it as a reference.
Note: This pizza dough recipe is for intermediate pizza bakers (that is, you’ve made pizza in your home oven at least a few times and are familiar with kneading, balling, and hand-stretching your dough). For beginner pizza bakers, please consult my Pizza Guide, easy Roberta’s Pizza Dough Recipe, or sign up for one of my online cooking workshops!
Benefits of Cold Fermentation

In pizza dough, yeast eats simple sugars in the flour. As the yeast feeds, it releases carbon dioxide gas, which forms bubbles that make the dough rise. The dough’s gluten structure traps these bubbles, giving the crust its light, airy texture when it bakes.
- Slow, cold fermentation produces better browning, improved structure, and a bubblier, softer, and chewier crust with more complex flavor.
- Additionally, cold fermentation makes the dough easier to work with and stretch, resulting in more circular pizzas and less tearing.
- Finally, there is much more flexibility in timing. I like to keep my dough in the fridge for at least 24 hours, but the crust improves even more up to 72 hours. That leaves a 2-day window in which you can use the dough at any point.
- Conversely, with a faster, room temperature dough, there is less room for error. If a recipe has you proof the dough for 2 hours, it might be over-proofed if you accidentally leave it out for an extra hour.
Want to know more? Let’s dig in!
The Role of Temperature
Temperature is hugely significant throughout the whole life cycle of pizza dough.
Before Baking
All yeast-based pizza dough undergoes some level of fermentation. In the case of cold fermentation, the fermentation occurs in, well, colder temperatures (usually the fridge). At a cooler temperature, this happens much more slowly.
From research and analysis from other pizza professionals and myself, I’ve determined that fermentation at cooler temperatures yields better structure, texture, and flavor.
Interestingly, I read in a pizza forum once that the most optimal temperature for the dough is actually around 50°F (10°C) to 60°F (16°C).
Why? Well, at this temperature, the yeast is still active enough to do its thing (just at a slower rate than room temperature). Some avid home cooks will actually ferment their dough in a wine cooler!
But, rest assured, since most of you likely don’t have a wine cooler at home (myself included), a fridge works well too, it just takes a bit more time.
During Baking
Temperature also plays an important role in the baking phase.
At a higher temperature, pizza takes less time to cook through. For example, my Ooni pizza oven cooks a pizza in 90 seconds at 932°F (500°C), while my home oven takes 3 – 4 minutes at 550°F (288°C).
Higher temperatures result in more exterior charring with smaller charred spots, especially leopard spotting. As an extreme example, you would never see charred spots on a pizza cooked at 200°F (93°C), while a 932°F oven is hot enough to cause charring within a minute.
The longer a pizza takes to cook, the more it “dries out.” Because pizza takes less time to cook at a higher temperature, the pizza dries out less, yielding a softer crust with a doughier inside.
Below, I’ve compiled a few pizzas from over the years. The left-hand side shows pizzas baked in a standard oven, while the right-hand side demonstrates pizzas cooked at a higher temperature in my Ooni pizza oven.

With the help of my broiler, the pizzas on the left-hand side show some nice charring, but they are nowhere near as soft as the pizzas cooked in the Ooni.
As I said above, the Ooni pizzas take significantly less time to cook, so they’re softer but still have a considerable amount of charring because of the higher temperature. Neither of these is worse or better, just different, as we will see below.
Summary
Pizza cooked in a pizza oven or wood-fired oven usually has plenty of charring, often with smaller charred spots and a softer, doughier interior.
If you’ve ever had Neapolitan pizza, you might know it’s usually eaten with a fork and knife because the interior is quite soft and wet. If you put a boatload of toppings on your dough and baked it Neapolitan-style, they would weigh it down, maybe even enough to tear the crust. And at a shorter baking time, the interior toppings don’t cook as much. As a result, the sauce stays saucy, the mozzarella melts without crisping up, and the basil won’t char.
On the other hand, pizza baked at a lower temperature, say 500°F (260°C) to 600°F (316°C), requires a longer time to cook through and achieve browning. A NY-style pizza is an example of this; it has a sturdier crust, does not require a fork and knife, and can hold plenty more toppings.
Conclusion: Temperature, both in fermenting the dough and baking the dough, plays a huge role in the resulting crust.
The Importance of Time
You’ve heard me say this several times now. Colder temperatures = slower fermentation = more complex flavors and better structure.
But how much slower is this fermentation? How long are you supposed to keep the dough in the fridge? And what exactly is the relationship between temperature and time when it comes to bread?
This is where yeast comes back into the picture. The more yeast you put into your dough, the faster the fermentation process occurs (more yeast leads to more carbon dioxide leading to more air bubbles).
Why Wouldn’t I Want to Speed Up Fermentation?
It’s a great question. I’ve told you that a slower fermentation at a colder temperature yields a better pizza…but what does that really mean? Why wouldn’t you just speed things up? It would be a lot easier.
I don’t disagree with you. Unfortunately, a speedier process doesn’t mean a better result. For example, you could put in more yeast and let your dough rise at room temperature for a couple of hours until it doubles in size. Then it would be very quickly ready to ball and bake. Let’s review the potential differences:
| Dough Type | Speedier fermentation at room temp | Slower, cold fermentation |
|---|---|---|
| Total Time | 1 ½ hours to 24 hours | 24 hours to 72 hours |
| Fermentation Temp | 72°F (22°C) | 40°F (4°C) |
| Yeast | Recipes typically call for more yeast | Recipes typically call for less yeast given a longer period of fermentation |
| Structure | Paler, tougher crusts and less bubbling | Typically better browning, improved structure, more bubbling and softer, chewier crusts |
| Flavor | Less complex, sometimes unpleasantly “yeastier” flavor | More complex, “aged” flavor |
Keep in mind that different recipes might yield different outcomes, but these are the results I’ve seen, from research online and my own experimentation.
Ingredient Notes
Flour
For this recipe, look for 00 flour/pizza flour for an airier texture (this is my preferred choice!) or bread flour for a chewier texture1. Both flours have high protein content (12%+), which is ideal for gluten formation.
I recommend Antimo Caputo’s 00 flour: For standard home ovens, buy the “Chef’s Flour” (usually in a red bag). For high-temperature pizza ovens (900°F or 482°C), buy the “Pizzeria Flour” (usually in a blue bag).
1 A thorough review of pizza flours can be found on my post covering bread flour vs. 00 flour vs. all-purpose flour. Because of the textural differences, bread flour is more often used for NY style doughs and 00 for Neapolitan style.
Salt
Typically, the salt percentage in doughs ranges from 2% to 3%; I lean towards 2.5% to 3%, but if you prefer less salt, you could get away with just 2.5%. Note that a decrease in salt can speed up fermentation.
Yeast
Both active dry yeast and instant yeast are commonly used in pizza making, though I prefer instant yeast (SAF Instant Yeast is great).
Unlike active dry yeast, instant yeast can be added directly to dry ingredients; active dry yeast traditionally needs to be “activated” in water to dissolve (in the last few years, commercially available active yeast allegedly does not need activation, but I recommend doing it to confirm the yeast is actually still alive).
Flour to Water Ratio
The higher the ratio of water to flour, the more difficult (and stickier) the dough will be to handle. In the case of a Sicilian style thick-crust pizza, it’s more similar to a focaccia-like process where you’re not really hand stretching and tossing the dough so it matters less that it’s sticky.
A Neapolitan dough, however, requires a lot of technique to stretch properly, so a stickier product will be a big pain. And as you might expect, there is a balance here. You want enough water to create steam in the oven so that the pizza puffs up nicely and the crust doesn’t dry out too much without it being too sticky.
There’s also a peak absorption rate for each type of flour brand. Bakerpedia defines peak water absorption as “the water taken up by flour to achieve the desired consistency and create a quality end-product. It is the optimal amount of water you can add to a dough before it becomes too sticky to process.”
King Arthur bread flour, for example, has an estimated 62% absorption rate while Caputo 00 flours have a lower rate at 55% to 57%. In my recipe, I use a 62% ratio of water to flour to accommodate both types of flours, and I haven’t noticed too much stickiness with the Caputo flours at that level.
Extra-Virgin Olive Oil
Oil is not a traditional component of Neapolitan dough, but it’s commonly found in many home oven pizza recipes, as it improves moisture without creating stickiness and enhances browning. I prefer it even with the Ooni, as it makes the dough easier to work with.
Best Equipment
For the best homemade pizza, a little bit of equipment can go a long way.
- Kitchen scale: Kitchen scales are incredibly useful and important in baking. Measuring cups just don’t cut it when it comes to accuracy and ease. You can easily find one on Amazon for $10.
- Baking steel: No pizza oven? No problem! Try a baking steel in your home oven. As Cook’s Illustrated points out, a baking steel cooks 30% faster than a stone and is more durable.
- Bench scraper: This is really great for getting any sticky bits of the dough off a cutting board or workspace.
- Pizza peel: A pizza peel is very helpful for launching the dough into the oven. It takes a bit of practice, but once you’ve gotten used to it, it’s hard to use anything else.
How to Make This Recipe (Step-by-Step)

Make the Dough:
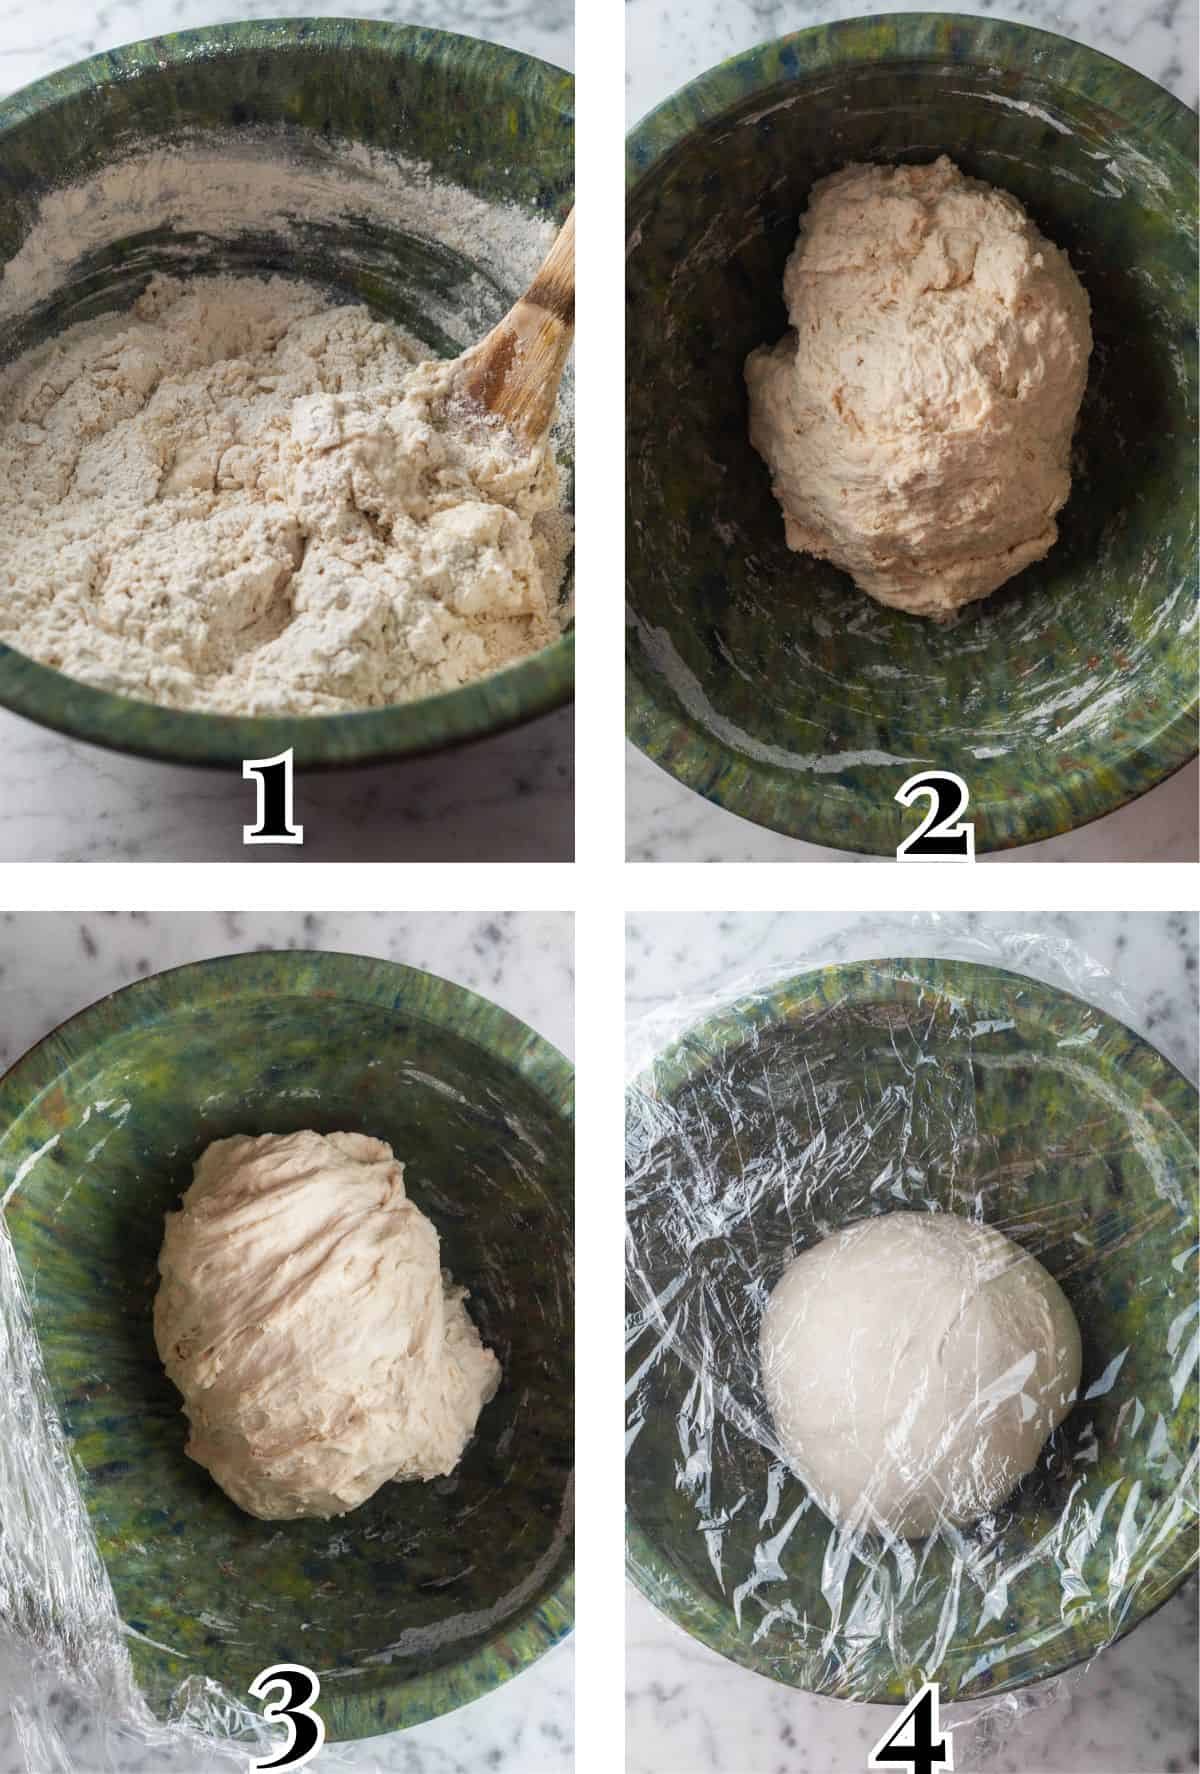
Step 1 – Mix Dry Ingredients: In a mixing bowl, stir all dry ingredients together until combined (Image 1).
Step 2 – Add Wet Ingredients: Make a well in the center of the bowl and slowly add in the water and olive oil. Mix the dry ingredients into the wet ingredients with your hands or a wooden spoon and knead for 2 – 3 minutes until no dry bits remain; the dough will have a shaggier texture and won’t be a smooth ball yet (Image 2).
Step 3 – Autolyse: Let the dough rest, covered with plastic wrap, for 30 minutes at room temperature. This step is called autolyse — it helps hydrate the dough, kickstarts gluten formation, and makes kneading much easier.
Step 4 – Stretch and Fold: Perform 3 sets of stretch and folds to strengthen the dough, each spaced apart by a 30 minute rest period. After the first stretch and fold, the dough will still be somewhat shaggy (Image 3).
After the last stretch and fold, the dough should be quite strong (when you stretch it, it should resist quite a bit) and show visible gas bubbling (Image 4). If you’re not seeing this gas bubbling, let the dough sit out for another hour or so until you observe this.
What is a Stretch and Fold?
A stretch and fold is a gluten strengthening technique in breadmaking where you pick up and stretch your dough and fold it onto the other side. It helps strengthen your dough without as much kneading — it’s a much more lax way to create gluten.
If you imagine your dough as having four corners, one “set” of a stretch and fold means picking up the dough from one corner, stretching it upwards until it feels taut, then folding it onto the opposite corner. Rotate the bowl 180 degrees and stretch and fold the dough again. Next, rotate the bowl 90 degrees and stretch the dough on top of itself, then turn the bowl 180 degrees and stretch again onto the other side.
In total, each “set” involves rotating, stretching, and folding 4 times. Therefore, 3 sets means you’re stretching and folding twelve times over the span of 1 ½ hours.
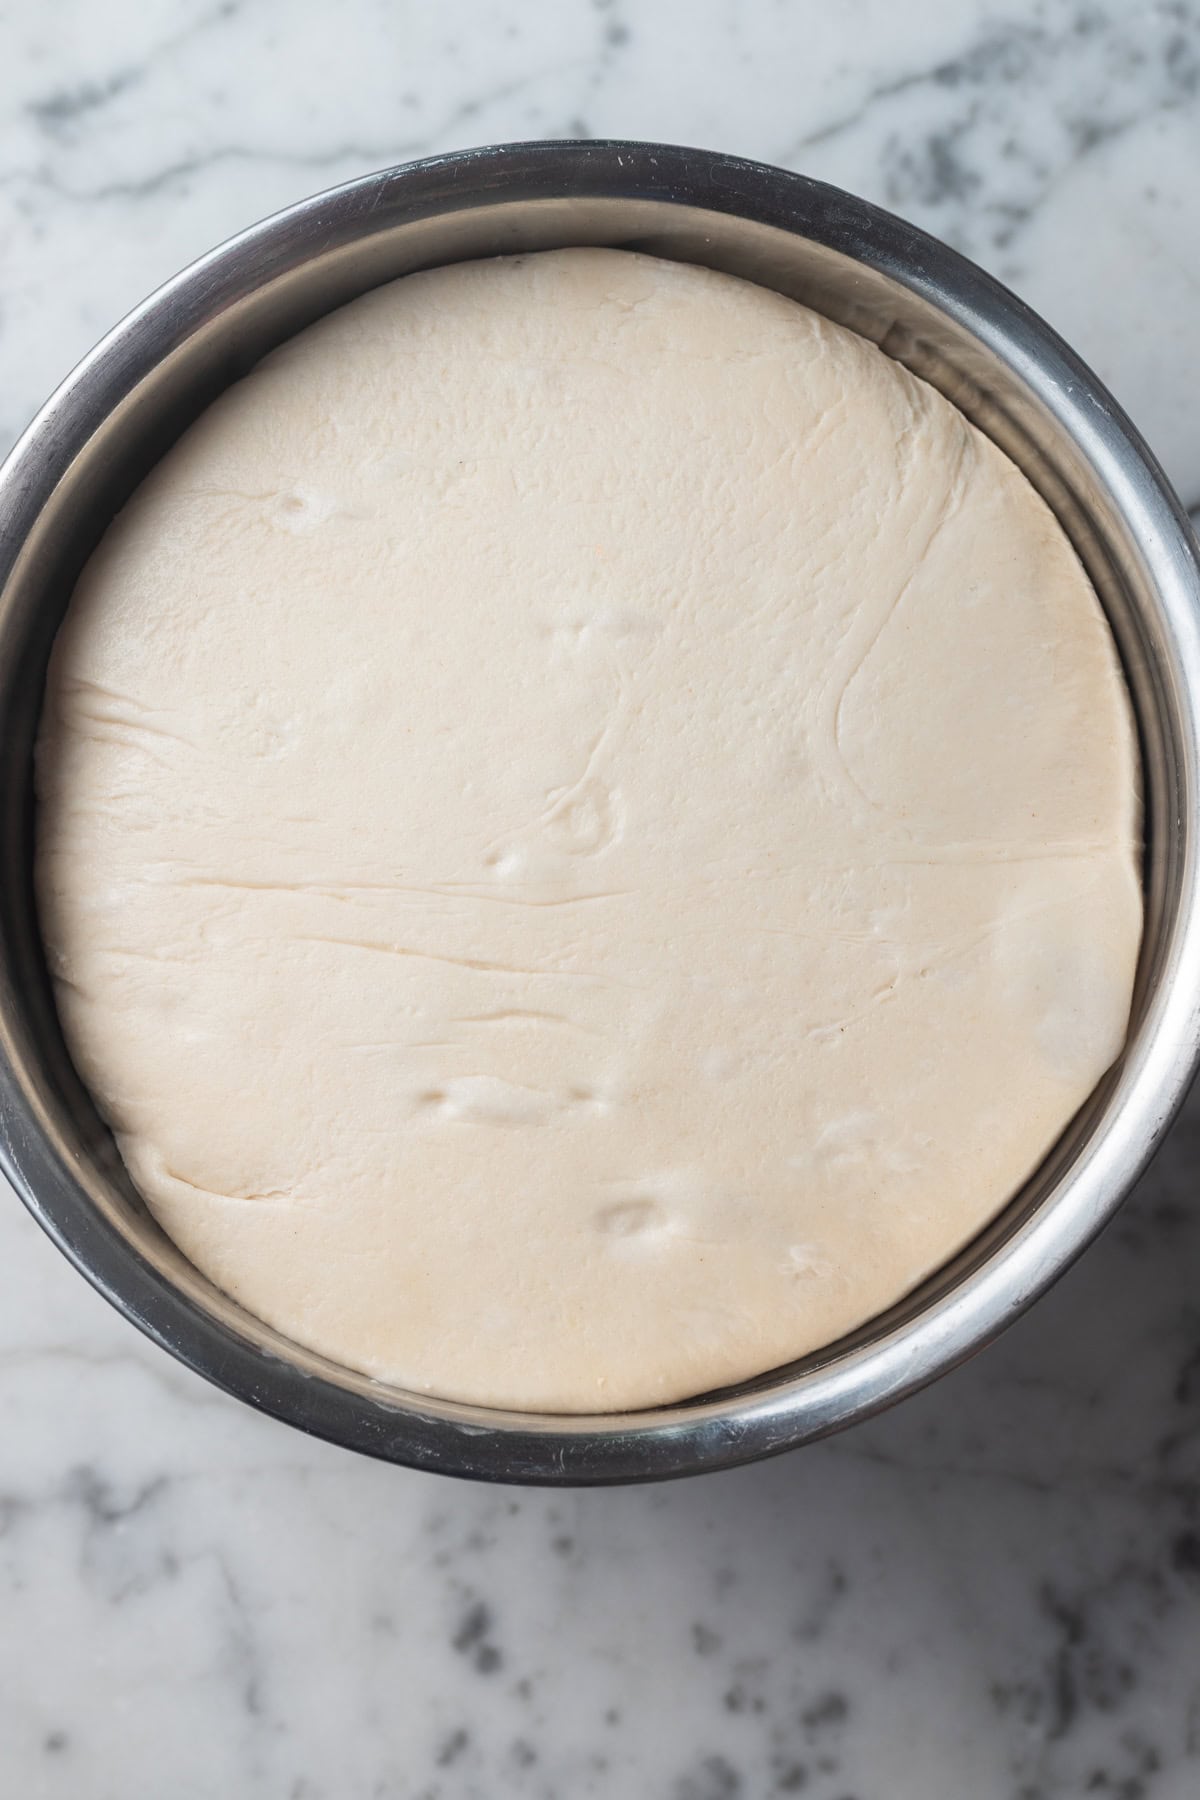
Step 5 – Ferment: Cover dough and let sit in the fridge for 24 hours to 72 hours.
Ball and Proof:
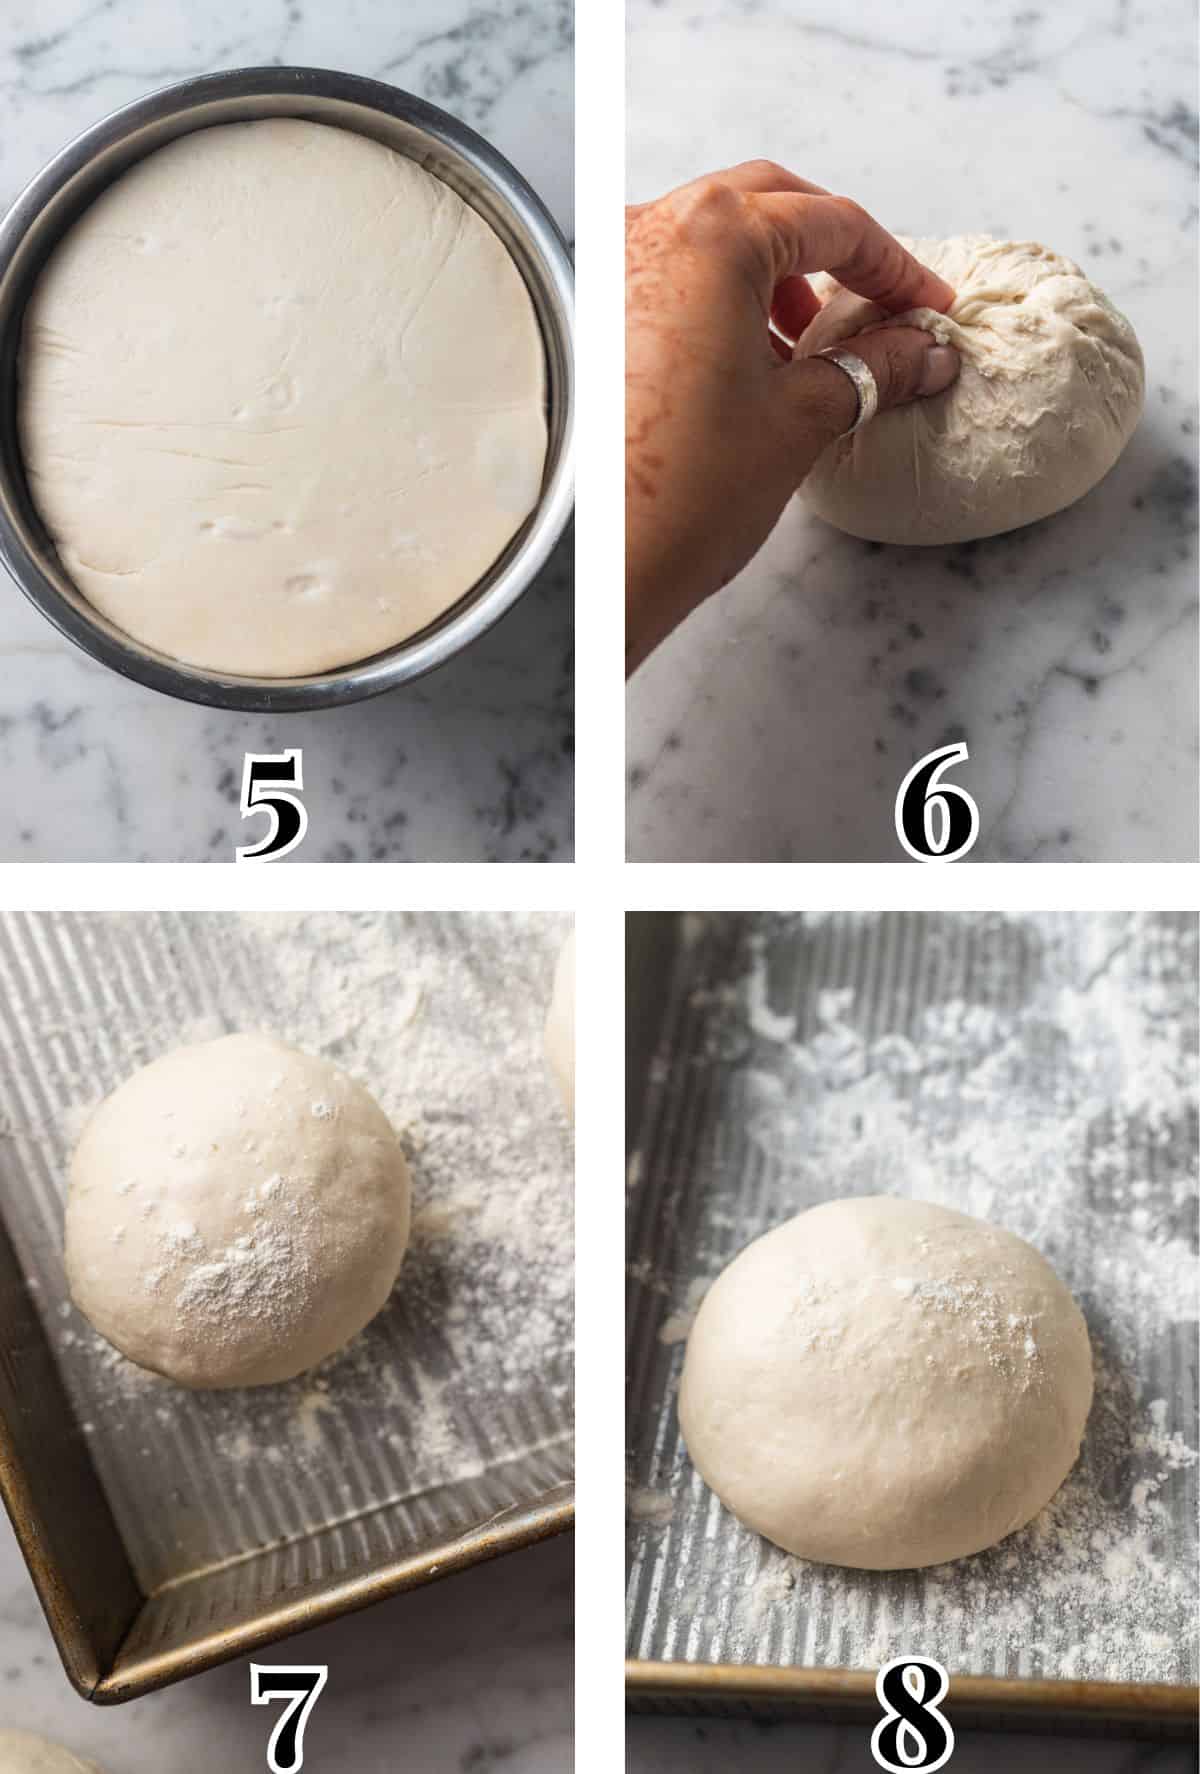
Step 6 – Ball: After 24 – 72 hours, take the dough out of the fridge (Image 5).
On a work surface, divide dough into 5 equal portions. Form each piece of dough into a ball (Image 6), then place each ball in a large pizza container (Image 7).
Generously dust the container and the dough balls with flour if using an outdoor pizza oven or oil if using an indoor pizza oven. Alternatively, you can place each ball into an individual container.
The more tension you create in forming the pizza dough ball (i.e. the tighter the ball), the more gas you’ll trap leading to a bubblier, more circular pizza. When you loosely ball the pizza, you’ll lose that shape and the trapped gas.
How to Ball Pizza Dough
There are many different ways to ball pizza dough, but here’s the method that I find easiest. Take your dough and tightly pull all of the corners to the center of the ball, forming and sealing a pouch, almost as if you were making a ball of mozzarella. This step not only helps create a spherical shape, but also it builds tension in the dough.
Place the dough on a wooden surface (seam-side down, dusted with flour if needed) and lightly cup both hands around the dough ball. Keeping your hands cupped, rotate the dough ball, sliding your fingers firmly under the dough while rotating to tighten the ball.
Step 8 – Proof: Let the dough balls proof 3 – 5 hours in advance until they expand and reach room temperature (Image 8).
Your dough is ready when it doesn’t feel cool to the touch and has spread out from a spherical ball into a flatter circle but still has some structure to it. If your dough sits out too long, it can overproof, making it more difficult to handle — you will likely see that it’s extremely bubbly and flattened.
Preheat – Standard Home Oven
Step 9a – Preheat: There are two methods of baking your pizza in a home oven. I recommend trying both and seeing which method produces the best pizza for you.
Regardless of which option you choose, place your baking tool of choice inside the oven. At least 45 minutes before baking, preheat to the hottest temperature possible (my oven goes to 550°F/288°C). This step is critical as it ensures the oven stays as hot as possible so that the pizza cooks faster and doesn’t dry out.
Top rack method: For this method, put your baking steel on the top rack of your oven. The top rack should be about 5 – 6 inches from the broiler. Once ready to form the pizza, switch the oven to the broil setting to preheat the broiler. When you’re ready to launch your pizza, broil it for 2 minutes, then turn off the broiler but keep the oven on at the hottest temperature until the pizza is finished cooking (an additional 1 – 2 minutes).
Switching racks method: Put your pizza steel in the middle rack of your oven, and arrange your top rack so that it is 5 – 6 inches from the broiler. Launch the pizza onto the steel for 3 – 4 minutes until the bottom is browned. Then, turn the broiler on and transfer the pizza to the top rack to finish cooking the top for 1 – 2 minutes.
Preheat – Portable Outdoor Oven
Step 9b – Preheat Portable Outdoor Oven: Have an Ooni, Roccbox, or other outdoor portable pizza oven? Refer to your instruction manual and make sure to preheat the oven at least 30 minutes before the pizza is fully proofed. For my gas-powered Ooni Koda 16, I typically preheat until the center stone reaches 900°F/482°C.
Stretch and Bake:
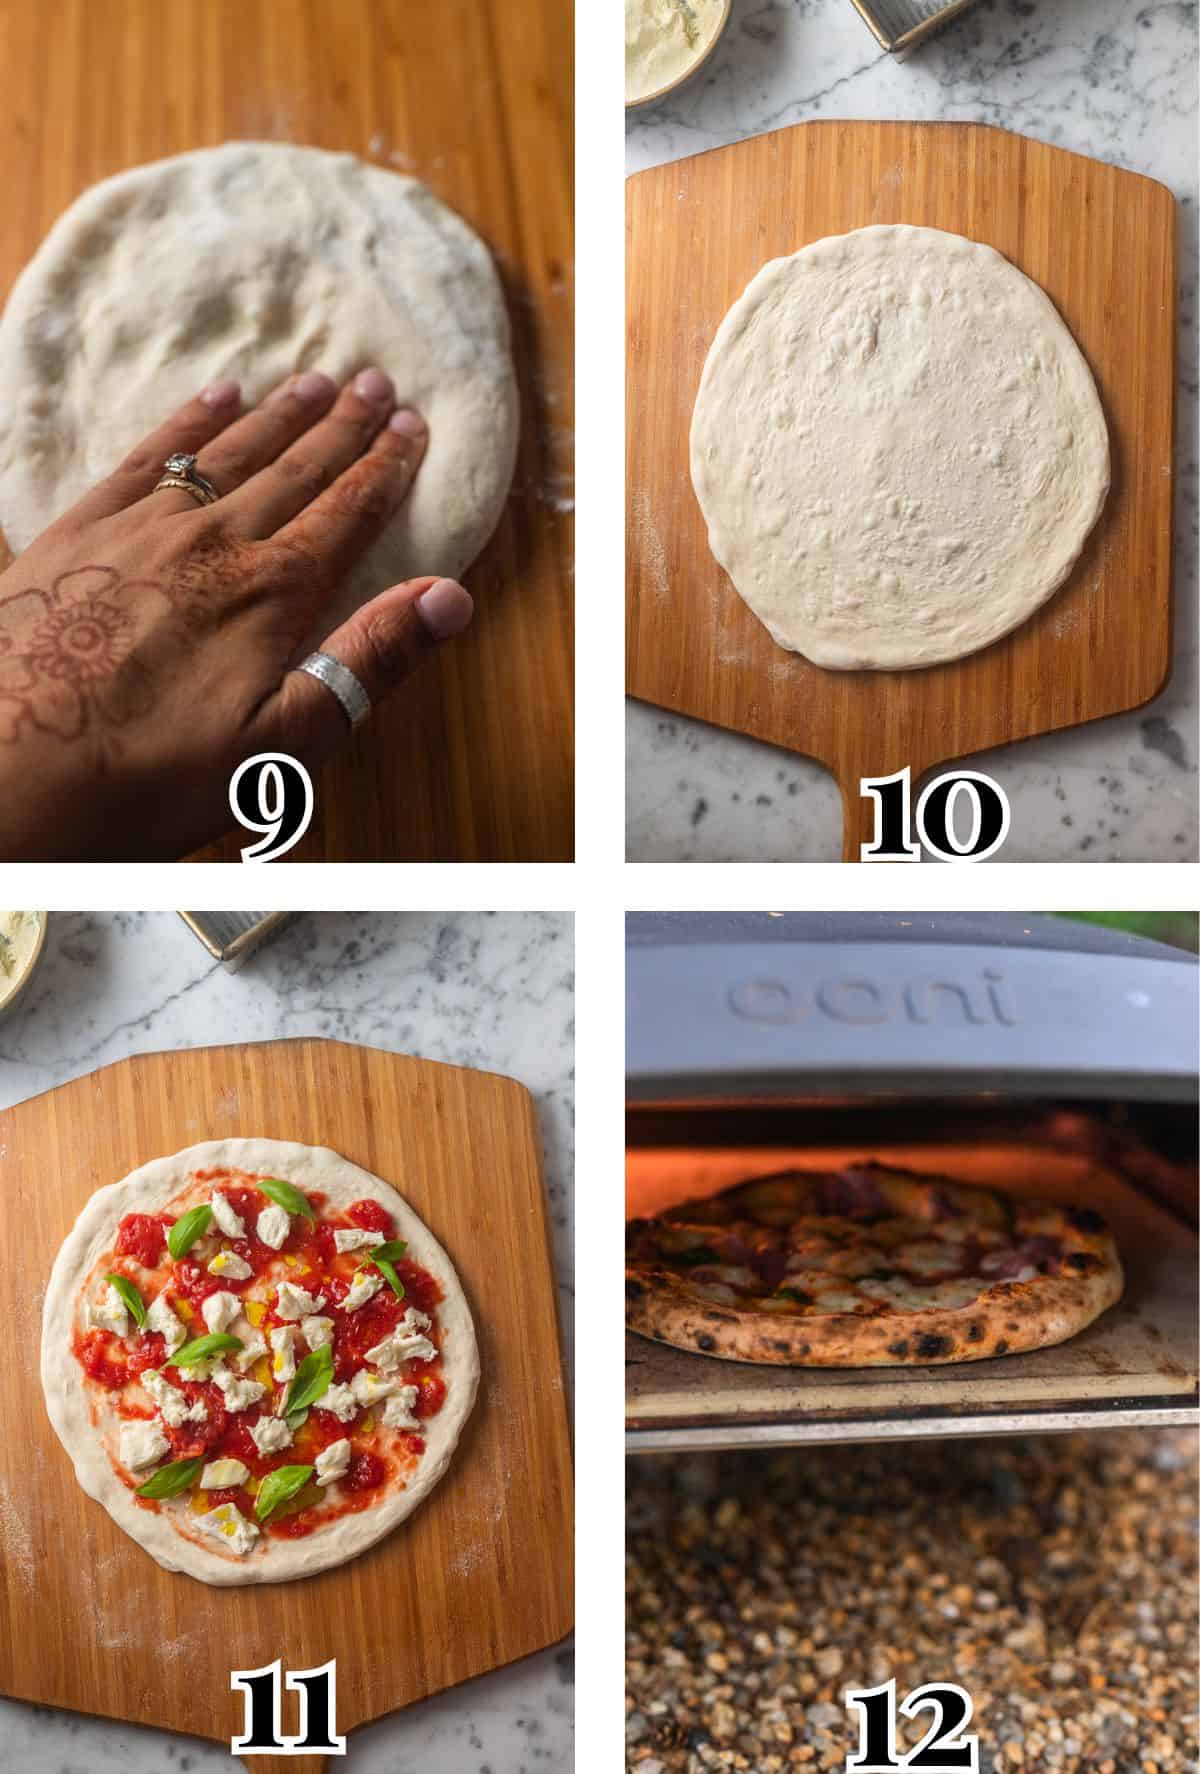
Step 10 – Flour the Dough: I like to use a 50/50 mix of semolina flour (or cornmeal) and 00 flour to flour the dough and peel.
Carefully pick up the dough from its container and place onto the pizza peel. The gentler you are with picking up the dough, the less likely you will have uneven spots creating tears when stretching, so try your best not to squish the dough in any way.
You don’t want the dough to stick to the peel. You can check that it’s not sticking by sliding the dough around the peel. If it is sticking, add a bit more flour to the bottom. I like to do this every minute or so to ensure my dough is not sticking, especially once I start adding the sauce and toppings. The faster you’re able to form and top the dough, the less sticking that will occur (and the less flour you’ll need to add).
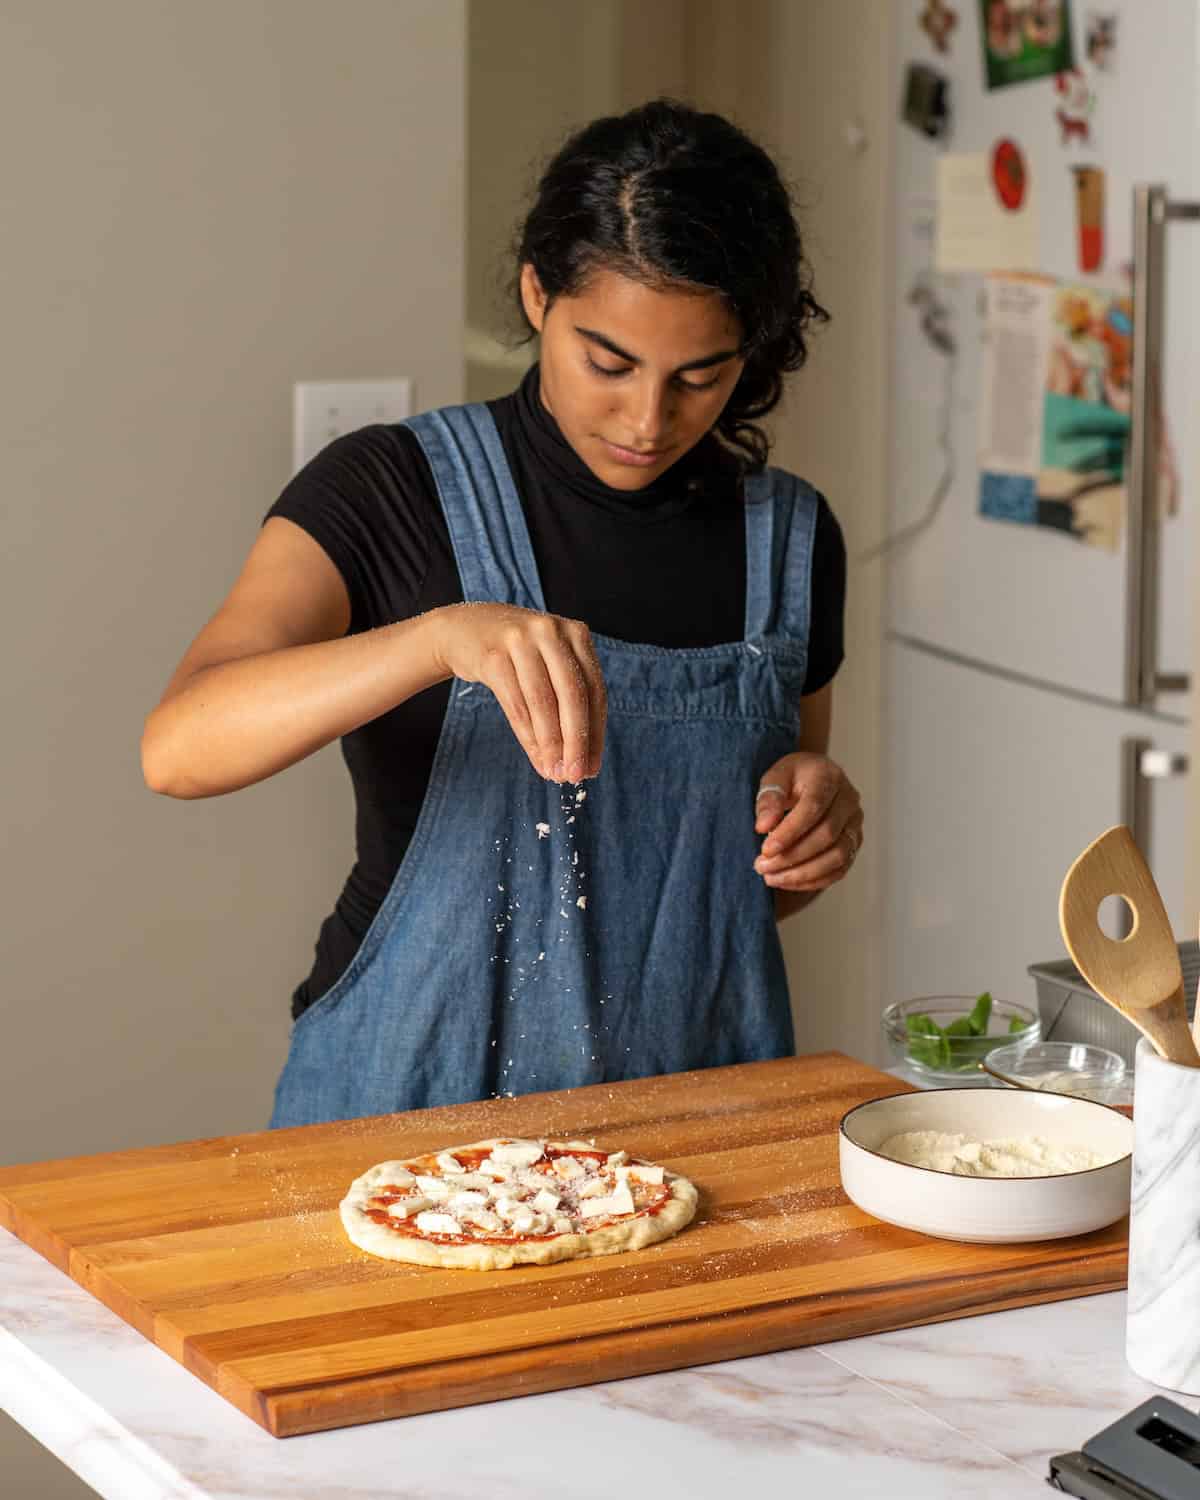
Step 11 – Create Rim: Form a rim for the crust by gently pressing your index finger around the perimeter of the dough, about ⅔-inch from the edge (Image 9). Once the rim has been formed, be careful not to deflate the outer edges, as this helps create the characteristic risen crust in the oven.

Step 12 – Stretch: Lift the dough and place your knuckles on the inside rim of the dough. Let the dough gently stretch by rotating your knuckles in a circle until it reaches the desired diameter (Image 10).
Step 13 – Sauce: Add your base sauce (San Marzano pizza sauce, olive oil, cream, etc.) using a ladle or spoon. Top the pizza with desired toppings (Image 11).
PS my white mushroom pizza is a delicious option!
Step 14 – Launch and Bake: If using a pizza peel, make sure the pizza is not sticking to the peel before launching. If it is, add a bit more flour, then hold the handle of the peel and gently and carefully slide the dough around to ensure it’s not sticking at all.
To launch, hold the peel parallel to your baking sheet/stone/steel and firmly slide the pizza onto it. There’s no need to rush it; you can do this slowly to get the hang of it. Immediately close the oven and bake according to your desired method (Image 12).
Step 15 – Serve: Remove the cooked pizza from the oven, then transfer to a wire cooling rack to prevent the bottom of the crust from getting soggy. Allow pizza to cool for about 30 seconds to a minute, then transfer to a large cutting board, cut into slices and serve.
Storage Tips
Bulk Pizza Dough: Store in the refrigerator for cold fermentation for up to 72 hours. After 72 hours, the dough may begin to overferment/overproof, though I typically haven’t had issues within the first 96 hours in the fridge.
Leftover Dough Balls: Extra balls of dough can be stored in the fridge for up to 72 hours.
Overproofing Fix: If I accidentally leave the dough in the fridge for too long (i.e., 5 to 6 days), I will turn it into a quick focaccia bread instead. I’ll place the dough in a rectangular sheet pan or tray coated with a generous amount of olive oil and let it proof at room temperature for a couple of hours, gently stretching it until it reaches the sides of the pan. I’ll then bake it using my fluffy focaccia as a guide.
Recipe FAQs

Yes, it can. While cold fermented pizza doughs are more forgiving, a dough that’s sat in the fridge for over a week is going to have a sour smell, and likely be overproofed while losing some of its structure. I typically start seeing issues after 4 days (96 hours) in the fridge, so 24 – 72 hours is really the sweet spot.
Pizza dough straight from the fridge will be nearly impossible to stretch. It will also need to sit at room temperature for its second rise, so that it can proof and rise.
If the recipe is followed properly, the dough is quite resistant to tearing. However, it can tear if it’s not relaxed enough (it will still feel cold) or if you try to stretch the dough with your fingers (use your knuckles to prevent yourself from poking holes)!
The easiest way to ensure a pizza is circular is to make sure each dough ball is circular. This can take a bit of practice, so don’t fret! Form a pouch with the dough, seal it, then cup with your hands to form a circular shape.
For any other troubleshooting questions, make sure to check out my Pizza Guide which includes a number of FAQ, or leave a comment below.
Note: This recipe was first published in 2022 and most recently updated in July 2025 with updated photos and streamlined instructions. I also removed the kneading step, as I found the stretch-and-folds sufficient for gluten development. If you have any questions about the changes, please leave a comment below.
Did you try this recipe?
I would love to hear your feedback! Be sure to rate the recipe and leave a comment below.


Cold-Fermented Pizza Dough
Equipment
- Scale, highly recommended
- Baking Steel, or pizza stone
Ingredients
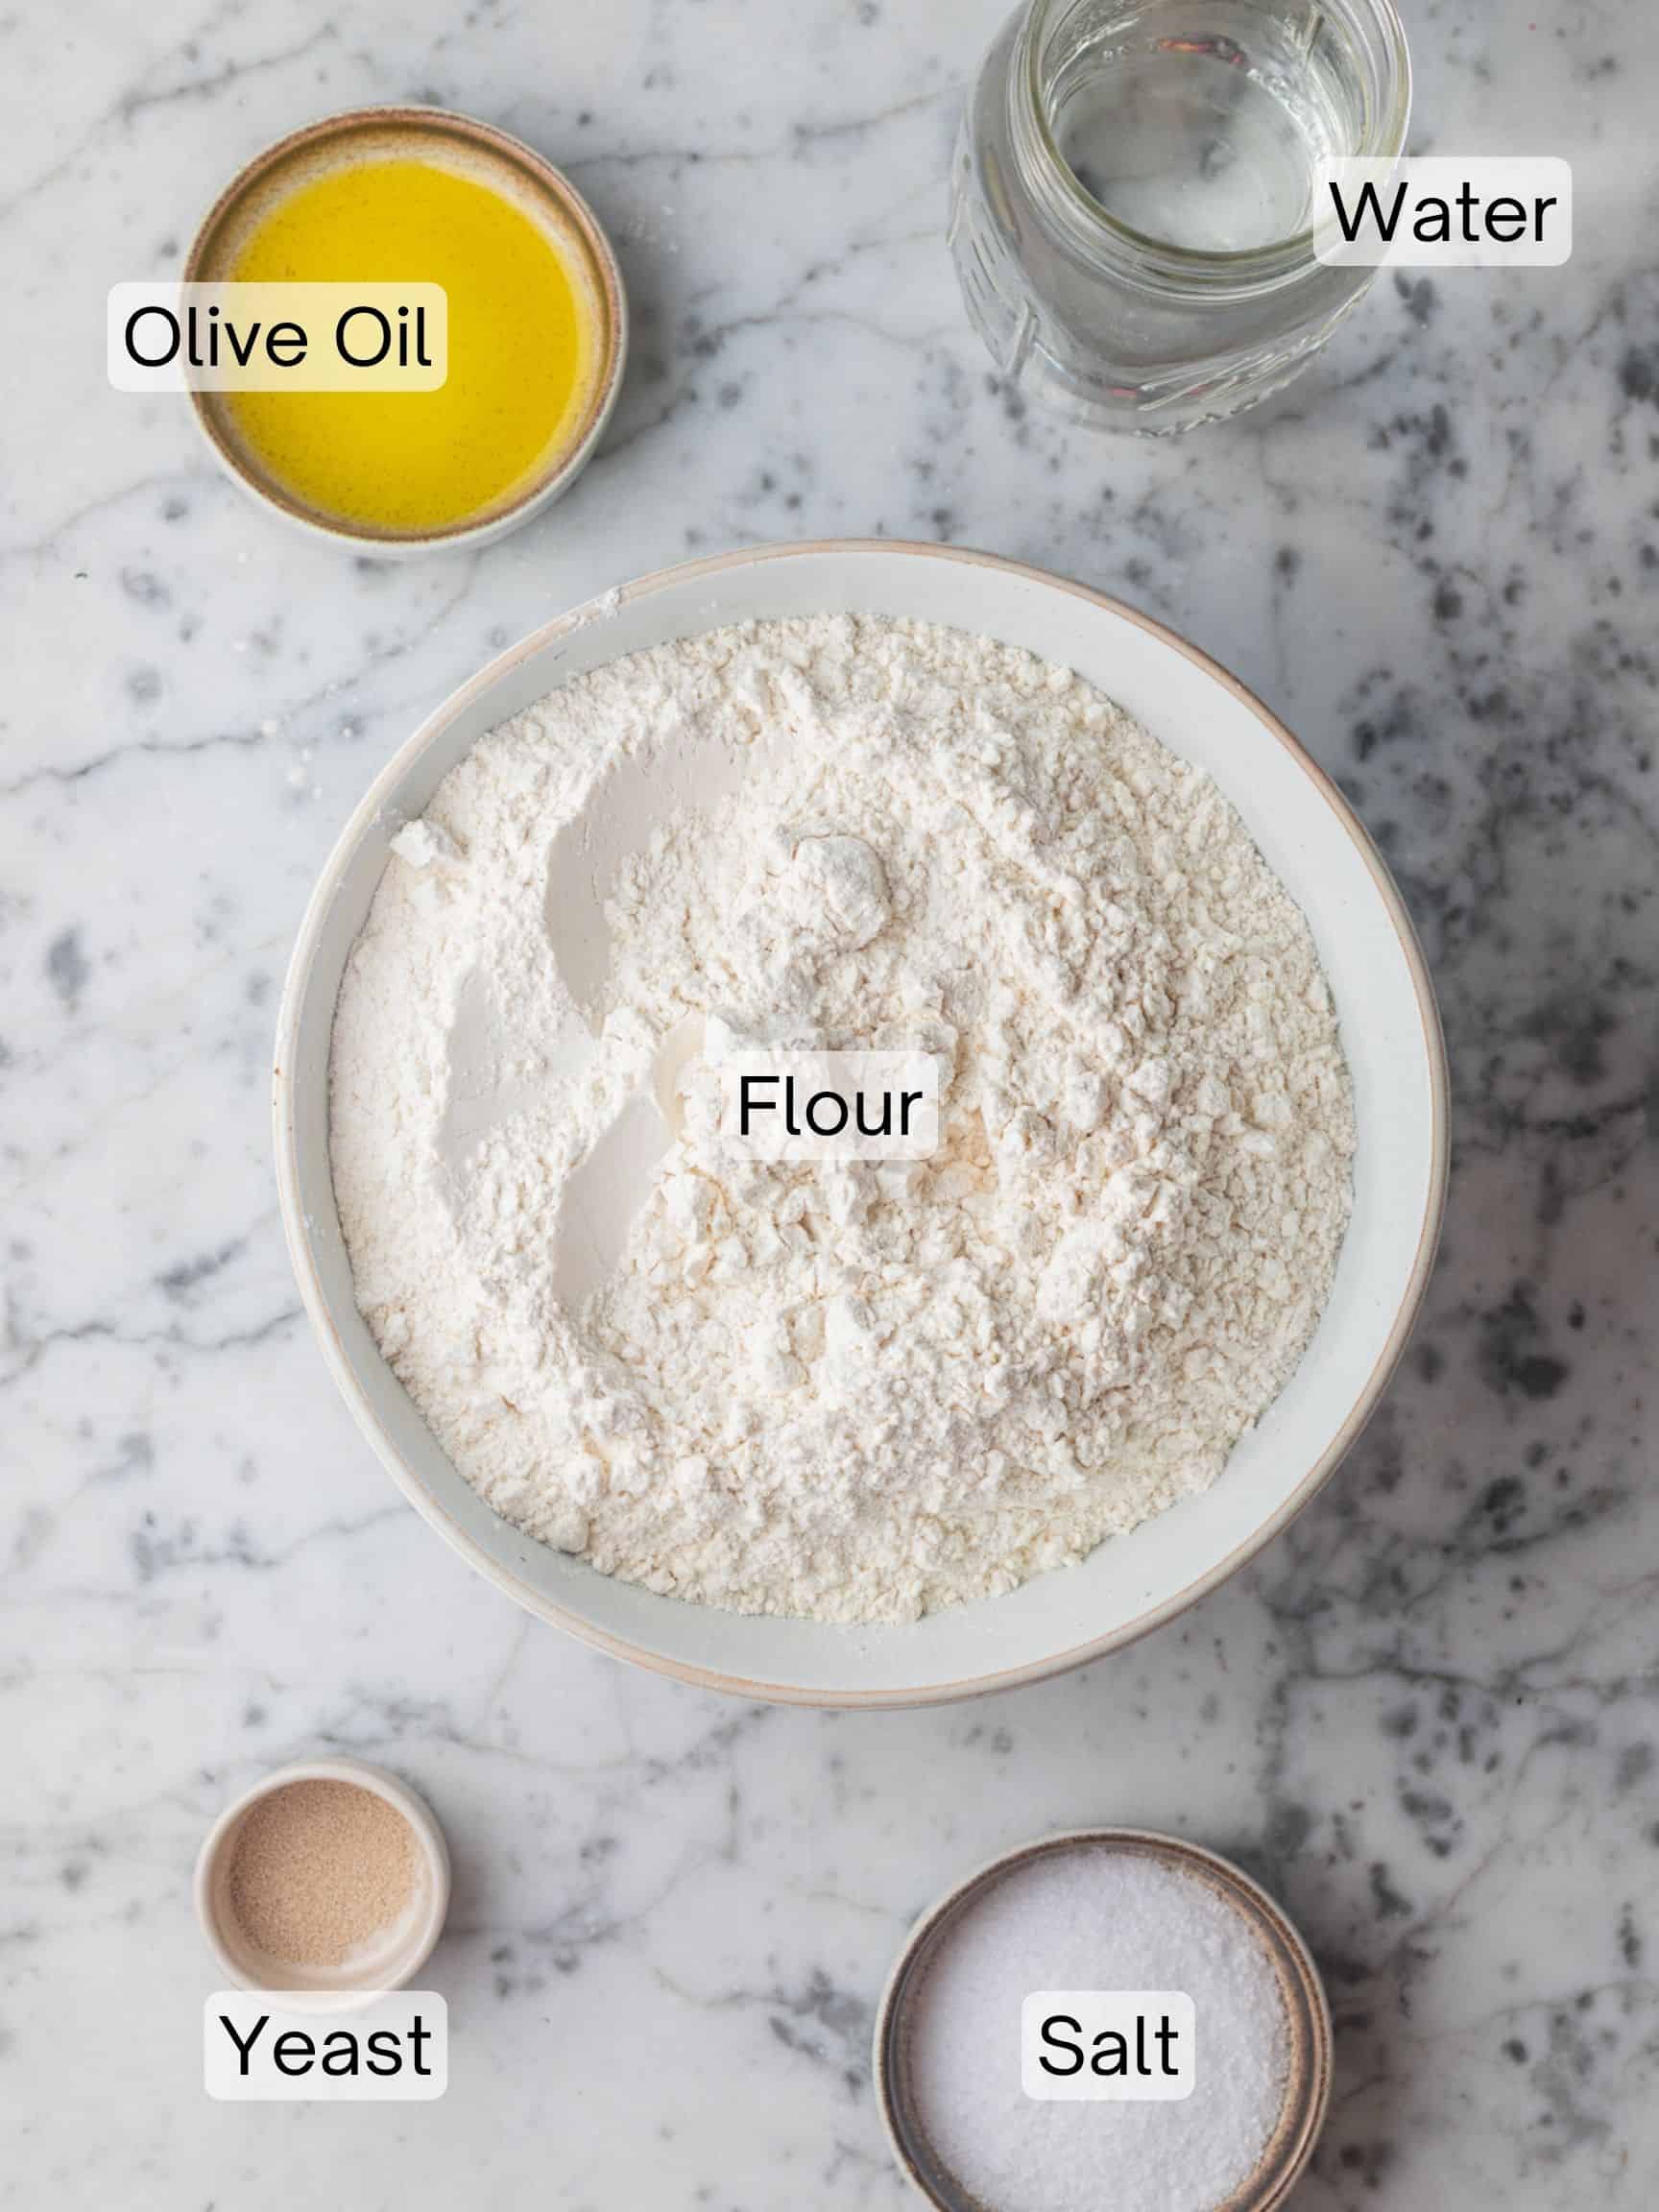
- 686 g 00 High-Protein Flour, like Antimo Caputo | 100%
- 20 g Diamond Crystal Kosher Salt, if using any other type of salt, use 20g by weight or see notes for volume conversions* | 2.9%
- ¼ teaspoon Instant yeast, 0.12%
- 425 g Lukewarm water, make sure to use lukewarm but not hot water as it will kill the yeast | 62%
- 8 g Extra-virgin olive oil, optional for outdoor pizza ovens** | 1.2%
- Semolina or 00 Flour, for dusting
Instructions
Prepare the Dough:
- Mix the dry ingredients: In a large mixing bowl, combine 686 g 00 High-Protein Flour, 20 g Diamond Crystal Kosher Salt, and ¼ teaspoon Instant yeast with a wooden spoon.
- Add the wet ingredients: Form a shallow well with your fist in the center of the bowl. Slowly pour in 425 g Lukewarm water and 8 g Extra-virgin olive oil (if using). Mix the dry ingredients into the wet ingredients with your hands or the spoon until just combined. Continue kneading until the dough is lumpy and shaggy, but no dry bits remain, about 1 – 2 minutes.
- Autolyse: Cover the bowl with a kitchen towel or plastic wrap. Rest for 30 minutes at room temperature.
- Stretch and fold: Perform three sets of stretch and folds, each separated by a 30-minute rest period. Perform each stretch and fold by gently pulling one side of the dough up and over to the opposite side. Rotate the bowl 90 degrees and repeat until you’ve folded all sides. For more details, please check out the How To section of my post.Stretch and Fold #1: Perform the first stretch and fold, then rest, covered, for 30 minutes.Stretch and Fold #2: Perform 30 minutes after stretch and fold #1, then rest, covered, for 30 minutes.Stretch and Fold #3: Perform 30 minutes after stretch and fold #2, then rest, covered, for 30 minutes. Note: After the final rest, the dough should feel quite strong (it will resist stretching slightly) and show visible gas bubbling. If you’re not seeing this gas bubbling, let sit out for another hour or so until you observe this.
- Chill: Cover dough with plastic wrap (or transfer to an airtight container) and chill in the fridge for a minimum of 24 hours (up to 72 hours).
- Divide and Proof: On the day you plan to make the pizza, remove the dough from the fridge.Divide dough into 5 equal sections. Form each piece of dough into a ball, then place in a large container generously dusted with flour or oil. Alternatively, you can place each ball into an individual container (sometimes I use deli containers or a plate).Cover and proof for at least 3 – 5 hours until the dough has reached room temperature, expanded in size, and appears bubbly and soft.
Prep the Oven (Standard Home Oven Method):
- 45 minutes before pizza dough is at room temperature, arrange oven racks to prepare for baking and preheat your oven to the highest temperature. For me, this temperature is 600℉ / 315℃.There are two main methods of cooking your pizza in the oven. I recommend trying both and seeing which method produces the best pizza for you (see 'Launch and Bake' section for full details on each method):1 – Top rack method: For this method, place your baking tool of choice (steel or stone) on the top rack of the oven, about 5 – 6 inches from the broiler. 2 – Switching racks method: Place your baking tool of choice over a rack set on the bottom-third of the oven. Place the top rack 5 – 6 inches from the broiler.
Prep the Oven (Portable Outdoor Oven Method):
- For a portable outdoor pizza oven (Ooni or Roccbox), preheat the oven at least 30 minutes prior to baking the pizzas. I typically preheat my oven to 900℉ / 482℃.
Stretching and Topping:
- Transfer: Once dough has come to room temperature, you’re ready to make the pizza.Flour your pizza peel with semolina flour or 00 flour. Carefully and gently pick up the dough from the container and transfer to the peel. Dust the dough with flour as needed to prevent sticking. Note: You can check that it’s not sticking by sliding the dough around the peel. If it is sticking, add a bit more flour to the bottom. I like to do this every minute or so to ensure my dough is not sticking, especially once I start adding the sauce and toppings.
- Stretch: Form a rim for the crust by gently pressing your index finger all around the perimeter of the dough, about ⅔” from the edge. Stretch the dough as desired. Pizza should stretch to at least a 10-inch diameter.
- Top: Ladle or spoon the sauce on top of the dough. You will likely need less sauce than you think (and too much sauce can weigh down the pizza), about 3 – 4 tablespoons of tomato sauce max. Top the pizza with desired toppings.
- Check Sticking: Make sure the pizza is not sticking to the peel before launching. If it is, add a bit more flour, then hold the handle of the peel and slide the dough around to ensure it’s not sticking at all.
Launch and Bake
- Standard Home Oven:Launching Tip: Launch the pizza in the oven by holding the peel parallel to your baking sheet/stone/steel and gently sliding the pizza onto it. There’s no need to rush it; you can do this slowly to get the hang of it. Immediately close the oven and bake according to your desired method.1 – Top rack method: Once ready to form the pizza, turn the oven to the broiler setting on high. Launch and broil for 2 minutes, then turn off the broiler but keep the oven on at the hottest temperature until the pizza is finished cooking (about 1 – 2 additional minutes). 2 – Switching racks method: When ready to launch the pizza, bake for 3 – 4 minutes on the bottom rack until the bottom is nicely browned. Then, turn the broiler setting on high and transfer the pizza to the top rack to finish cooking for 1 – 2 minutes.Repeat the process with the next pizzas.
- Portable Pizza Oven:For my Ooni Koda 16, I typically launch the pizza at the highest temperature setting, then lower the knob to about ½ of the max heat right after launching for the rest of the baking. I cook the pizza for 30 seconds, then rotate every 15 seconds until cooked through (about 2 minutes). If I find I want a crispier bottom crust, I will turn the heat down fully to low and cook for an additional 30 seconds or so. I'll then crank the oven temperature back to the max in preparation for the next pizza. Repeat the process with the next pizzas.
Video
Notes
- I developed this recipe using metric measurements, so for best results, please use a scale.
- These make 5 personal-sized pizzas. For larger pizzas, feel free to scale the recipe up.
- If using Antimo Caputo flour, make sure you buy the right kind for the oven you’re using. For standard home ovens: Buy the “Chef’s Flour” (usually in a red bag). For high-temperature pizza ovens (900°F or 482°C): Buy the “Pizzeria Flour” (usually in a blue bag).
- Even Baking: In a standard home oven, you may notice your pizza doesn’t cook perfectly evenly, especially with the broiler. Feel free to rotate the pizza 180 degrees halfway through the cooking process to ensure even charring.
Nutrition
The nutritional information on this website is only an estimate and is provided for convenience and as a courtesy only. The accuracy of the nutritional information for any recipe on this site is not guaranteed.
Example Timeline
See below for an example timeline of how you can make this pizza dough and bake it during the weekend.
- Friday, 9:00am – 9:15am: Mix dough ingredients
- Friday, 9:15am – 9:45am: Let rest in autolyse
- Friday, 9:45am – 10:15am: Perform the first stretch and fold and rest 30 minutes
- Friday, 10:15am – 10:45am: Perform second stretch and fold and rest 30 minutes
- Friday, 10:45am – 11:15am: Perform last stretch and fold and rest 30 minutes
- Friday, 11:15am: Cover and place dough in fridge for 24 – 72 hours
- Sunday, 7:40am: Remove dough from fridge and form into dough balls. Let sit for 5 – 6 hours until they reach room temp
- Sunday, 12:00pm: Preheat oven
- Sunday, 12:45pm: Stretch, top, and bake pizzas
References
- Slow Rise Pizza
- The Perfect Loaf – Sourdough Pizza
- Baking Steel – 72 Hour Pizza Dough
- NYTimes – Roberta’s Pizza Dough & Video
- Cooks Illustrated – The Ultimate Pizza Set-Up
- Stadler Made – Pizza Calculator
- King Arthur – Using the Autolyse Method
- Bakerpedia – Water Absorption
- Pizza Making Forums – King Arthur Flour Absorption Rates
- Spruce Eats – The Science of Kneading Dough
- Serious Eats – All About Dry Yeast
- King Arthur Baking – Active Dry Yeast
- The Pizza Heaven – Salt in Neapolitan Pizza Dough


I am wondering what I did wrong. My dough doesn’t appear to be as smooth as the video after the third stretch and fold. What step did I miss?
Hi Jacqueline – did your dough look similar to mine when you first mixed it? Before the stretch and folds? If so, it could be temperature! If you’re in a colder room, it might take a bit longer to smooth out and hydrate. If you’re worried, you can leave the dough out at room temperature for an additional hour or so before doing one last stretch and fold.
Hey Karishma,
Thanks for this breakdown! This has been a super helpful recipe in figuring out how the dough should behave at each step of the process.
One question I’d like to ask is if the dough should rise during the cold ferment after the stretch and folds. In recipes where I knead the dough and bulk ferment for 72 hours, I usually see the dough double in size. After the stretch and folds, however, I’m noticing that the dough doesn’t seem to be growing much.
Hi Harry, good question! The dough will definitely rise a bit in the fridge but I wouldn’t be concerned if you’re not seeing doubling. You’ll really only see the full effects of the fermentation at the last step, when you let them rise on the countertop before stretching. As long as you’re seeing a bit of gas bubbling after the stretch and folds, you should be good to go.
Can you parbake the dough? I won’t have time to do the last steps for a pizza party. Thanks for any tips you can provide.
Hi Virginia,
It’s a good question; unfortunately, I haven’t tried this myself so I can’t recommend it but I totally understand wanting to have things ready for the party.
If I were to parbake, I’d probably try parbaking the dough with some sauce on it. If you parbake pizza dough without anything on top to weigh the dough down, it’ll puff up in a strange way. Then, put the rest of the toppings and finish baking when ready.
My other concern would be whether the crust dries out if you parbake and then bake again with the toppings. So given those concerns, I’d only recommend doing this if you have time to test it out in advance to see if it works. I wouldn’t want you to have a poor outcome for the party! But if you try it out, please let me know and sorry this isn’t the most helpful answer.
I would like to experiment with rice flour in lieu of wheat flour. Have you ever done it? Even if you haven’t would you think about it and give me/us some advice! Thanks!
Hi Gail,
Unfortunately, I wouldn’t recommend rice flour instead of the flour I recommend, as it doesn’t have any gluten and so it won’t yield the right structure for a chewy, crispy crust. If you are looking for a gluten free pizza crust, I would recommend this recipe: https://theloopywhisk.com/2024/06/21/easy-gluten-free-pizza-dough/.
Can I freeze the dough after 48 or 72 hours and then let it proof when I am ready to take it out of the freezer?
Hi! Yes – so I’d recommend a bulk rise in the fridge for 48 – 72 hours, then remove it from the fridge, ball the dough, and then freeze. The day before you want to use the dough, let it thaw in the fridge overnight, and then proof at room temperature (according to the instructions) before stretching and baking.
Can you do a combination of bread flour and 00 flour?
Yes! I do it frequently.