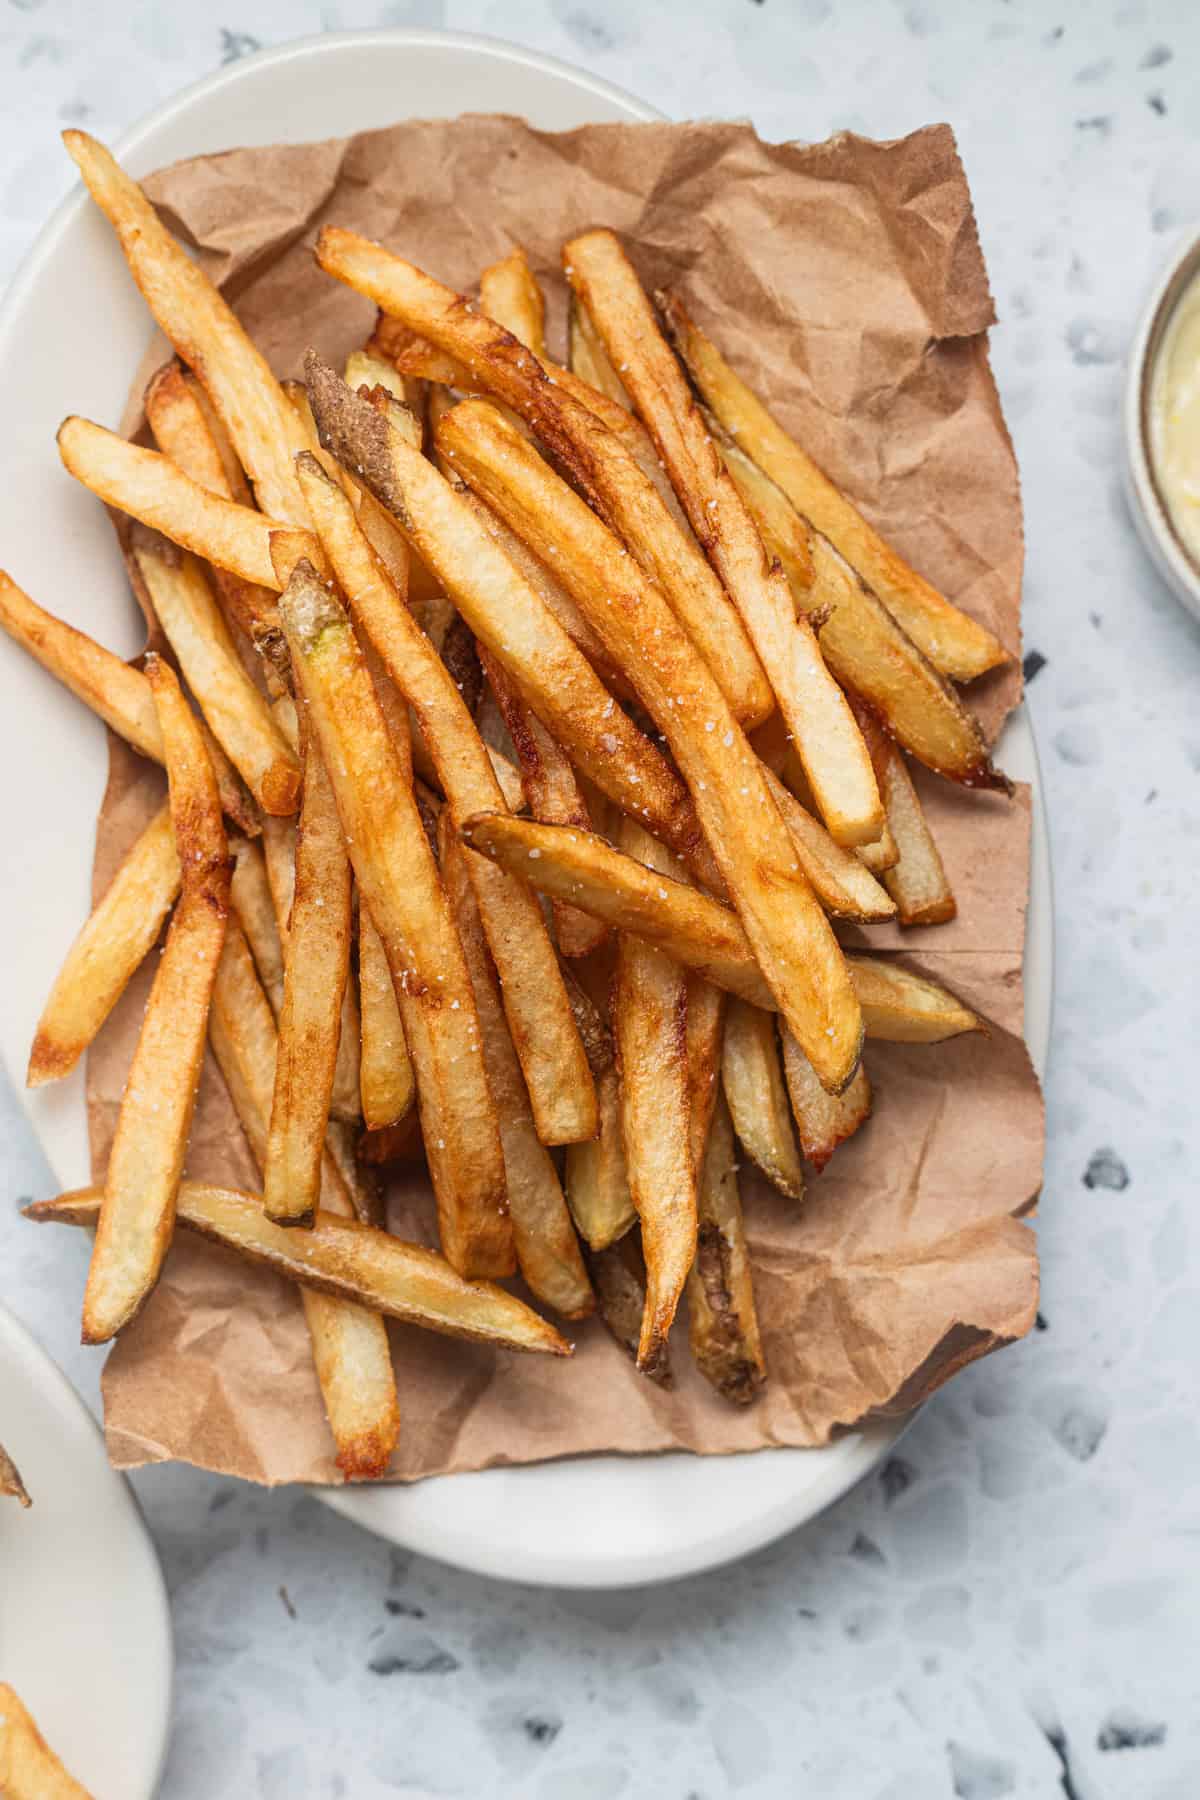
These crispy homemade french fries use a vinegar soak and double-fry method for a fluffy interior and golden, crackly exterior, served with lemon-garlic and chili crisp aiolis!
I have been testing a bistro-style french fry for years (I even developed one for Simply Recipes a while back), and I’m so excited to share my last version with you. I recognize that homemade fries are not going to be the fastest or easiest recipe. I know, I know, we’re frying! There’s a lot of oil! It can be kind of intimidating.
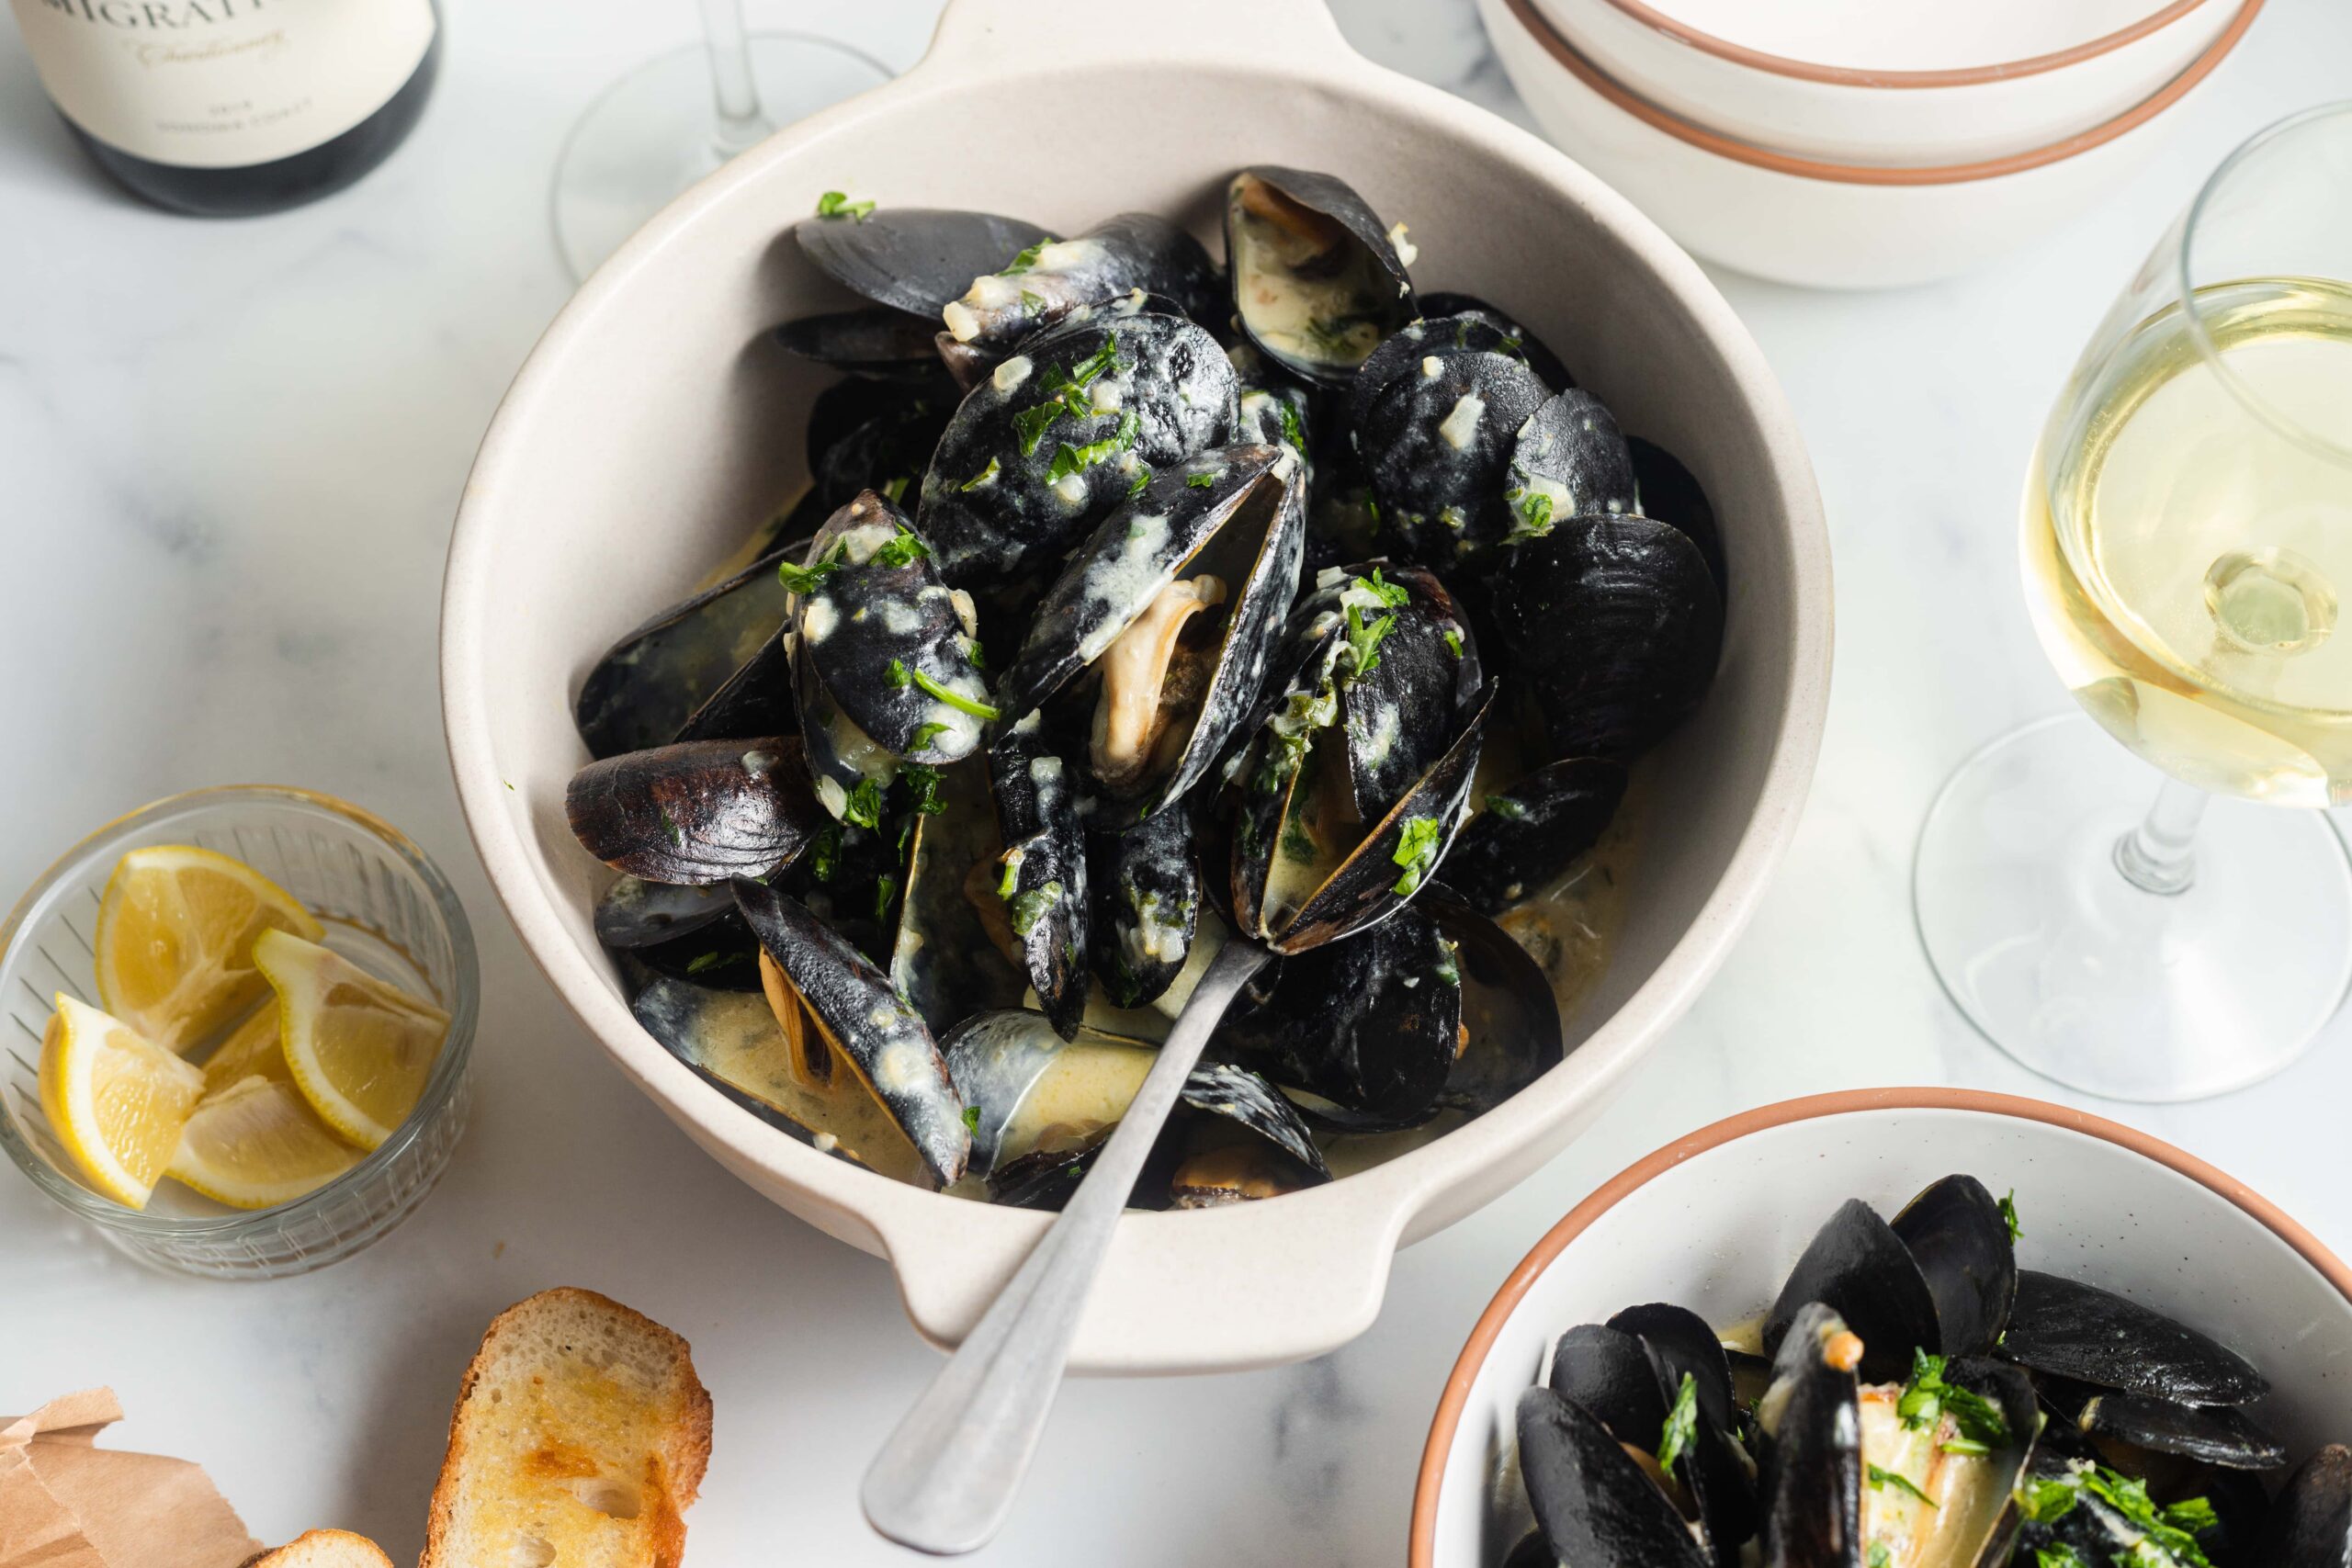
But don’t worry! My method is well-tested, using science-based techniques to deliver restaurant-quality fries without the fuss. You can’t go wrong serving these with my impossible smash burgers or mussels in cream sauce (a la moules frites) and a good green salad.
👩🏽🍳 How to Make Great Homemade Fries
& why this recipe works
- Soak the potatoes in a salt-and-vinegar brine to remove excess starch, preventing the fries from clumping or browning unevenly. No parboiling necessary, meaning less work and less mess!
- Dry the fries thoroughly & completely before frying to prevent a soggy texture.
- A double fry is key! The first fry cooks the potato, and the second fry creates that crisp outer coating.
- Draining the fries on paper towels set over a wire rack soaks up excess oil, retaining that crisp exterior.
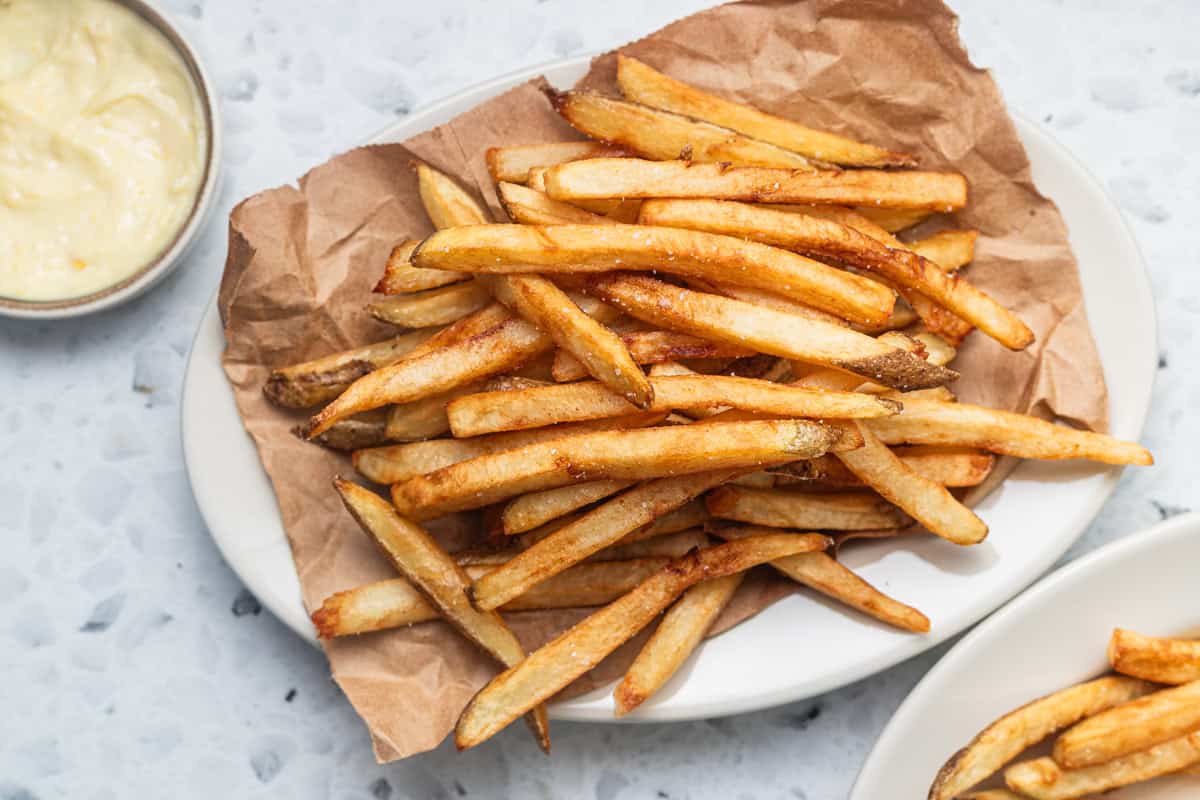
- Pair with a good sauce: I share two easy sauce recipes that pack a punch: lemony garlic aioli and a spicy chili crisp aioli. I also have a smash burger sauce, Taco Bell-style chipotle sauce, or parmesan garlic sauce (cheese fries, anyone?).
For all of my testing details, read on for my testing summary.
Testing Summary
There are a few well-known methods for preparing fries. I’ll walk through each one and share I got to my final method.
#1 – Cold-Oil Cook
America’s Test Kitchen and Epicurious both highlight a cold oil method.
What is it? Simply add your cut potatoes to a pot, fill with oil, and fry over high heat. As the temperature of the oil increases, the fat gently cooks the potatoes until tender before crisping the exterior.
Pros: Quick and easy.
Cons: Unfortunately, when I tried this method, it did not yield as crispy a fry as the double fry method.
#2 – Soak, then Double Fry
What is it? Potatoes soak in a cold water-vinegar-brine followed by a first fry at a low temperature (300°F), then a second fry at a higher temperature (375°F).
Pros: Deliciously crispy fries, especially after freezing. The soaking is hands-off, unlike a par boil. As a result, this is my winning method!
Cons: Needs a few hours of your time (some inactive, some active).
#3 – Par-Boil, then Double Fry
What is it? Par-boil the potatoes in a bit of vinegar until tender, then double fry.
Pros: Crispy fries!
Cons: Needs a few hours of your time, more cumbersome than a simple soak, and the potatoes can sometimes fall apart.
Ingredient Notes

- Russet Potatoes: Russets are floury potatoes with lower moisture content than, say, a waxy potato like a Yukon Gold, leading to a superior result.
- Oil: You can use any neutral, high-heat frying oil you like. Peanut oil has a slightly milder flavor, but canola oil is a great option, too.
- Vinegar: A spoonful of vinegar in the soaking liquid keeps the fries firm.
For a full list of ingredients and their quantities, please refer to the recipe card.
Step-by-Step Photos
Slice and Soak:
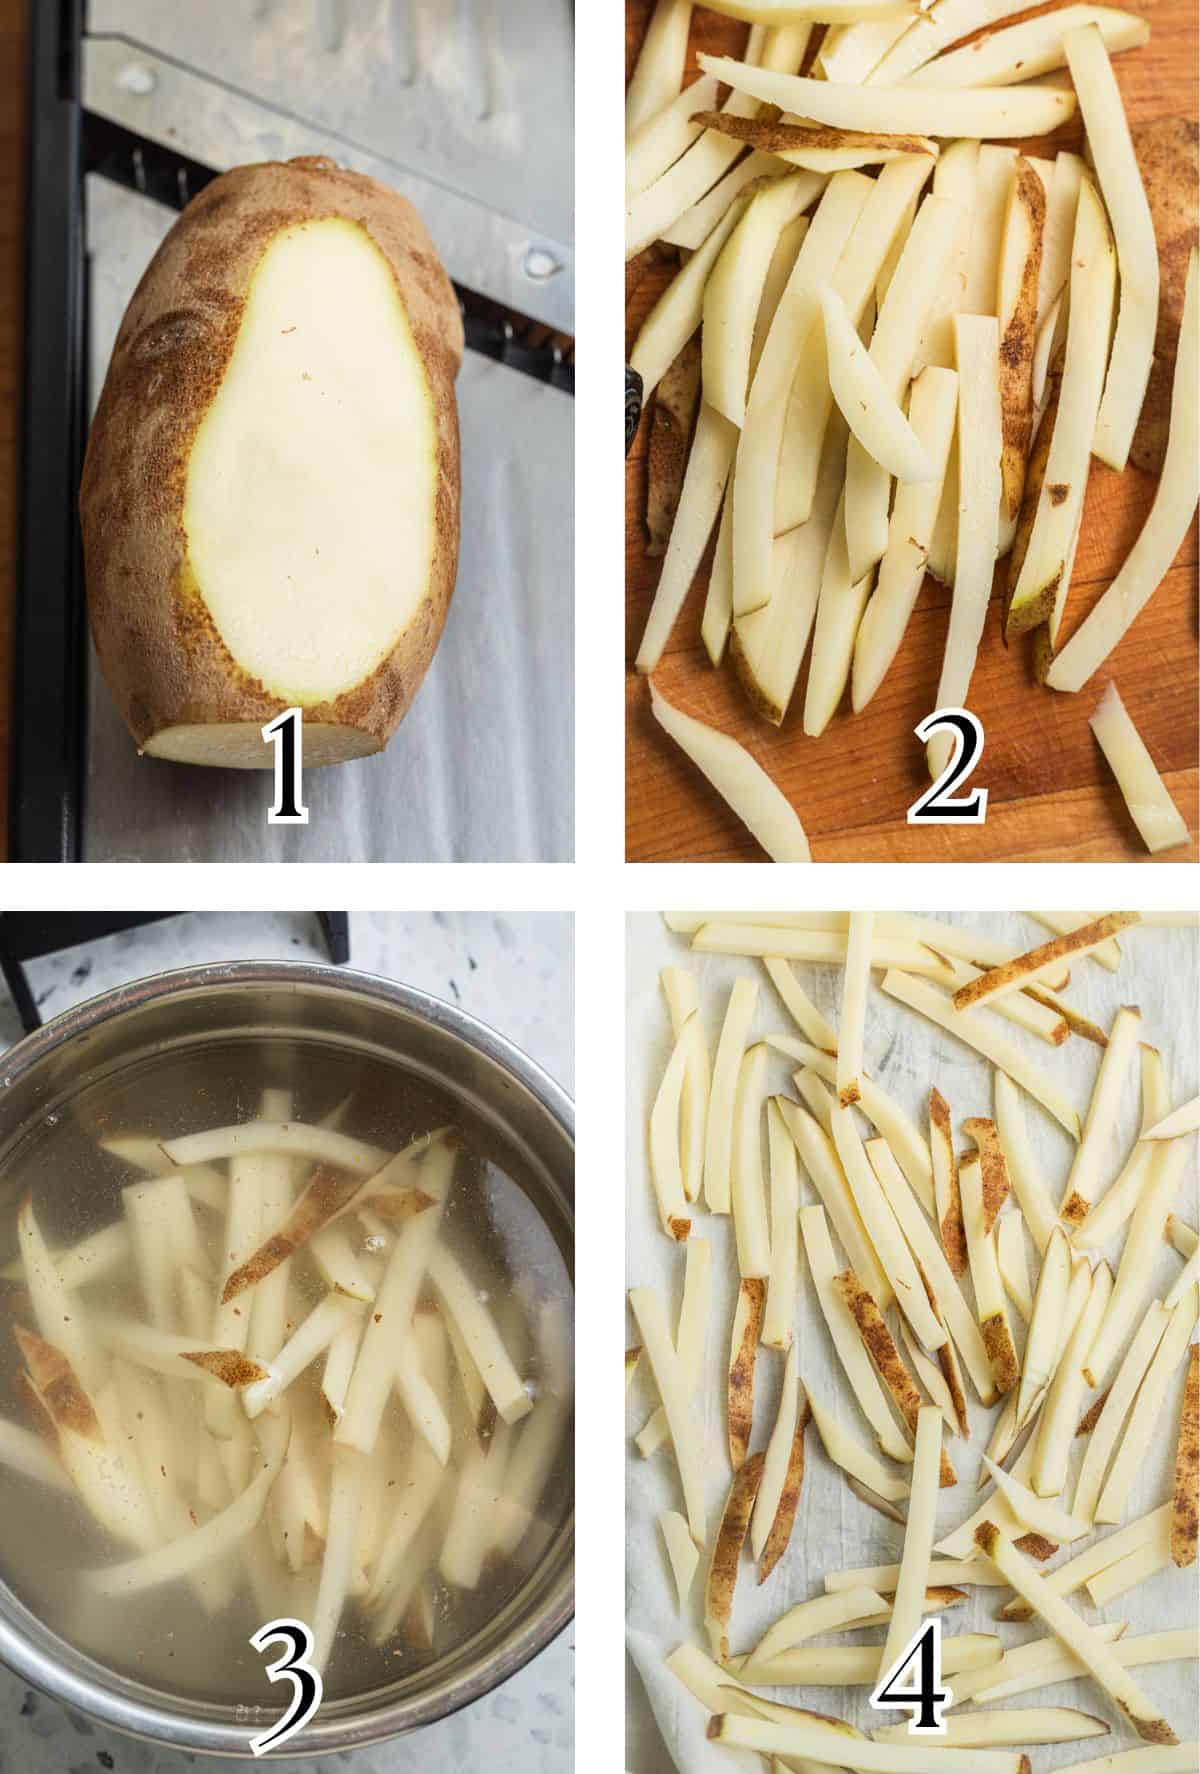
Step 1: Cut the fries into ¼-inch to ⅜-inch-thick slices (I prefer ¼-inch, but you can do a wider cut if you like!) using a mandoline or a very sharp knife (Images 1 & 2).
TIP: If using a mandoline, use a hand guard and cut-resistant gloves! Mandolines are very sharp, it’s not worth a trip to the ER!
Step 2: To a large bowl of water, add vinegar, salt, and cut potatoes. Soak for a couple hours at room temperature or up to overnight in the fridge (Image 3).
Step 3: Thoroughly dry the fries on some clean kitchen towels (or paper towels) for at least 30 minutes to an hour. This step is extremely important; the drier the fries, the better the result! (Image 4)
Double Fry:
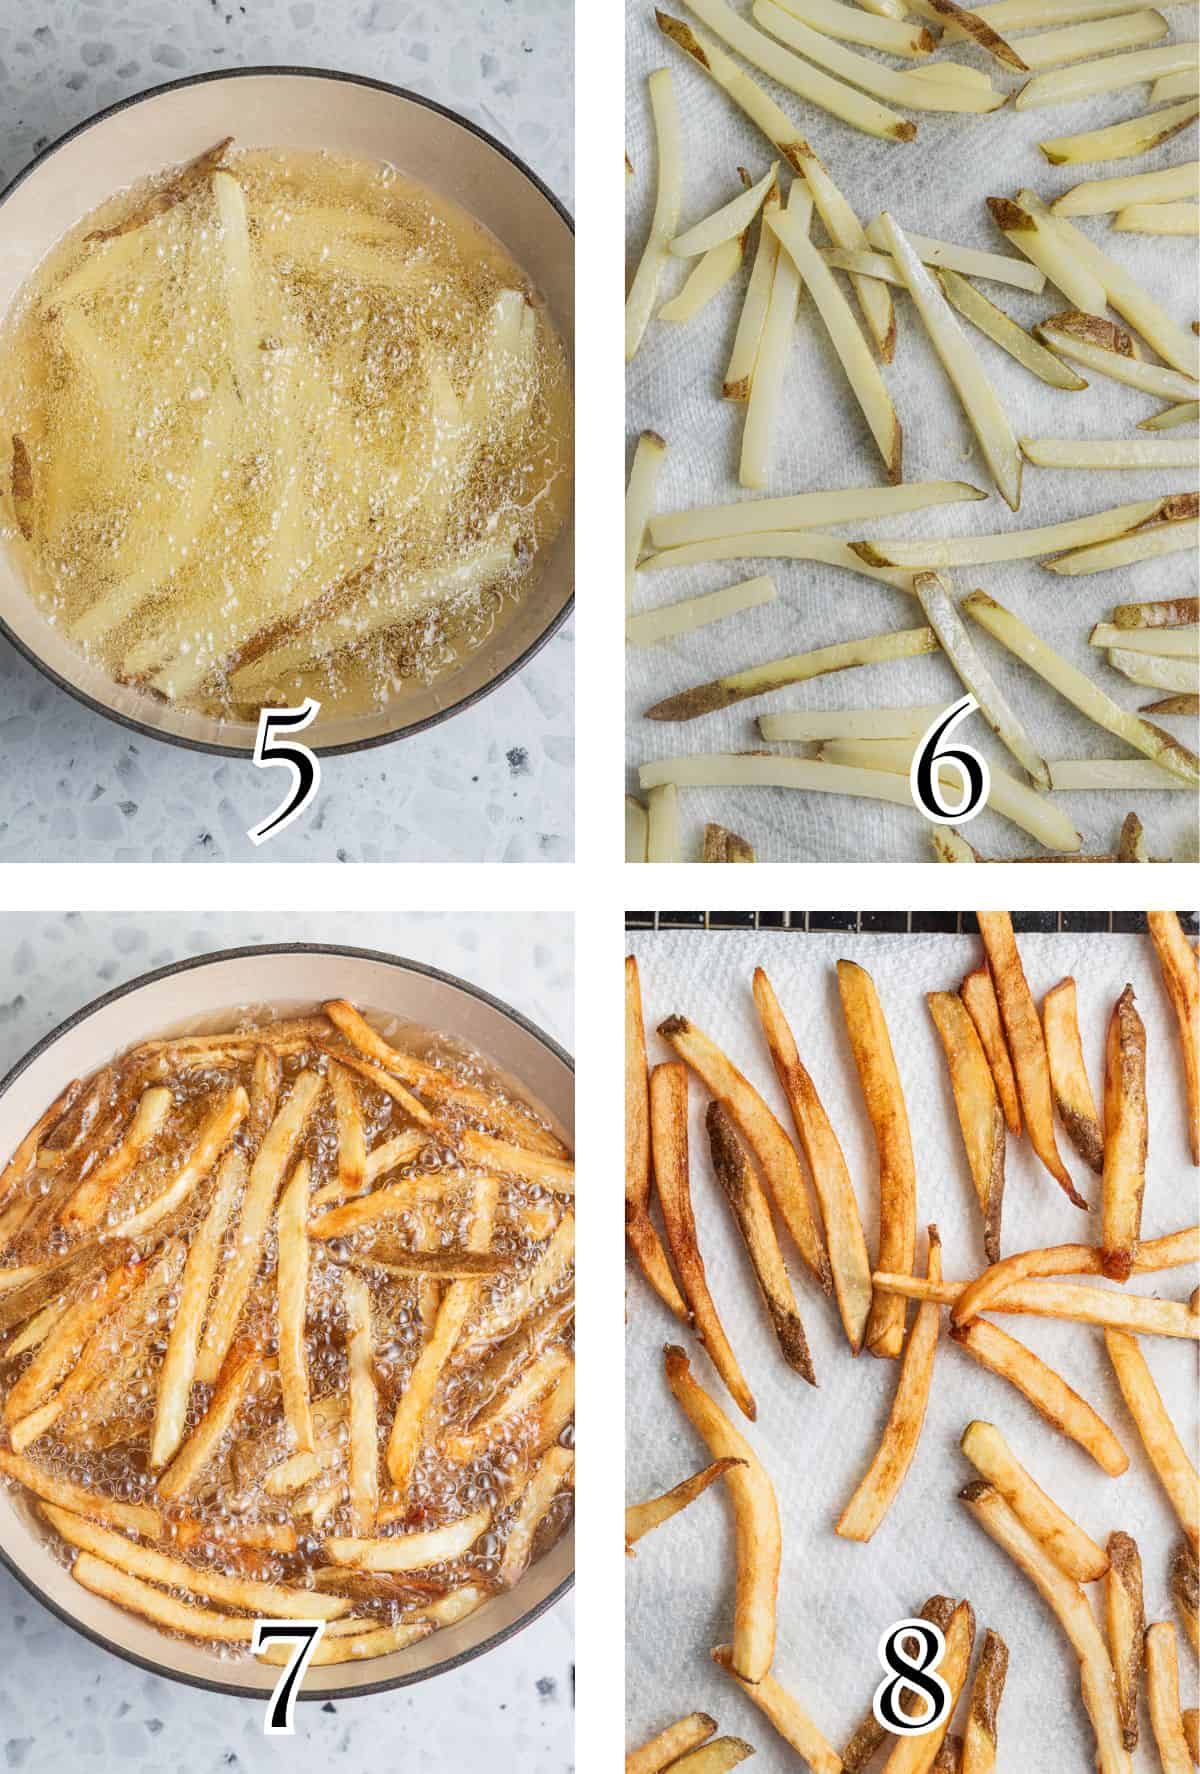
Step 4 – Heat a quart of oil to 300°F, then cook potatoes for a few minutes until tender (Image 5). Dry thoroughly, once more (Image 6).
Step 5 – Increase the oil temperature to 375°F, then fry again (in batches) until crispy and lightly browned (Image 7). Drain the fries on paper towels set over a wire rack and immediately season with salt. Serve hot!
Expert Tip
For extra-crispy fries, freeze the potatoes after the first fry. Dry thoroughly. Freeze in a single layer on a parchment-lined baking sheet until completely frozen, about 1 hour, then transfer to a Ziploc bag. Use within 2 weeks, and do not thaw before frying.
Recipe FAQs
No, but it does result in a more consistent cut, which is better for frying. If using a sharp knife, slice a thin piece off one side of the potato to create a flat base, then set it cut-side down to safely cut the fries.
I prefer unpeeled, but either will work! If leaving the skins on, trim off the side of the potato that will run against the mandoline blade to create a smoother slice.
The fries will still be good without vinegar, but it does keep them slightly firmer during the cooking process and reduces browning.
Double frying prevents the potatoes from browning too quickly on the outside and staying raw on the inside. Cooking first at a lower oil temp ensures the potatoes are tender and forms a layer of gelatinized starch — a barrier that prevents more oil from going in. Then, the second fry develops that classic golden exterior.
Absolutely! After frying, strain any food bits through a sieve, then pour the filtered oil into an airtight container and store in the fridge for 1 – 2 months. You can re-use the oil 2 – 3 times before discarding.
Did you try this recipe?
I would love to hear your feedback! Be sure to rate the recipe and leave a comment below.

Crispy Homemade French Fries
Equipment
Ingredients
- 2 medium Russet potatoes, about 1 to 1 ½ pounds, scrubbed
- 1 tablespoon distilled vinegar
- 1 tablespoon Diamond-Crystal Kosher Salt, plus more for seasoning (use ½ tablespoon if using another brand)
- 1 quart neutral oil, such as canola oil or peanut oil (or enough to fill the pot at least 1 ½ inches deep)
For Serving:
- Lemon Garlic Aioli, optional, recipe follows
- Chili Crisp Aioli, optional, recipe follows
Lemon Garlic Aioli (optional):
- ¼ cup mayonnaise
- 1 small clove garlic, finely grated
- 1 teaspoon lemon zest
- Salt, to taste
Chili Crisp Aioli (optional):
- ¼ cup mayonnaise
- 1 teaspoon chili crisp, such as Fly by Jing's Sichuan Chili Crisp
Instructions
- Cut the potatoes: If desired, peel 2 medium Russet potatoes. Trim a thin slice off one long side of the potato to create a flat surface. Cut the potatoes into fries with a mandoline or a very sharp knife.For a mandoline: Set the mandoline to the julienne setting, anywhere between ¼-inch and ⅜-inch thick (I prefer ¼-inch). If unpeeled, trim the edge that contacts the mandoline for smoother slicing. Using cut-resistant gloves and a hand-guard, cut the potatoes into julienned sticks. With a sharp knife: Slice the potato lengthwise into ¼-inch planks, then cut the planks into ¼-inch sticks.Transfer potatoes to a strainer. Rinse under cold water a few times to remove some of the excess starch.
- Soak: Transfer the potatoes to a large bowl and fill with 6 cups of very cold water, along with 1 tablespoon distilled vinegar and 1 tablespoon Diamond-Crystal Kosher Salt. Soak the potatoes at room temperature for 2 hours (or transfer to the fridge and chill in a sealed container up to overnight).
- Dry: Line a large baking sheet with a clean, lint-free kitchen towel. Drain the potatoes, then transfer to the towel to dry. Place another kitchen towel on top to blot off any excess moisture. Allow the potatoes to air dry for 30 minutes to 2 hours.
- First Fry: Set a Dutch oven or heavy-bottomed pot over medium heat with 1 quart neutral oil and bring the oil temperature to 300℉ (149℃). Meanwhile, set a wire cooling rack over a large baking sheet, and line with paper towels.Working in batches to avoid overcrowding, carefully lower the potatoes into the oil and cook until tender (a fork should pierce the potatoes easily), about 3–5 minutes. Transfer to the prepared rack in an even layer. Return the oil to 300°F between batches.Allow the potatoes to dry out for an additional 30 minutes to 2 hours at room temperature. Do not discard the oil.
- Second Fry: Over medium heat, bring the oil temperature up to 375℉ (191℃). Line one of the large baking sheets with paper towels set over a wire cooling rack, once again. To a small bowl, add 2 teaspoons Diamond-Crystal Kosher Salt or 1 teaspoon Morton Kosher Salt, sea salt, or table salt. Working in batches, fry the potatoes until golden brown and crisp, about 2 – 5 minutes. Remove with a slotted spoon, draining any excess oil back into the pot, and transfer to the prepared rack. Immediately season with a generous amount of salt.
- Finish and Serve: Serve hot with Lemon Garlic Aioli or Chili Crisp Aioli, if desired.
For the Lemon Garlic Aioli:
- In a small bowl, combine ¼ cup mayonnaise, 1 small clove garlic, 1 teaspoon lemon zest. Season with salt to taste. Store in the fridge in an airtight container for 3 – 4 days.
For the Chili Crisp Aioli:
- In a small bowl, combine ¼ cup mayonnaise and 1 teaspoon chili crisp. Store in the fridge in an airtight container for 3 – 4 days.
Notes
Nutrition
The nutritional information on this website is only an estimate and is provided for convenience and as a courtesy only. The accuracy of the nutritional information for any recipe on this site is not guaranteed.