
This KitchenAid pasta recipe is the *best* step-by-step guide to making fresh egg pasta with your KitchenAid pasta attachment. We’ll cover everything from flour selection to kneading to feeding through the machine. Once you learn this method, I’m confident you’ll develop a deep appreciation for the soothing experience of crafting your own pasta!

I have a soft spot for freshly made pasta, especially classic egg pasta, which is delicate and velvety with a slight chew. It’s perfect for a creamy mushroom pappardelle, a rich, slow-cooked lamb ragu, or a delicate egg yolk ravioli.
Homemade pasta uses common pantry staples, so you can enjoy a delicious bowl whenever a craving hits. Ready to give this a go? Before you begin, I highly recommend putting on your favorite music and pouring a glass of wine (or sparkling lemonade!). Now, let’s get to it!
👩🏽🍳 Cook’s Notes
See why reader Amy gave this 5 stars: “I used this recipe and cooked half of the pasta fresh and froze the second half to cook a few days later. Both turned out great!”
- Well-tested and developed: With over 15 years of pasta-making experience, including a workshop in Italy and recipe testing for the cookbook “Pasta Every Day,” I’ve honed the art of crafting delicious homemade pasta.
- Mistake-free results: Save yourself the trouble of trial and error. I’ve made all the mistakes, researched extensively, and consulted multiple Italian cookbooks to provide a seamless, foolproof recipe.
- Comprehensive guidance: My recipe offers valuable tips, tricks, and best practices to ensure your success.
Perfecting the Recipe
Fresh pasta should be silky, soft, and slightly elastic. In this recipe, we’re focusing on egg dough from Central and Northern Italy, which serves as the base for many shapes like fettuccine, pappardelle, farfalle, garganelli, and ravioli.
- I call for whole eggs because they’re easier to work with. Egg yolk doughs, while richer, are more difficult to knead.
- Although the classic ratio of 1 egg to 100g of flour is most traditional, a more precise guideline from Evan Funke recommends an egg dough with 57% hydration compared to the flour weight. This is, in turn, the ratio I used in developing the recipe.
- Ultimately, however, the key to perfect pasta lies in its feel; adjust moisture and flour as needed, and with practice, you’ll develop an instinct for the ideal consistency.
P.S. – Looking for an eggless dough? Try my semolina pasta dough recipe!
Ingredient Notes

Flour: My base recipe calls for 00 flour only, but you can add 10% to 25% semola rimacinata if you want more chew.
- 00 Flour – This is a softer wheat flour (though still relatively high protein!). The “00” annotation refers to the fineness of the flour when milled, ensuring the sheets will easily slide through the rollers. I prefer Antimo Caputo’s 00 flour.
- Semolina Flour – Semolina flour is made by milling durum flour, hard wheat flour with higher protein and a characteristic pale yellow color. Because of its coarse nature, it’s most often used for dusting to keep pasta from sticking to itself. Semola rimacinata, a finer grind, will work too.
Olive Oil: A touch of extra-virgin olive oil provides moisture for easier kneading and rolling.
For a full list of ingredients and quantities, refer to the recipe card.
How to Make Homemade Pasta
Make the Dough

Step 1. Make the well: Measure out your flour onto a cutting board or large wooden work surface. Make a strong well with your fist (or a glass) in the center of the flour, then widen it. You’re looking for a wide, almost crater-like well so the eggs do not spill over the top (Image 1).
Slowly add eggs, one at a time, into the well. Add olive oil and salt. Using a fork, poke the eggs and whisk them until homogenous.
TIP: If this is your first time making pasta, I recommend building your well in a large bowl to avoid a mess (in case the eggs break).
Step 2. Mix the flour into the eggs: Incorporate more and more of the surrounding flour into the well, being careful not to break it (Image 2).
Step 3. Mix until a thick paste forms: Begin incorporating more and more of the flour into the well, whisking with the fork until the liquid thickens into a paste. Once it becomes thick and pasty (Image 3), knead with your hands or a bench scraper (Image 4).
Knead

Step 4. Knead: Alternate between incorporating more of the remaining flour and kneading the dough (Image 5). Continue kneading the dough until it comes together into a shaggy mass.
TIP: If the dough feels quite dry (which can happen in the winter), wrap it in plastic wrap and allow it to rest for 15 minutes to hydrate.
Next, wash and dry your hands, and discard any unincorporated dry bits from the work surface with a bench scraper.
TIP: Evan Funke, a master pastaio, notes that once your pasta is in a solid ball, it takes much more effort to incorporate small scraggly bits into the dough. If there are a few bits leftover, just discard them and continue kneading.
Knead aggressively for 5 – 7 minutes, digging the heel of one hand into the dough and stretching it, then folding it over itself. Rotate 45 degrees and continue digging, stretching, and folding (Image 6). If the dough feels dry, you can lightly wet your hands or mist the dough directly to control the humidity.

Step 5. Rest: At this point, your dough should feel quite smooth and slightly tacky but not sticky, with no dry bits remaining (Image 7).
Wrap the dough tightly in plastic wrap. Let the dough rest for at least 20 minutes (up to 2 hours) at room temperature before rolling out. After 20 minutes, your dough should feel very smooth and soft (Image 8).
Step 6. Divide: Divide into 4 equal pieces. On a lightly floured surface, roll out one section of dough until it’s about ⅓-inch thick (leaving the rest sealed in plastic wrap).
Roll Out the Dough

Step 7. Shape: Attach your roller attachment to the KitchenAid mixer, and turn the dial to ‘1’ (the widest setting). Over low speed, feed the dough through the attachment.
After the initial feeding, the dough will form an oval shape (Image 9). To make a uniform rectangle, fold one end halfway up the dough, then fold the other end on top so you’ll have three even layers like an envelope (Image 10). Roll the dough out to ¼-inch thickness.
Step 8. Feed: Feed the dough through the next highest setting (‘2’) twice, then continue feeding through narrower settings until you’ve reached the thinness desired (Image 11). See the below section, ‘How to Cut Different Pasta Shapes’ to determine thinness.
Step 9. Cut: Coat sheets with a little flour, then cut into the desired shape by hand or with the machine (see below section on cutting tips).
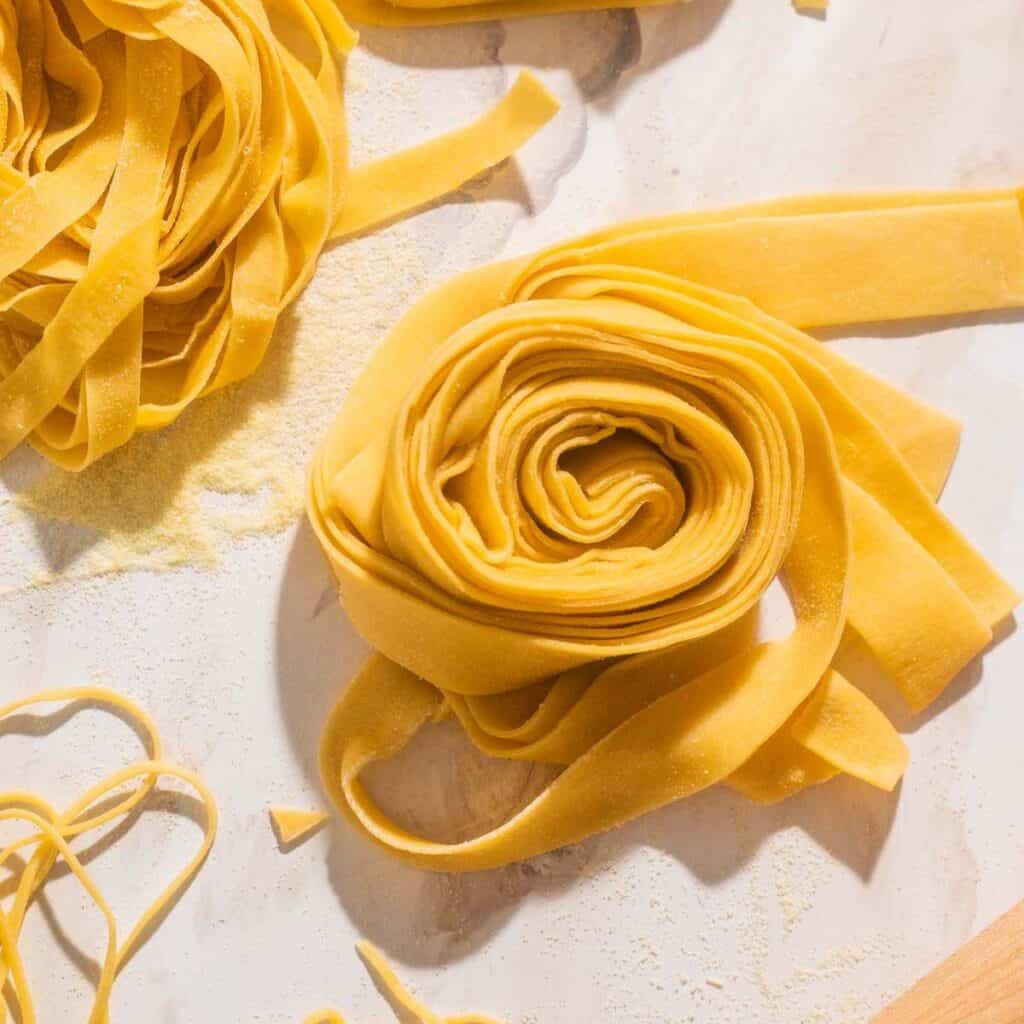
Step 10. Store: Dust the noodles with semolina flour to prevent sticking, then roll the strands into a nest and store on a semolina-dusted baking sheet covered with a kitchen towel (Image 12). Repeat rolling out and cutting the remaining dough.
Step 11. Cook: Bring a pot of salted water to a rolling boil, and cook pasta until al dente. Sauce and serve! Bon Appétit!
How to Cut Different Shapes
Regardless of your method, make sure to generously dust the sheets with semolina flour or 00 flour to prevent sticking.
Cutting with the Attachment
Spaghetti: Switch out the pasta sheet roller with the Spaghetti cutter, then run the sheet through the cutter.
Recommended Thickness: Setting 4 or 5.
Fettuccine: Run sheet through the Fettuccine cutter.
Recommended Thickness: Setting 5 or 6 (I prefer 6 for thinner, delicate strands).
TIP: If desired, you can cut the sheet in half crosswise for shorter noodles.
Cutting by Hand

Loosely fold the sheet of pasta over itself lengthwise in 2 ½-inch increments (Image 2), then use a sharp knife to cut widthwise (the short way) into desired lengths (Image 3).
Dust with more semolina flour, then unravel each piece (Image 4).
Tagliatelle: Cut pasta into ¼-inch pieces.
Recommended Thickness: Setting 5 (for chewier strands) or 6 (for more delicate strands).
Pappardelle: Cut pasta into ¾-inch to 1-inch pieces. For more details, check out my homemade pappardelle pasta recipe!
Recommended Thickness: Setting 5 or 6.
For more details, check out my guide which covers different pasta shapes.
Recipe FAQs
Yes. 00 flour has a finer consistency than all-purpose (AP), so the dough comes together more easily. However, the resulting texture should be similar if you use a higher protein AP flour, like King Arthur.
Cover with plastic wrap and let it hydrate for 15 minutes. If after 15 minutes, it’s still too dry, add 1 teaspoon of water at a time until it comes together.
Cover with plastic wrap and let it rest for 15 minutes. If it’s still too wet, you can add ½ teaspoon of flour add a time until it comes together.
Room Temperature: Store freshly cut pasta in a single layer on a semolina-dusted baking sheet for up to 2 hours. Cover with a damp kitchen towel to prevent drying.
Fridge: Or, keep in the fridge up to 24 hours in an airtight container. Line with semolina-dusted parchment paper to prevent sticking.
Freezer: For longer storage, freeze pasta on a parchment-lined sheet for 1 hour. Transfer to an airtight container or ziploc bag and freeze up to 1 month. Cook directly from frozen.
Check out my guide for step-by-step details on storing fresh pasta.
You can freeze leftover pasta scraps and toss them into stews and soups like this creamy gochujang pasta e ceci recipe.
Did you try this recipe?
I would love to hear your feedback! Be sure to rate the recipe and leave a comment below.

KitchenAid Pasta Recipe
Equipment
- Bench Scraper, or a Sharp Knife
Ingredients
- 360 grams 00 flour
- 208 grams large eggs
- 2 teaspoons extra-virgin olive oil
- ⅛ teaspoon kosher salt
- Semolina flour, for dusting
Instructions
- Form the well: On a large wooden cutting board or work surface, add 360 grams 00 flour in a mound.*Using your fist or a small glass, form a strong, wide, crater-like well in the center of the flour. Add 208 grams large eggs, one at a time, into the well. Add 2 teaspoons extra-virgin olive oil and ⅛ teaspoon kosher salt to the eggs. Using a fork, poke the eggs and whisk them until homogenous.*Note: If you've never made pasta before, I recommend using a large mixing bowl to make the egg well (this way, in case the well breaks, it's no big deal!)
- Knead: Slowly begin mixing some of the surrounding flour into the well, being careful not to break it. Begin incorporating more and more of the flour into the well, whisking with the fork until the liquid in the well starts thickening. Once it becomes thick and pasty, place the fork down. With your hands or a bench scraper, alternate between incorporating more of the remaining flour and kneading the dough.Note: If you do happen to break the well, it’s totally fine — it’ll just make it slightly harder to get a homogenous dough ball as quickly.
- Knead until it comes together into a shaggy mass. If it’s feeling quite dry (which can happen in the winter), you can wrap the dough in plastic wrap and allow it to rest for 15 minutes to hydrate better. Once the dough has come together into a solid mass, wash and dry your hands. Discard any unincorporated dry bits from the work surface with a bench scraper.Knead aggressively, digging the heel of one hand into the dough and stretching it, then folding the dough over itself. Rotate 45 degrees and repeat digging, stretching, folding, and rotating for 5 – 7 minutes.
- Rest the dough: At this point, it should feel quite smooth and slightly tacky but not sticky — with no dry bits remaining.Wrap dough tightly in plastic wrap. Rest for at least 20 minutes (up to 2 hours) at room temperature before rolling out.
- Divide rested dough into 4 equal pieces. Roll out one piece at a time, leaving the rest in plastic wrap. Roll out a section of dough until it’s about ⅓-inch thick.
- Roll out the dough: Attach your pasta maker to the Kitchenaid and turn the dial to ‘1’ (this is the widest setting). Turn the mixer on the lowest setting ('Stir'), then feed the dough through the attachment twice. Afterward, the dough will form an oval shape. To create a uniform rectangle, fold one end of the dough towards the center, then fold the other end on top, overlapping slightly, like folding a letter into an envelope.Using a rolling pin, roll the dough out to ¼-inch thickness.Feed the dough through the next setting ('2') twice, then repeat this process at each subsequent setting, rolling twice per setting, until you reach your desired thinness ('5' or '6'). Trim any uneven edges for perfectly straight pasta sheets.
- Rolling and Cutting Recommendations: Note: I like setting 5 for chewier strands and setting 6 for thin, delicate pasta. For setting 6, run through the rollers just once. For all lower settings, run twice through.For shorter noodles, slice the sheet in half crosswise before cutting into individual noodles. Generously dust with semolina flour to prevent sticking.Spaghetti: Thickness: 4 or 5 | Switch out the pasta sheet roller with the Spaghetti cutter, then run the dough through the cutter. Fettuccine: Thickness: 5 or 6 | Run the dough through the fettuccine cutter. For tagliatelle and pappardelle, loosely fold the sheet of pasta over itself lengthwise (the long way) in 2 ½-inch increments, then use a sharp knife to cut widthwise (the short way) into desired lengths. Unfurl into individual strands.Tagliatelle: Thickness: 5 or 6 | Cut pasta into ¼-inch wide pieces.Pappardelle: Thickness: 5 or 6 | Cut pasta into ¾-inch to 1-inch pieces.
- Dust the cut pasta with semolina flour to prevent sticking, then loosely twirl it into a nest and store on a semolina-dusted baking sheet covered with a kitchen towel. Repeat rolling out and cutting the remaining dough.
- Cook the pasta: Cook fresh pasta in a large pot of salted boiling water until al dente. Fresh pasta cooks very quickly, so it may be done in as little as 1 minute depending on the shape. Sauce and serve!
Notes
- Use a mister while kneading and rolling if the dough begins to dry out.
- Knead on a wooden cutting board. Wood absorbs moisture and prevents sticking or rapid drying. Non-wood surfaces will work but can yield slightly stickier dough.
- Room Temperature: Store freshly cut pasta on a semolina-dusted baking sheet for up to 2 hours. Cover with a damp kitchen towel to prevent drying.
- Fridge: Fresh pasta can be kept in the fridge up to 24 hours in an airtight container. Line with semolina-dusted parchment paper to prevent sticking.
- Freezer: For longer storage, freeze pasta on a parchment-lined sheet for 1 hour. Transfer to an airtight container or ziploc bag and freeze up to 1 month. Cook directly from frozen.
Nutrition
The nutritional information on this website is only an estimate and is provided for convenience and as a courtesy only. The accuracy of the nutritional information for any recipe on this site is not guaranteed.


Thank you for this recipe and clear instructions. I made fresh pasta for the first time last week. It was so easy and tasted so much better than boxed.
Why do you not use the dough hook to start the mixing and kneading?
I’m so glad it worked out! Great question – I know some folks will use the dough hook to start the process as you suggested (and then finish kneading by hand). I personally prefer working with my hands the whole time as it helps me get a feel for the dough. It’s more of a personal preference, but I find it comes together a bit more smoothly when I do by hand.
I used this recipe and cooked half of the pasta fresh and froze the second half to cook a few days later. Both turned out great!
Hi Amy,
Thanks for your kind review! Great to hear you were able to successfully freeze it.
I used this recipe to make pasta dough. I actually ended up turning this into raviolis. It was really tasty.