
With a slightly chewy, al dente texture, homemade orecchiette, or “little ears” pasta, is truly one of the most wonderful shapes to enjoy! After years of pasta-making, including teaching it in my cooking classes, I’ve gathered all the tips and tricks you need to make these adorable little pasta from Puglia with success.

I love making homemade pasta, from malloreddus to homemade pappardelle to egg yolk ravioli. But my favorite shape, by far, has got to be orecchiette.
Orecchiette pasta has a thicker edge and a thinner, rougher inside surface, forming a cup-like shape. The chewy texture is so satisfying, and it’s fun to pair with lots of different sauces, like sausage and broccoli rabe, blistered tomatoes, or Calabrian chili sauce.
👩🏽🍳 Expert Tips
- Do a solid knead. Although kneading for at least 10 minutes may seem tedious, it’s crucial! Kneading develops the gluten in the pasta, resulting in a delightful chewy texture without any doughiness or undercooked taste.
- Let the dough rest. The dough needs to rest and relax for an hour so that it’s easier to work with when forming the shapes. Otherwise, it tends to spring back!
- “Scrape” the dough to form the best shape. Firmly press the knife’s serrated edge into the dough, as this action scrapes and creates a rough texture, essential for sauces to cling to!
Ingredient Notes
Orecchiette is made from a simple flour and water dough. Let’s talk details below.
- Semolina Flour: Semolina flour is made by milling hard durum wheat flour. Its coarse texture and high protein content make it an ideal flour for adding a chewy texture. I recommend a finer grind (look for ‘semola rimacinata‘ flour) for a smoother dough, but you can also use standard semolina.
- Water: Kneading the flour with lukewarm water hydrates the dough more quickly and helps develop gluten.
For a full list of ingredients and quantities, refer to the recipe card.
How to Make This Recipe

I’ve got a full post with step-by-step photos on how to make the actual dough (Semolina Pasta Dough), but I’ve summarized the key details in Step 1 below.
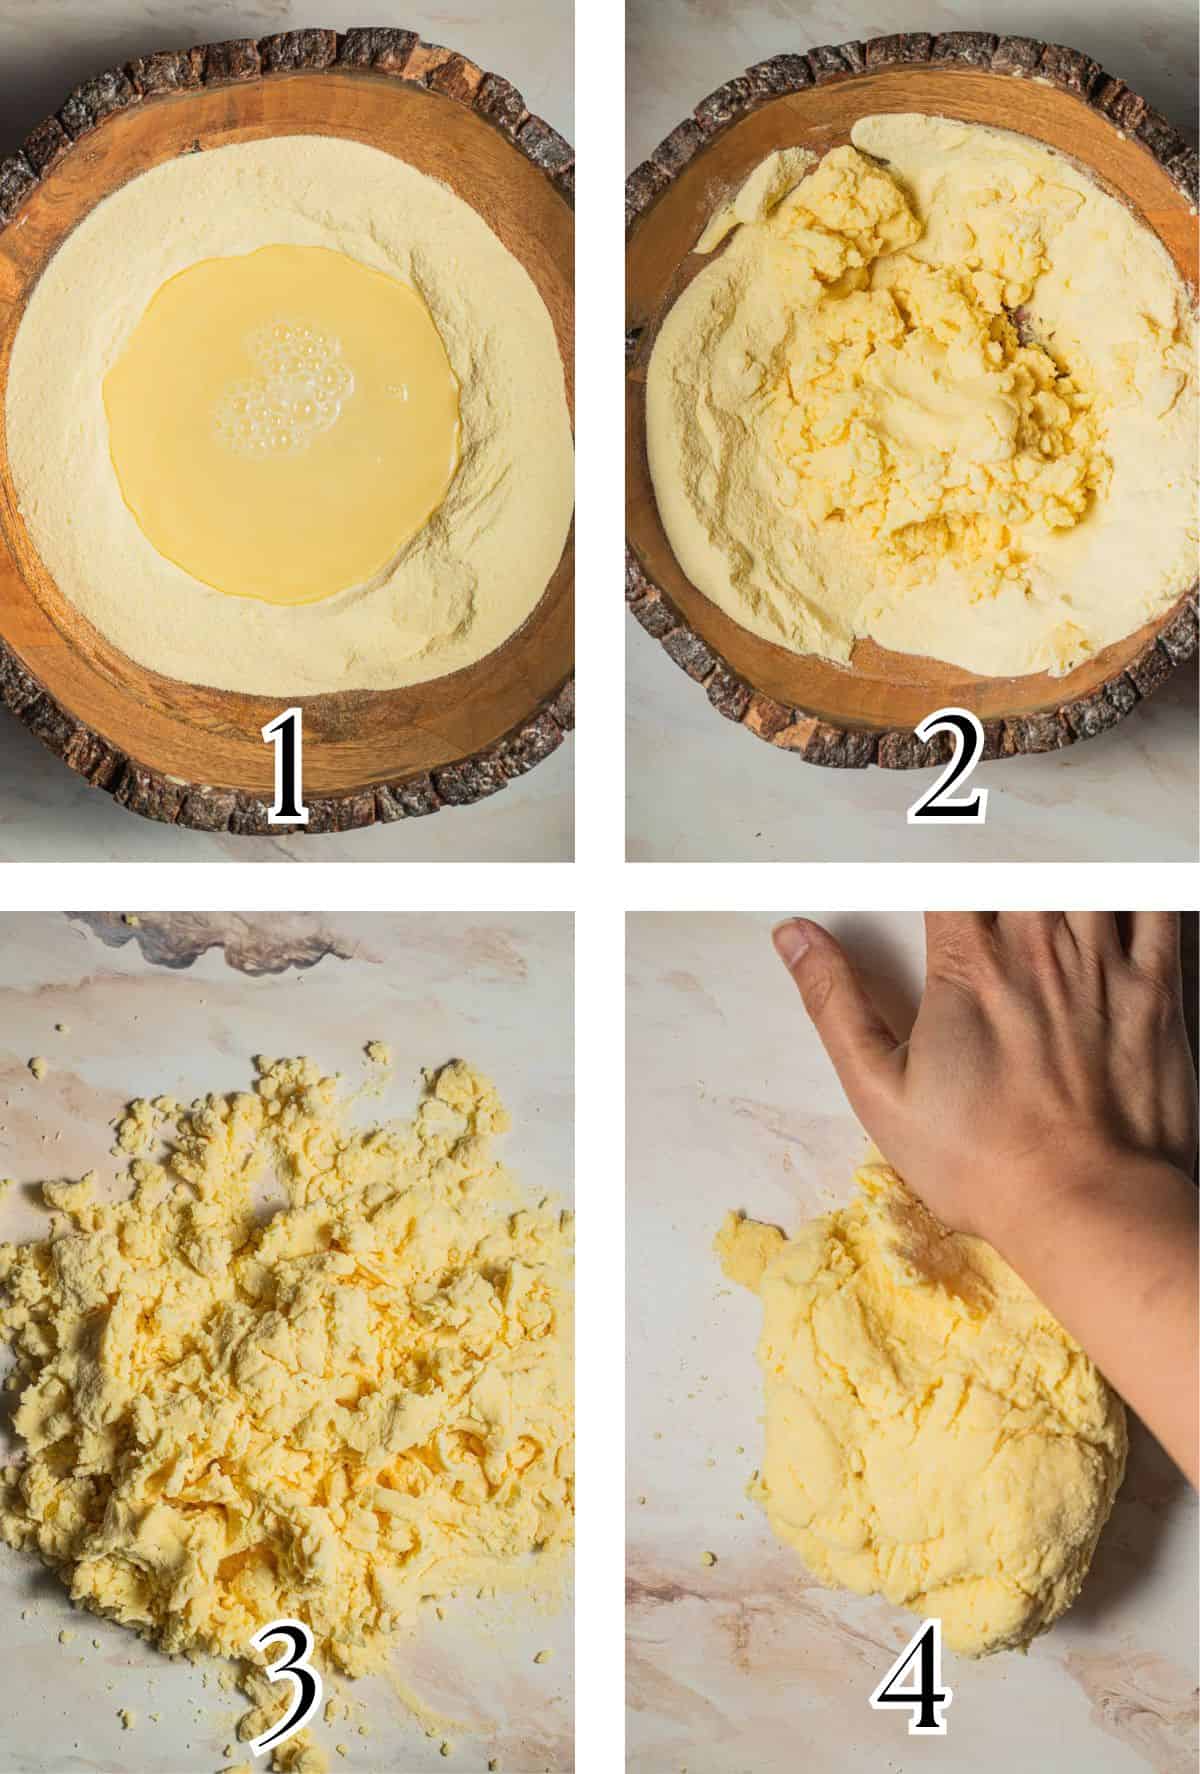
Step 1 – Make the dough: To a large bowl, add flour. Make a well in the center of the flour, and pour in the water (Image 1). Using a fork or your hands, slowly begin incorporating some of the flour into the water until a thick paste forms (Image 2).
Alternate between adding in the remaining flour mixture and kneading until a shaggy dough forms (Image 3). Use a bench scraper to gather any loose bits from the work surface and your hands.
Once the dough forms a solid mass, transfer it to a clean surface and begin kneading (Image 4). Press the heel of your hand into the dough to stretch it, then rotate it 45 degrees counterclockwise.
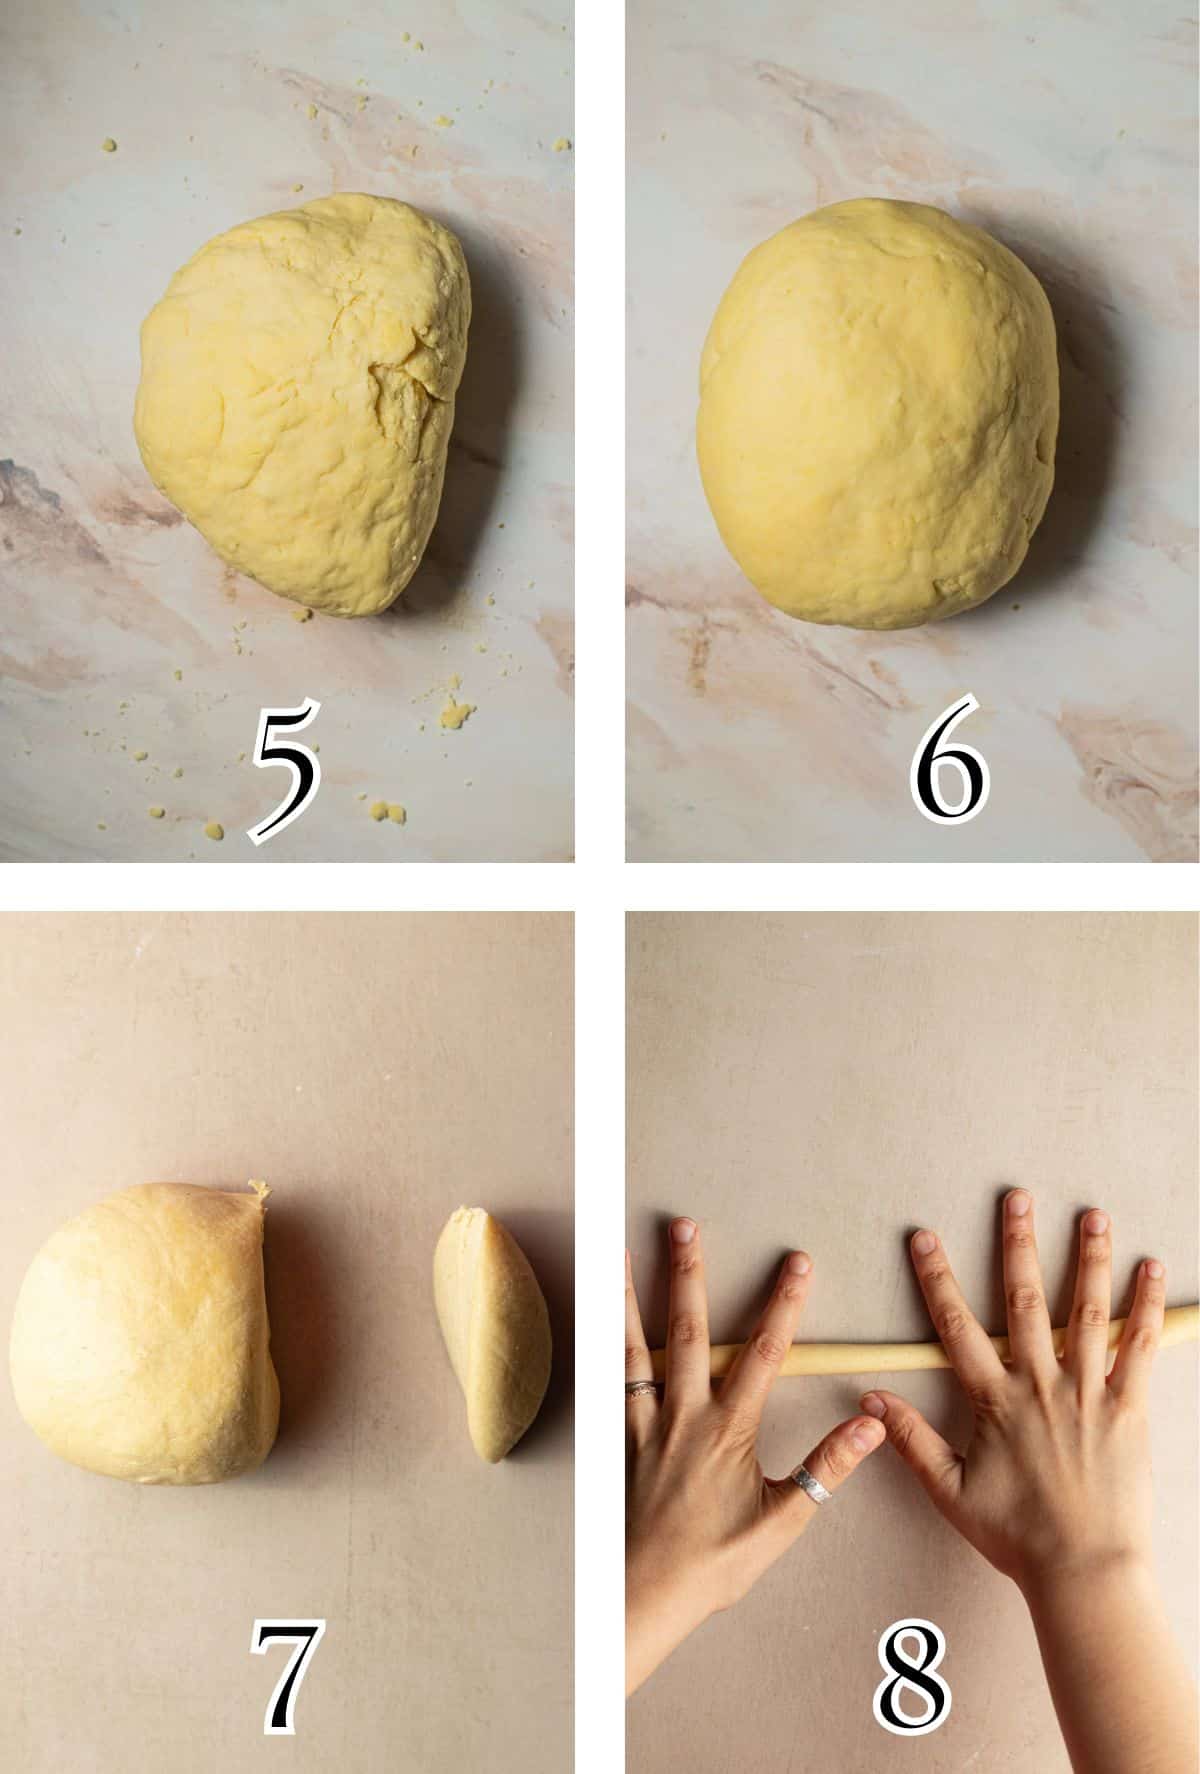
Continue kneading until the dough is soft and smooth, about 10 – 15 minutes (Images 5 & 6). This extended kneading is necessary to build enough gluten for a chewy texture due to the high protein content.
Wrap tightly in plastic wrap and let the dough rest for an hour before using.
Step 2: Unwrap the dough ball, and use a sharp knife to slice off a chunk about the width of two fingers (Image 7). Keep the remaining dough tightly wrapped.
Step 3: Use your hands to roll the dough into a thin snake about ½ inch in diameter. The easiest way is to lay your hands over the dough and spread your fingers.
Roll the dough upwards and outwards using your fingers and the tops of your palms (Image 8).

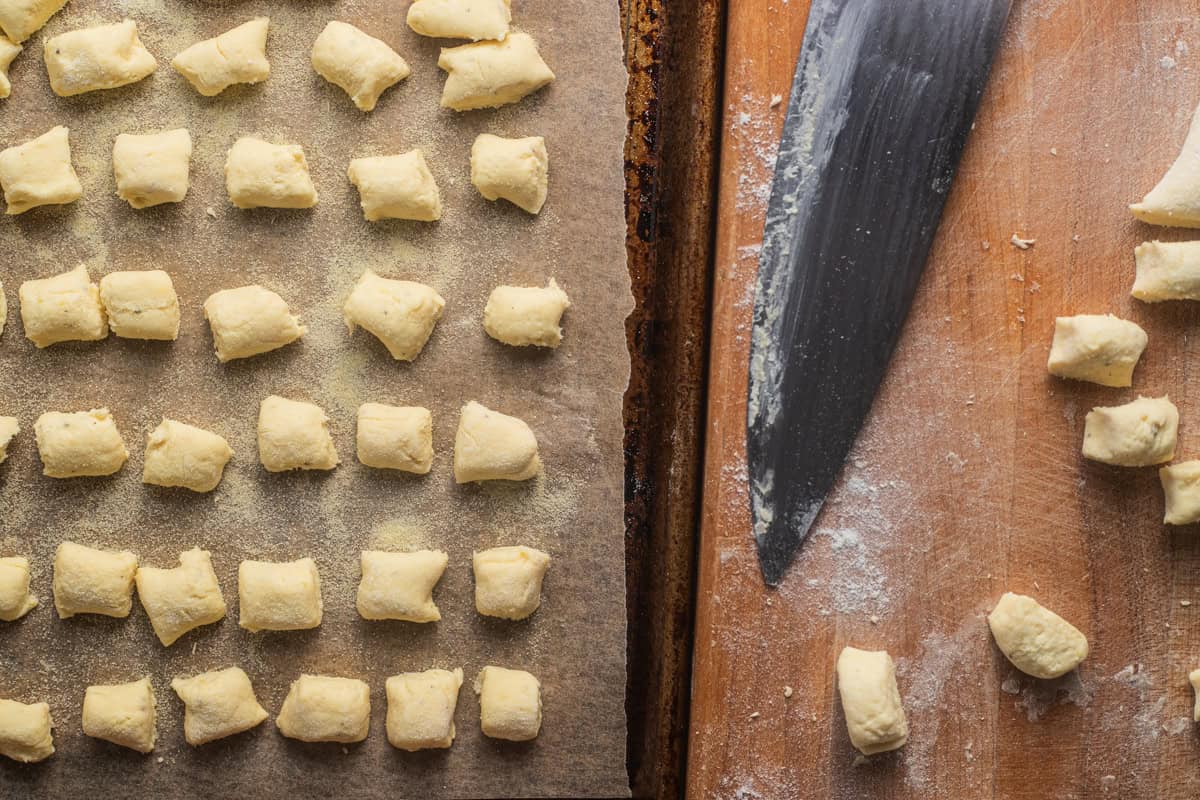
Step 4: Using a pastry board or wooden cutting board, slice the snake into ½-inch pieces. Grab one of the pieces and a serrated butter knife. Place the piece so that the cut (rougher side) faces up (Image 9).
Step 5: Lightly dig the serrated edge of the knife into the top edge of the piece, ensuring there’s a small gap between the knife and the top-most part (Image 10).
Apply more force as you continue dragging the knife at a 45-degree angle toward you until the pasta curls into itself (Image 11). Peel open the piece; you should be left with a rough texture on the inner side.
TIP: If you’re more of a perfectionist like me, you’ll likely want the shape to be as circular as possible. Through experimentation, I discovered that one way to achieve a more even shape is by dragging the knife over the cut, ‘rougher’ edge of the piece instead of the smooth side.
Step 7: Prop the smooth side of the orecchiette on your thumb, using your fingers to gently mold the shape over your thumb to form a cup-like shape (Image 12).
Arrange the shaped orecchiette in a single layer on a lightly floured tray, and repeat the process to create the remaining pasta.

In the photo above, you can see the evolution of the shape from start to finish.
Storage Instructions
Short-term storage: Freshly made orecchiette can be stored at room temperature for 3 – 4 hours on a semolina-dusted baking sheet.
For long-term storage, I recommend freezing. Generously dust a baking sheet with semolina flour, then arrange the pasta in an even layer. Freeze for 1 hour, then sift out excess flour and transfer pasta to Ziploc freezer bags. Seal and freeze for up to 2 months.
For more details, check out my article on ‘storing fresh pasta‘.
Recipe FAQs
They are both handmade pasta shapes from Southern Italy, but the former has a hollowed-out, hot dog-like shape, while the latter has a cup-like shape.
Interestingly, cavatelli is essentially the precursor to orecchiette; that is, if you invert cavatelli on your thumb, it’ll form orecchiette.
Semolina flour has a higher gluten content, so it gives the shape more structure and chew.
If you use all-purpose flour, you won’t have as much of a “toothsome” texture, and it will overcook much more quickly.
You don’t need any special equipment! All you need is a bowl, a wooden cutting board, a serrated knife, and a baking sheet.
The dough needs to rest to allow the gluten to relax. If you don’t let it rest, it’ll be much harder to roll out and shape.
Did you try this recipe?
I would love to hear your feedback! Be sure to rate the recipe and leave a comment below.
Want to see more of my content? Add me as a trusted google source.


Homemade Orecchiette Recipe
Equipment
Ingredients
- 320 g semola rimacinata flour, or semolina flour | plus more for dusting
- 160 ml lukewarm water
Instructions
- Make the dough: To a large bowl, add 320 g semola rimacinata flour. Make a well in the center, and add 160 ml lukewarm water into the well. With your hands or a fork, slowly begin incorporating a little bit of flour into the water. As you continue incorporating flour, the water will transform from a loose liquid into a thick paste. Alternate between adding in the remaining flour and kneading until a shaggy dough forms. Use a bench scraper to gather any loose bits from the work surface and your hands.
- Knead and rest: Once the dough forms a solid mass, transfer it to a clean surface and begin kneading. Press the heel of your hand into the dough to stretch it, then rotate it 45 degrees counterclockwise. Continue kneading until the dough is soft and smooth, about 10 – 15 minutes. Wrap tightly in plastic wrap and let the dough rest for at least 1 hour at room temperature (up to 2 hours) before using.
- Roll: Lightly flour a baking sheet with semolina, and set aside. Cut off a piece of dough the width of two fingers, and put the remaining dough under an overturned bowl or wrap with plastic wrap, to keep it from drying out. Place your hands over the dough with your fingers spread. Using light pressure, roll the dough back and forth, moving your hands outward from the center to gently elongate it into a rope.On the work surface, roll the piece of dough into a rope ½-inch thick in diameter. Cut the rope into ½-inch pieces.
- Form the pasta: To form the orecchiette, take one piece of dough and place it cut-side up (have the rough side facing you). Using a serrated butter knife, position the blade slightly below the top edge of the dough, leaving a small border at the top. Press the serrated edge firmly into the dough and drag the knife toward you at a 45-degree angle. The dough will curl around the blade as you pull. Turn the curled piece inside out over your thumb, gently pressing around the edges to form a small ear shape. Transfer to the prepared baking sheet and repeat with the remaining dough.
- Cook: Bring a large pot of salted water to a boil. Add pasta, and cook for 1 – 2 minutes until the orecchiette float to the surface then boil for an additional 2 – 3 minutes until chewy and al dente. Transfer pasta with a slotted spoon to your sauce pot, coat in sauce, and serve.If cooking from frozen: Cook directly from frozen (do not thaw), adding 1 – 2 minutes to the cooking time above.
Video
Notes
- Although kneading for at least 10 minutes may seem tedious, it’s crucial! Kneading develops the gluten in the pasta, resulting in a delightful chewy texture without any doughiness or undercooked taste.
- The dough needs to rest and relax for an hour so that it’s easier to work with when forming the shapes. Otherwise, it tends to spring back!
- Firmly press the knife’s serrated edge into the dough, as this action scrapes and creates a rough texture, essential for sauces to cling to.
- Short-term storage: Freshly made orecchiette can be stored at room temperature for 3 – 4 hours on a semolina-dusted baking sheet.
- For long-term storage, I recommend freezing. Generously dust a baking sheet with semolina flour, then arrange the pasta in an even layer. Freeze for 1 hour, then sift out excess flour and transfer pasta to Ziploc freezer bags. Seal and freeze for up to 2 months. Cook directly from frozen, but add 1 – 2 minutes to the cooking time.
Nutrition
The nutritional information on this website is only an estimate and is provided for convenience and as a courtesy only. The accuracy of the nutritional information for any recipe on this site is not guaranteed.


Owner’s Review: Though it requires a bit more practice, orecchiette is such a fun pasta to make at home when you get the hang of things!