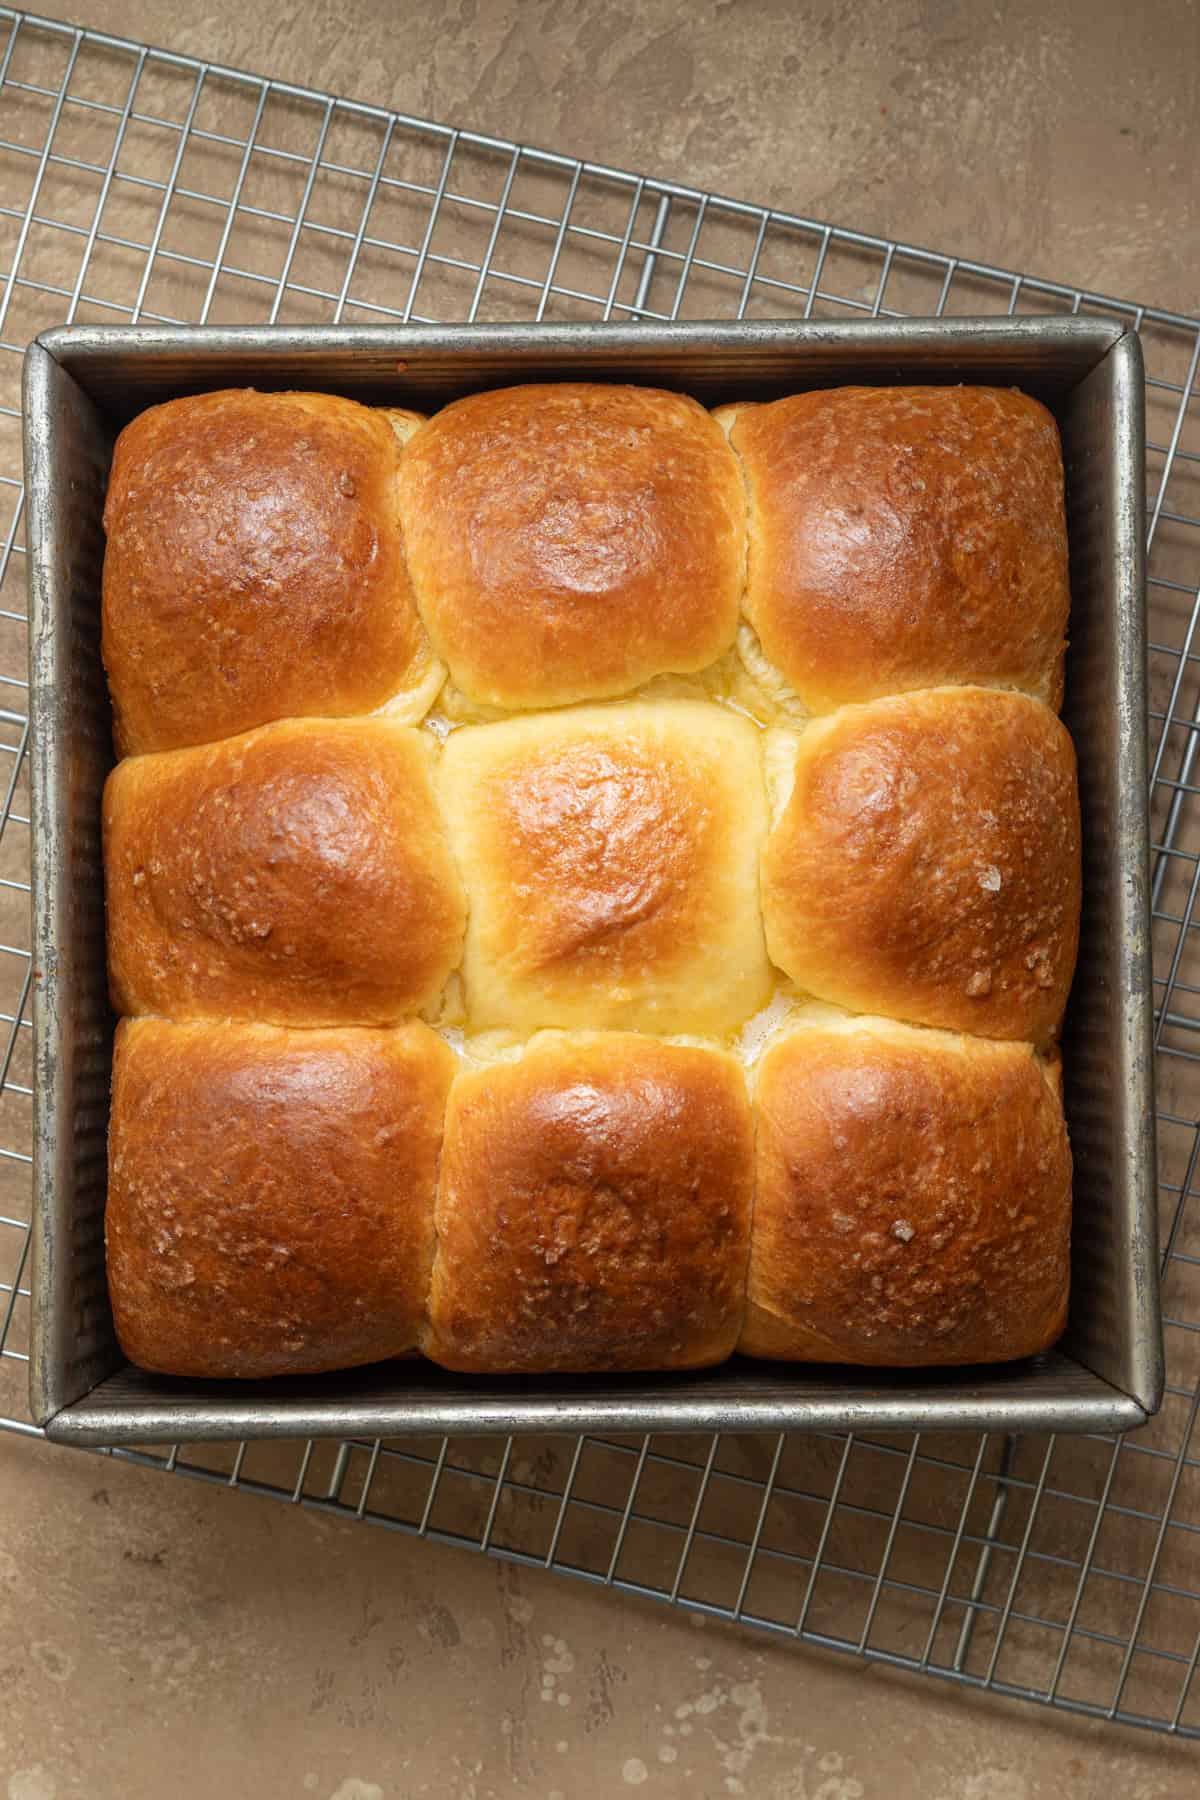
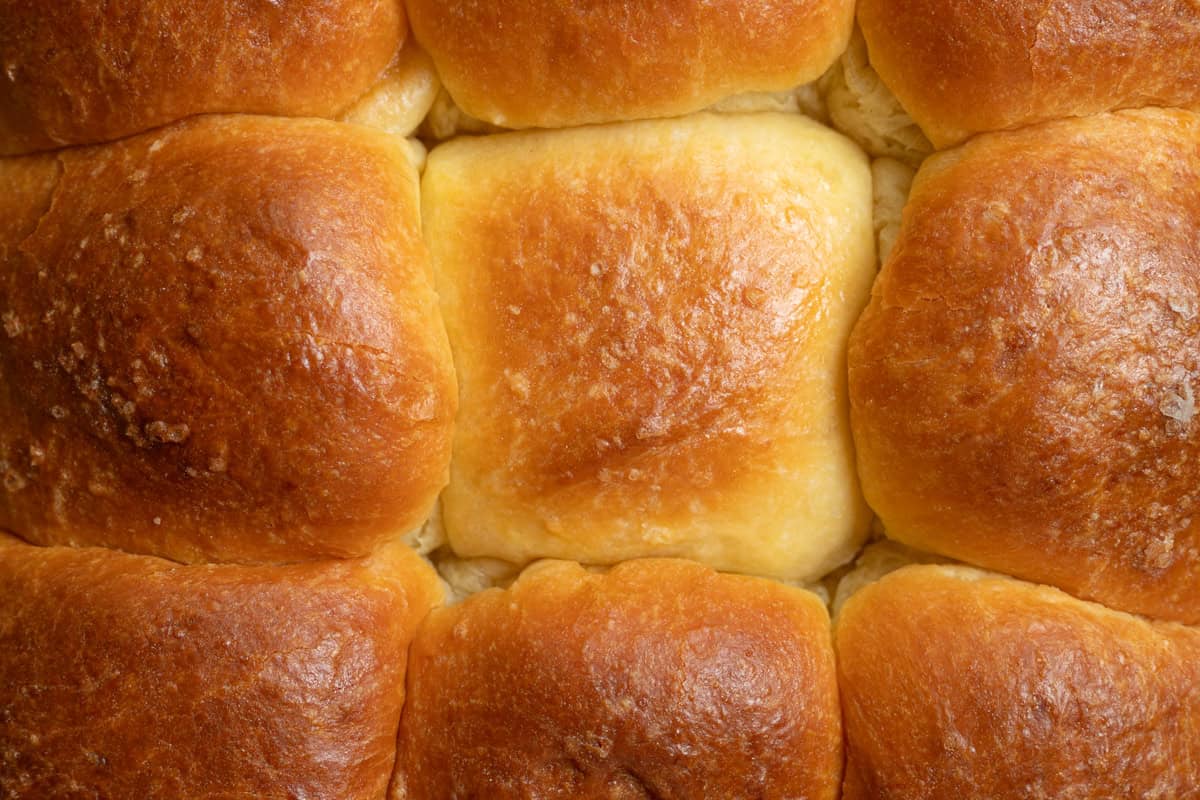
These are not your average dinner rolls! Made from a buttery, enriched dough, these brioche dinner rolls will be the hit of your next dinner party or holiday meal. An overnight chill yields a soft, fluffy pull-apart texture and allows you to prep ahead.
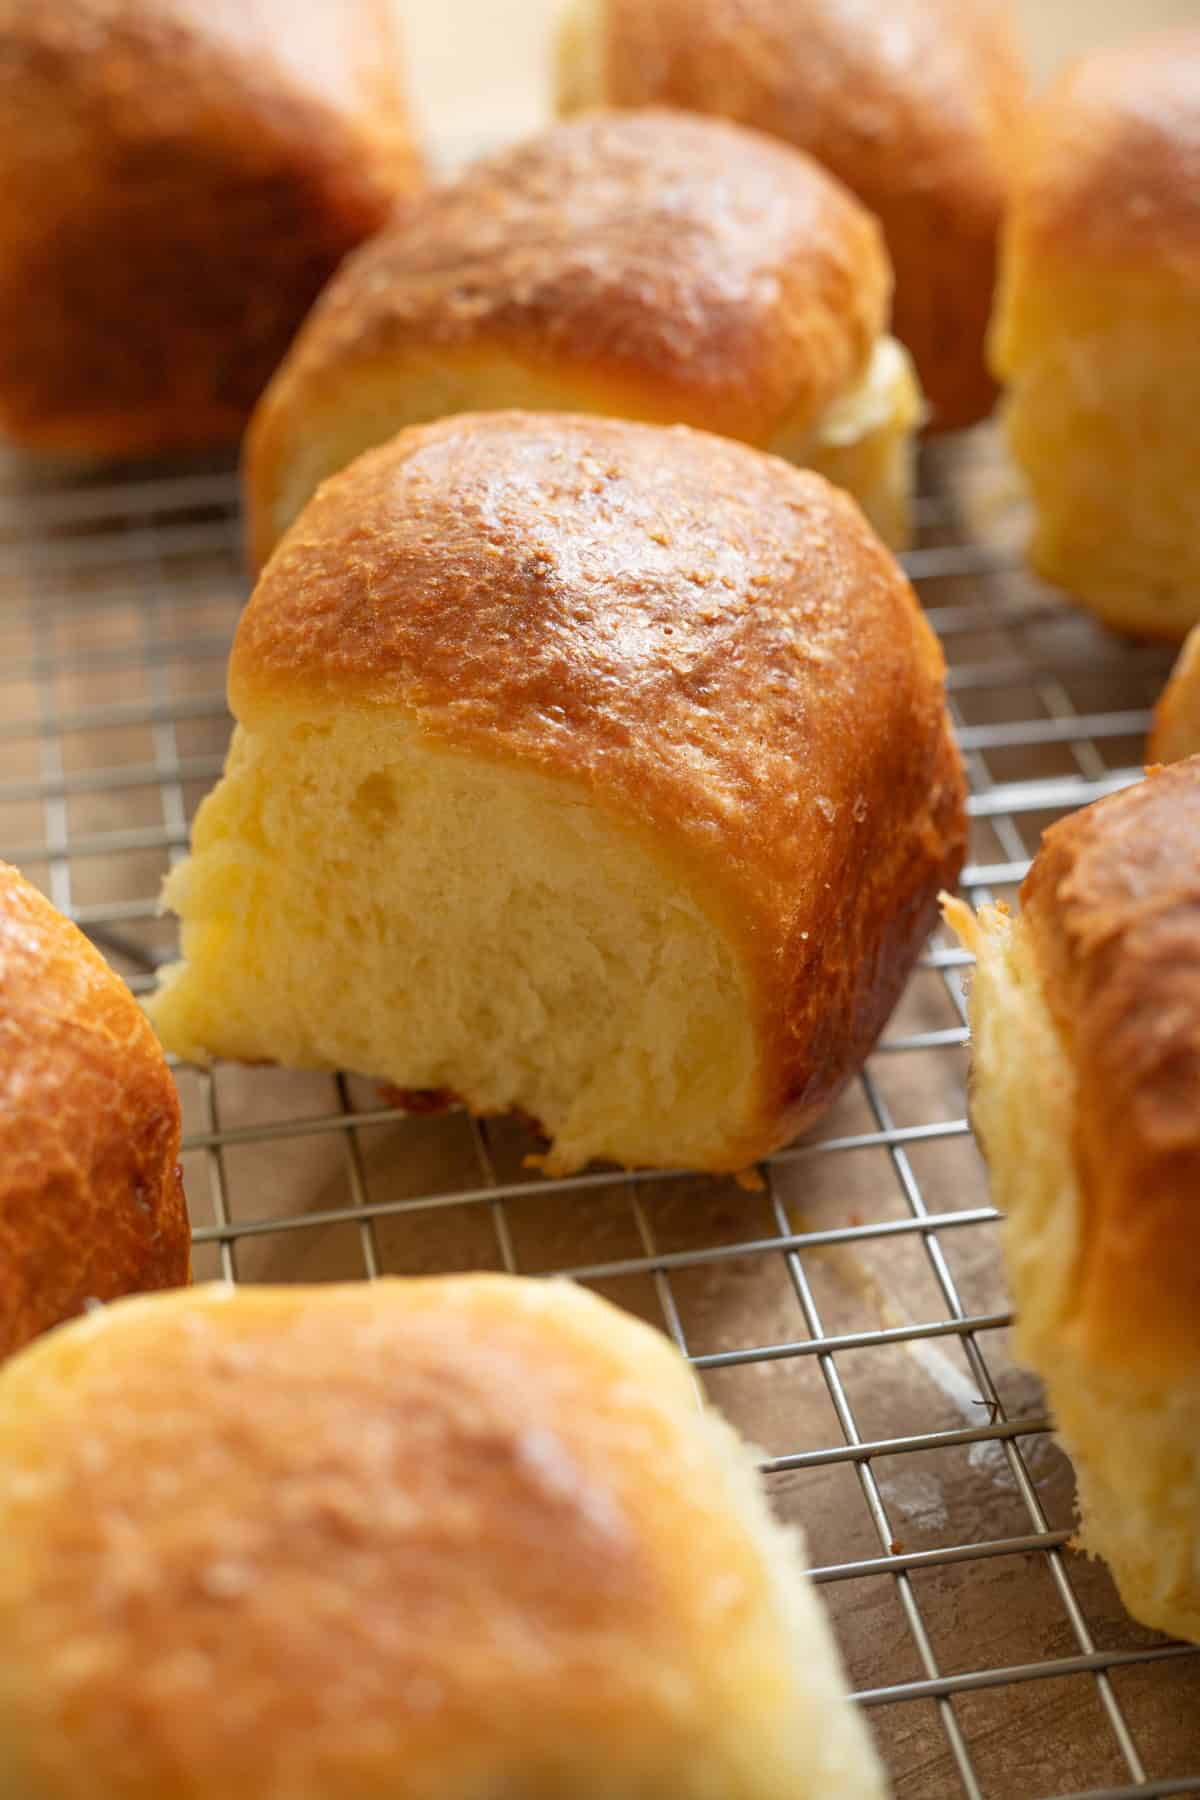
These rolls have the most buttery flavor, thanks to the most velvety soft brioche dough.
Pair with cultured butter alongside my mushroom bourguignon (or crab stew!) and tangy apple and radicchio salad for a delicious holiday dinner! You could even make my impossible smash burgers and use these as the buns!
👩🏽🍳 The Lowdown
key details before we dive into the cooking!
- Why You’ll Love It: These warm dinner rolls are a perfect accompaniment to your holiday table. Extra-soft and fluffy, with a burnished golden-brown crust, they’re a crowd favorite!
- Timing & Prep: Make the dough the night before, then let the rolls rise the next day before baking.
Testing Notes
- These rolls are based on my garlic parmesan pull-apart rolls and jalapeño cheese buns recipes. Using Tartine’s cookbook, I then adapted the base into a very traditional brioche dough for my overnight cinnamon rolls.
- Using that same dough, I wondered if I could make savory dinner rolls, and when I baked them, they turned out absolutely delicious. I made a few minor tweaks before sharing the final version with you!
How to Make This Recipe
Make the Dough:
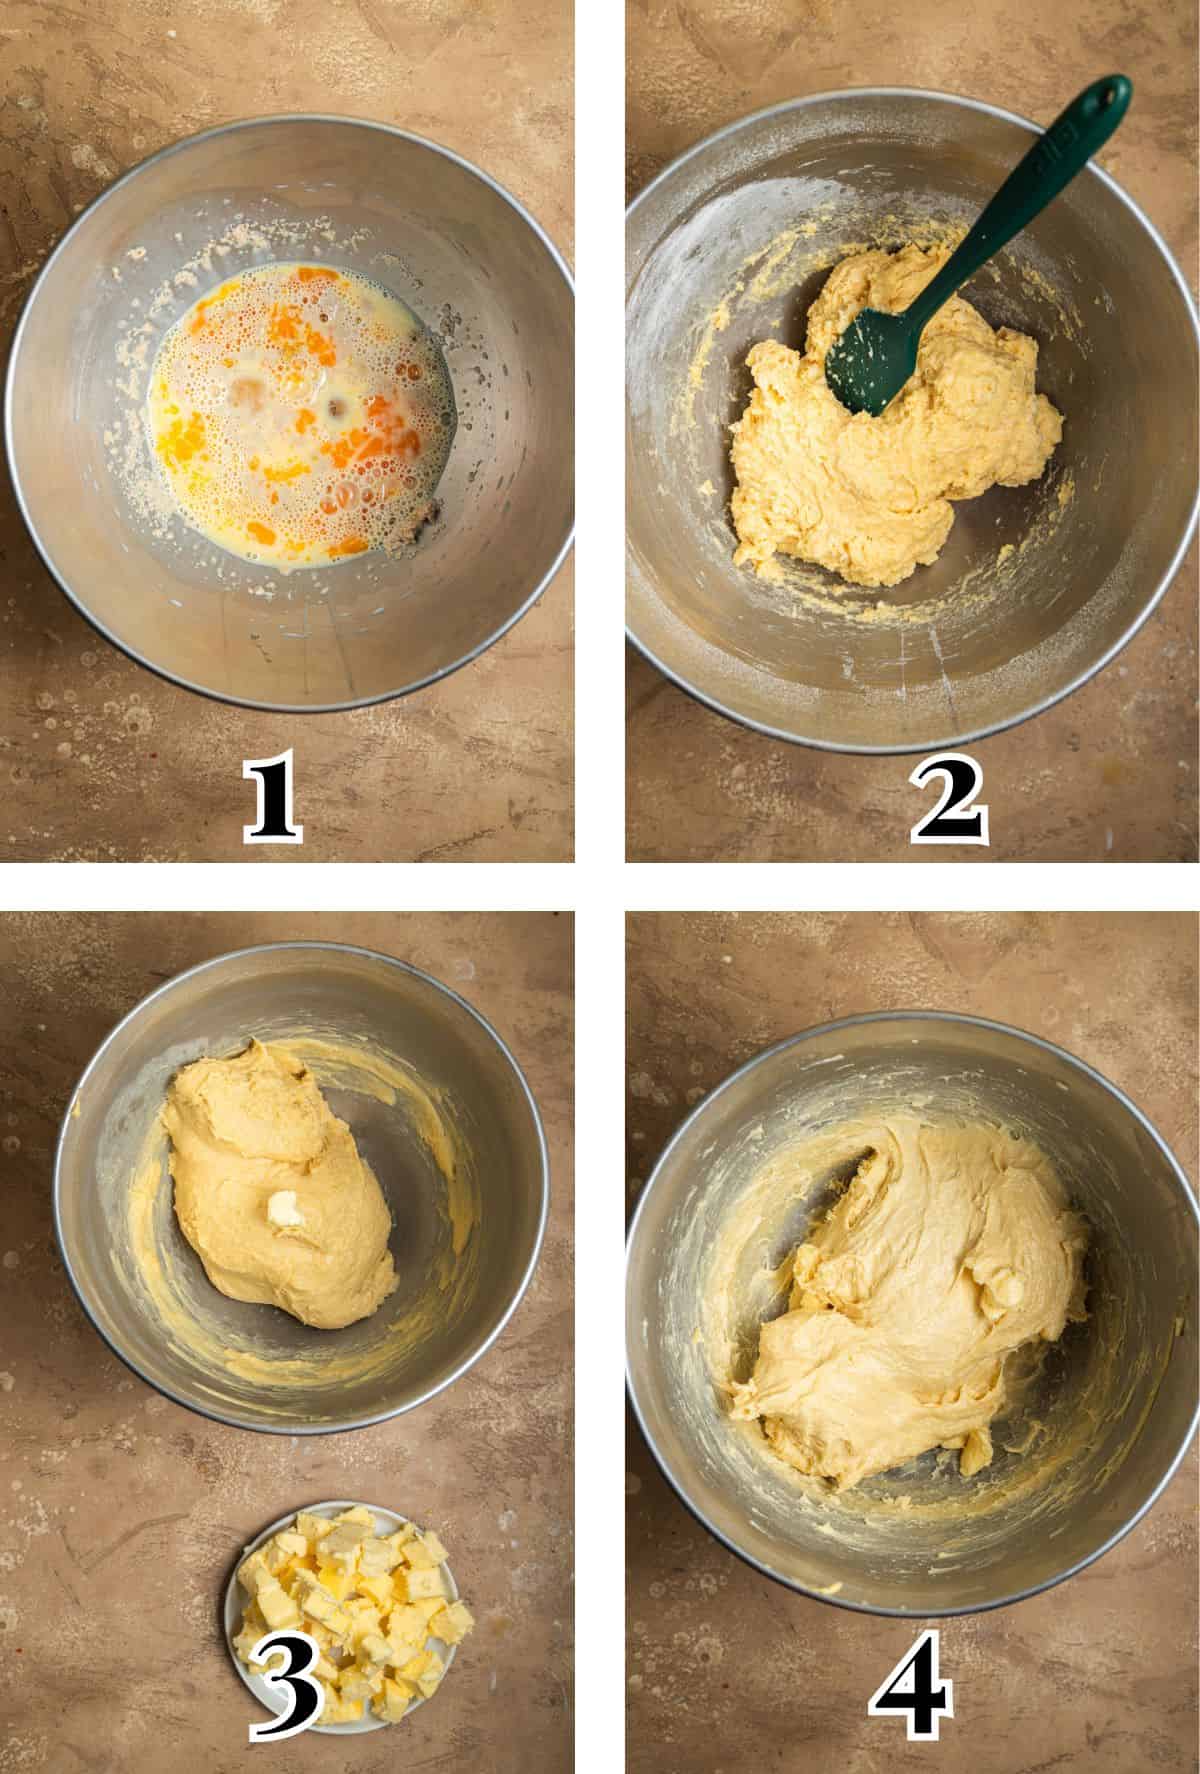
Step 1 – In the bowl of a stand mixer, combine milk, eggs, and instant yeast. With the dough hook attachment, mix on low to break up the ingredients (Image 1). Add the dry ingredients to the yeast mixture and mix until a shaggy dough forms (Image 2).
Step 2 – On medium speed, add the butter, one piece at a time (Image 3). Halfway through adding the butter, use a rubber spatula to scrape down the sides of the bowl. Continue mixing until all the butter has been added (Image 4).
TIP: The butter must be at room temperature (ideally 69°-72°F); otherwise, it will be tough to incorporate into the dough!
Proof and Chill:
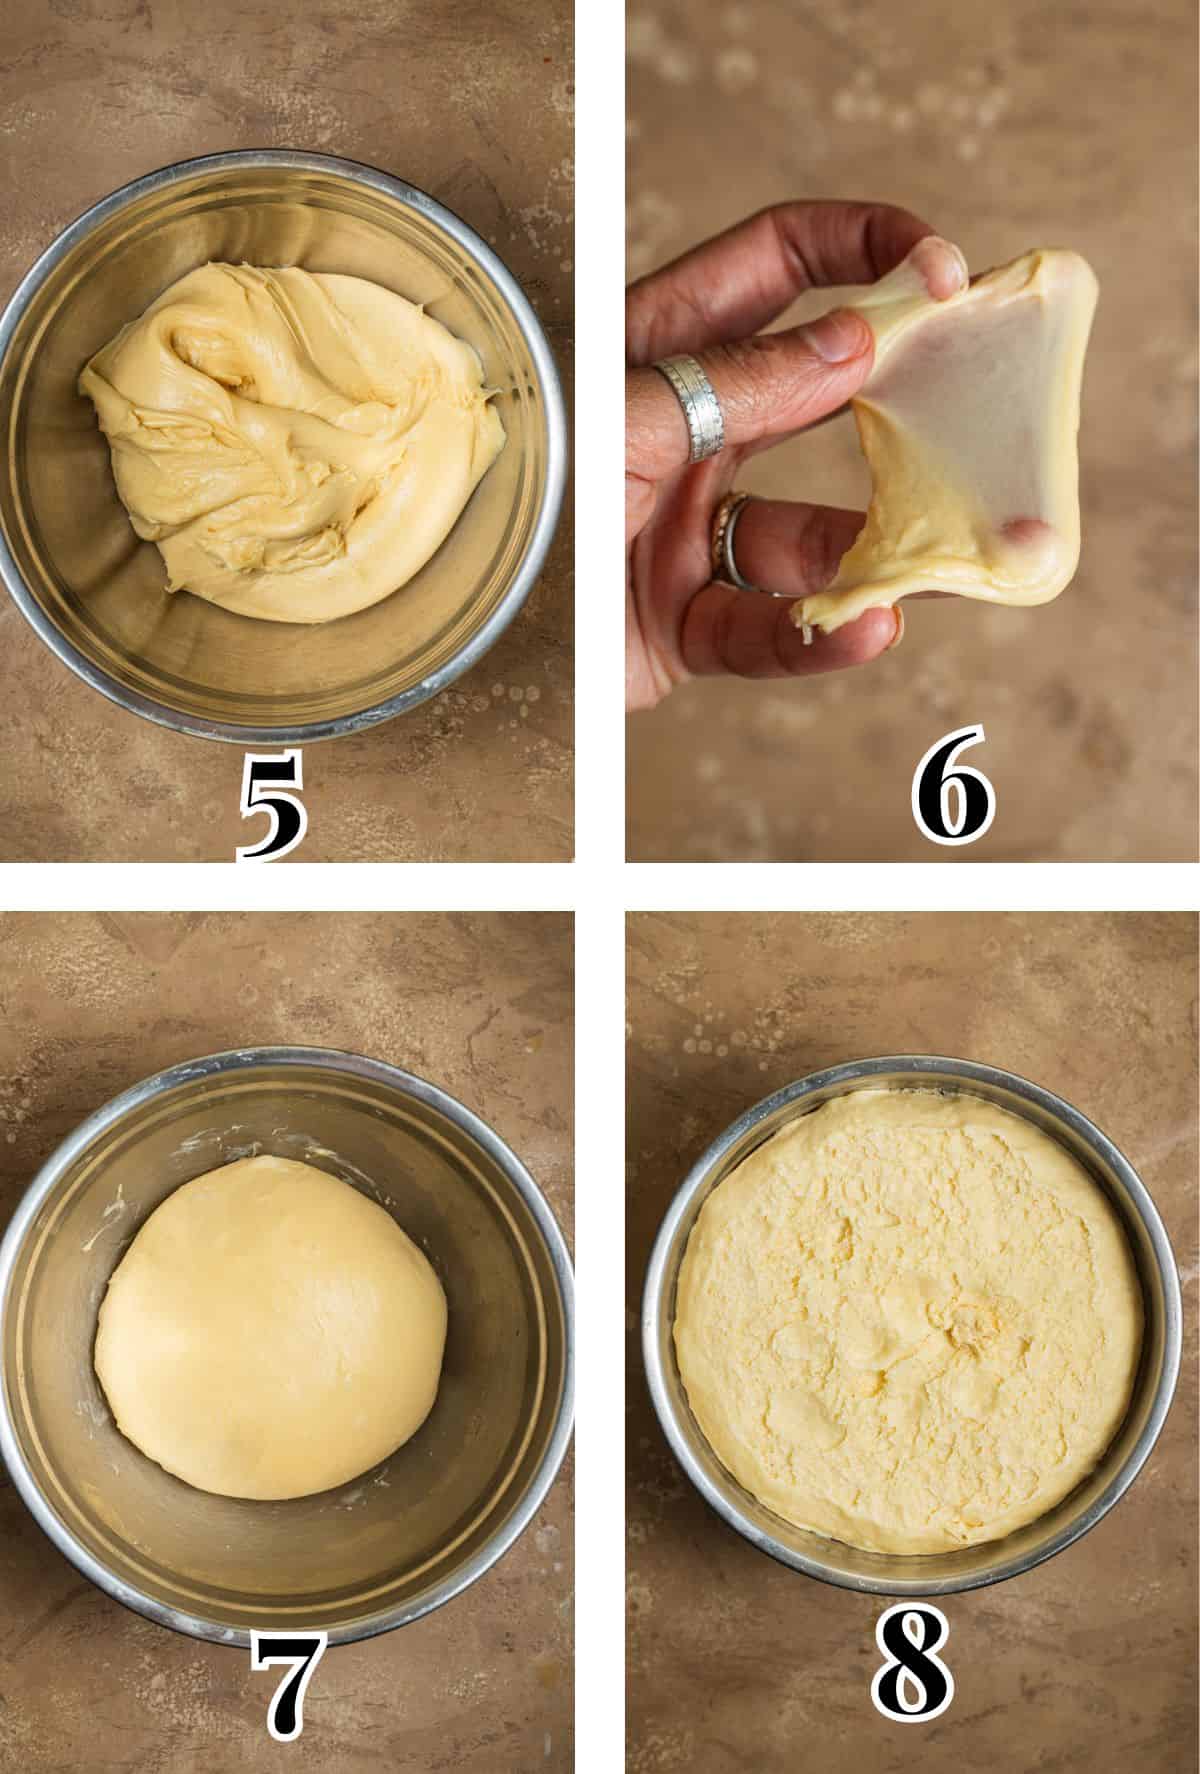
Step 3 – Continue mixing the dough until the butter is fully incorporated and the dough is extremely smooth, soft, and slightly tacky without being sticky (Image 5). When ready, you should be able to pass the windowpane test.
Windowpane Test: Take a small piece of dough and use your pincers to slowly pull it apart until translucent; it should not rip (Image 6). If it rips easily, continue mixing.
Step 4 – Transfer the dough to a large bowl and cover with plastic wrap. Let the dough rise in a warm place until puffy and bubbly, about 1 ½ to 2 hours (Image 7). Punch down the dough, then chill it in the fridge overnight. Remove from the fridge (Image 8), then divide into nine equal pieces.
Form the Rolls and Bake:
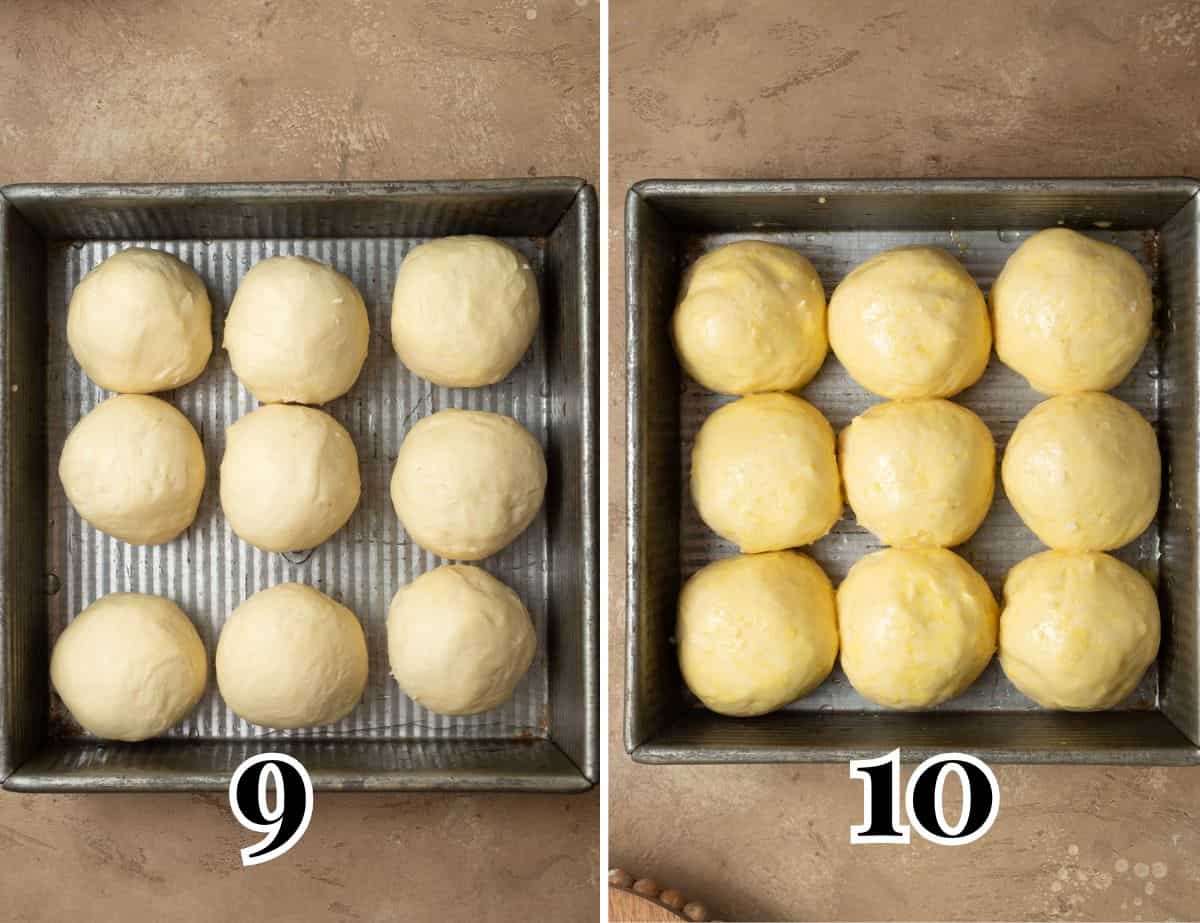
Step 5 – Form each piece into a tight dough ball and place in a well-oiled container (Image 9). Proof again until puffed, about 1 to 1 ½ hours. Make an egg wash, brush over the dough with a pastry brush, and garnish with flaky salt (Image 10).
Step 6 – Bake for 20 – 25 minutes, or until the buns are deeply golden brown. Immediately brush with melted butter, then cool on a wire rack for a few minutes before serving warm. Enjoy!
Expert Tip
Not serving immediately? Skip the melted butter and let the buns cool completely (do not pull apart). Store in an airtight container for 2 – 3 days. Reheat in the oven at 350°F in foil until warmed through, then brush with melted butter before digging in.
Recipe FAQs
Because bread recipes require more precise measurements, the default measurements are in metric. While there is a conversion to US cups, I recommend using a kitchen scale! They are quite cheap and will yield more accurate results.
These rolls are made from traditional brioche dough, which means the butter content is close to 50% of the total flour, yielding a very soft texture.
Because brioche dough is very buttery, it needs a long chill time to make things easier to work with. Otherwise, it will be very greasy and messy. That said, you could start the dough at 7AM, chill it at 8AM, then take it out of the fridge at 4PM and bake it in time for dinner. Alternatively, stick the dough in the freezer for 2 – 3 hours.
Unfortunately, because the dough is so buttery, it is very difficult to knead without a stand mixer!
Did you try this recipe?
I would love to hear your feedback! Be sure to rate the recipe and leave a comment below.

Brioche Dinner Rolls (Pull-Apart)
Equipment
- 8-inch by 8-inch metal baking pan, or a large cast-iron skillet or metal cake pan
- Instant Read Thermometer, optional
Ingredients
For the Dough:
- 114 grams whole milk, or 2%, chilled
- 3 large eggs
- 1 ¾ teaspoons instant yeast
- 370 grams bread flour, plus more for dusting
- 25 grams granulated white sugar
- 1 ½ teaspoons Diamond Crystal Kosher Salt, use half the amount if using any other salt brand
- 168 grams unsalted butter, 1 ½ sticks, cut into ½-inch cubes and softened to room temperature
For the egg wash:
- 1 large egg yolk
- 14 grams whole milk, or 2% milk
For topping:
- Flaky salt
- 28 grams unsalted butter, melted
Instructions
Make the Dough:
- In the bowl of a stand mixer fitted with the dough hook, add 114 grams whole milk, 3 large eggs, and 1 ¾ teaspoons instant yeast. Mix on medium speed just to break up the ingredients slightly, about 1 minute.
- Turn the mixer off, then add 370 grams bread flour, 25 grams granulated white sugar, and 1 ½ teaspoons Diamond Crystal Kosher Salt. On low speed, mix until a shaggy, sticky dough forms, about 2 minutes. Increase the speed to medium, and mix for 4 – 6 minutes until the dough is quite stretchy and sticky.
- With the mixer still on, begin adding 168 grams unsalted butter(cubed), one piece at a time. Use a flexible spatula to scrape down the sides of the bowl once half of the butter has been added.Add the rest of the butter until all of it has been incorporated, about 4 minutes.
- Continue mixing the dough for about 8 minutes, or until the dough begins vigorously slapping the sides of the bowl. The sides of the bowl should be almost completely clean.Note: The dough may look greasy or separated at first; keep mixing until smooth and elastic.The dough should be completely homogeneous with no streaks of butter. It should be extremely soft, smooth, and tacky, and just barely sticky.
- Windowpane Test: Once the dough has met the above criteria, check that it's built up enough strength via the windowpane method. Pinch off a small piece of dough, flatten it, and gently stretch it with your fingers. The dough should become thin and translucent without tearing.
- Form the dough into a ball, then transfer to a large, lightly oiled mixing bowl. Cover with a towel or plastic wrap, and allow to rise in a warm environment (72°F/22°C to 75°F/24°C) for 1 ½ – 2 hours until proofed.Note: When properly proofed, the dough should pass the poke test. Coat your index finger in flour, then press your fingertip into the dough gently to make an indent; the indent should slowly fill back up halfway. If the indent springs back quickly, it needs more time.
- Gently press down to deflate the dough. Then chill the dough in the fridge, covered, in the mixing bowl overnight (at least 8 hours up to 18 hours).
Form the Rolls:
- Remove the chilled dough from the fridge. Divide dough into 9 equal portions. For each piece of dough, bring the corners together as if you're sealing a pouch, and seal tightly. Place seam side down on a work surface, then cup the dough in your hands, shaping it into a ball as you rotate it in a clockwise motion. Repeat with the remaining pieces of dough, and transfer each dough ball to a 8-inch by 8-inch square non-stick baking pan. Allow to proof for 45 minutes to 1 ½ hours, or until it passes the poke test again.
- Meanwhile, place a rack in the center of the oven and preheat to 350°F/177°C. Just before baking, whisk 1 large egg yolk and 14 grams whole milk in a bowl until combined. Brush the tops of the buns with the egg wash and top with Flaky salt.
- Bake in the oven for 20 – 25 minutes until the rolls are golden-brown on top and a thermometer inserted into the middle of a roll registers 190°F/88°C (for softer rolls, remove them from the oven at 185°F/85°C).If serving immediately, brush the tops with 28 grams unsalted butter (melted). Cool in the pan for 10 minutes and serve warm.If serving later, do not brush with butter. Cool rolls in the pan for 10 minutes, then transfer to a wire rack to cool completely. Store in an airtight container or Ziploc bag until ready to serve. Just before serving, wrap rolls in foil and warm in a 350°F oven for 10 minutes, before brushing with melted butter.
Notes
- Maple Butter: Combine 2 tablespoons unsalted butter and 1 tablespoon maple syrup.
- Garlic Parmesan Butter: Combine ¼ cup unsalted room temperature butter, ½ teaspoon garlic powder, 1 tablespoon minced fresh parsley, and 2 tablespoons grated Parmigiano-Reggiano cheese.
Nutrition
The nutritional information on this website is only an estimate and is provided for convenience and as a courtesy only. The accuracy of the nutritional information for any recipe on this site is not guaranteed.


Owner’s Review: I love how soft and fluffy these dinner rolls are! The overnight chill is necessary for the best texture, so don’t skip it!